What is a Photoshop Temp File?
Photoshop temp files are files that Photoshop creates automatically to store unsaved changes as you work on images. When you open or edit an image in Photoshop, it doesn’t overwrite the original file right away. Instead, it saves your changes to a separate temp file located in a scratch disk folder on your hard drive.
Photoshop uses scratch disks to temporarily store data that is too large to fit in your computer’s RAM. Temp files allow you to experiment with edits and effects without worrying about permanently altering your original image. They serve as a safety net in case your project crashes before you explicitly save your work.
Temp files can grow quite large, sometimes even larger than the original image file, as they record every small change made in an editing session. They remain on your hard drive until you close the image file in Photoshop. At that point, Photoshop deletes the associated temp file to free up space.
Knowing how temp files work helps explain what happens if you don’t save frequently in Photoshop. Your changes get written to a temp file, but aren’t merged into the original image file until you manually save. Closing Photoshop without saving will discard all changes stored in the temp file.
Locating Lost Temp Files
When you work on an image in Photoshop, it automatically saves your progress to a temporary file in case of a crash or power outage. Knowing where these Photoshop temp files are located can help you recover unsaved work if needed.
By default, Photoshop stores temp files in the following locations:
- Windows:
C:\Users\[username]\AppData\Local\Temp - Mac:
/Users/[username]/Library/Caches/Adobe/Photoshop/[version]/TemporaryItems
You can also access the Windows temp folder by typing %LocalAppData%\Temp into the Run command. On Mac, go to Finder > Go > Go to Folder and enter the path above.
Photoshop’s temp files have generic names like PSTemp followed by random characters. They are deleted when you close Photoshop normally, but can persist if the app crashes.
Searching for Temp Files
One method to locate lost Photoshop temp files is to search your hard drive directly. Photoshop’s temp files use extensions like .psbtemp or .psdtemp. To find them, use your operating system’s search feature and look for these extensions. Make sure to search the entire hard drive, including system folders and hidden files.
When searching, sort the results by date modified so the latest temp files appear at the top. This makes it easier to identify the ones associated with your most recent work in Photoshop. The default save location for Photoshop temp files is in your user profile temp folder, like C:\Users\Username\AppData\Local\Temp on Windows. But you may find older temp files saved elsewhere on your system.
Tools like Windows Search or Mac Finder’s search make locating Photoshop temp files quick and easy. Using the date modified filter and the common file extensions gives you the best chance of recovering your unsaved work.
For more guidance, see this helpful article on finding Photoshop temp files on Windows 10: https://www.easeus.com/questions/recovery/delete-photoshop-temp-files.html
Recovering Unsaved Work
If you experience a crash, freeze, or other issue that causes Photoshop to close unexpectedly before you save your work, there is still hope for recovering your unsaved edits. Photoshop automatically saves backup files to a Temp folder as you work, creating recovery points in case of data loss.
To recover an unsaved PSD file in Photoshop, first navigate to the Temp folder location on your computer: C:/Users/YourUsername/AppData/Local/Temp/. Here you will find temp PSD files that Photoshop generated while your original file was open. The files are named starting with “PSE” followed by random numbers and letters.
Double click the temp PSD file you want to recover, which will launch Photoshop and open the file. Once opened, immediately go to File > Save As to save the recovered work to a new PSD file in the location of your choice before making additional edits.
If you don’t see your unsaved work in the Temp folder, try restarting Photoshop. Photoshop’s auto-recovery feature is triggered on launch, so it may restore your unsaved edits upon restarting if the temp files were still available.
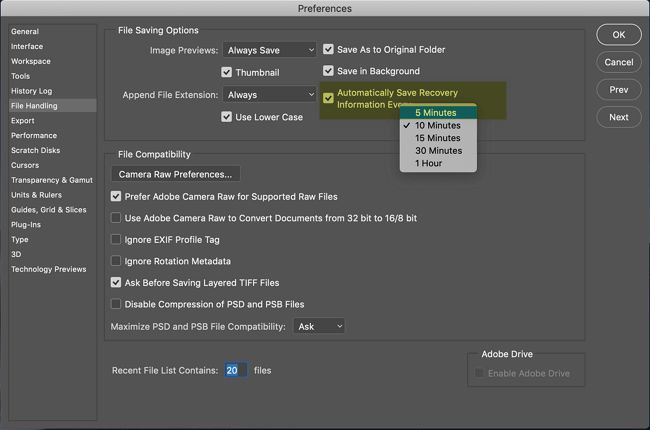
Enabling Preferences > File Handling > Automatically Save Recovery Information every 10 minutes is another good practice to minimize work lost from crashes, freezes, or power loss. Just be aware Photoshop’s auto-recovery has limits, so manually saving your work regularly is still recommended.
Enabling Auto-Save
Auto-save is a useful feature in Photoshop that automatically saves your work at set intervals. This can help you avoid losing progress if Photoshop crashes or your system unexpectedly shuts down. There are two auto-save options:
- Auto-Save: Saves a snapshot of your current Photoshop document at specified time intervals.
- Auto-Recovery: Saves your Photoshop editing session to allow recovering unsaved document information in case of crashes.
To enable auto-save:
- Open Photoshop and navigate to Edit > Preferences > File Handling (Windows) or Photoshop > Preferences > File Handling (Mac).
- Check the box for “Automatically Save Recovery Information Every:” and enter the desired time interval in minutes. The default is 10 minutes.
- Check the box for “Automatically Save Projects” and enter the desired time interval. The default is every 5 minutes.
Setting shorter auto-save intervals can prevent losing a lot of work if a problem occurs, but may impact performance. Balance frequency with your computer’s capabilities.
With auto-save enabled, you can recover unsaved document information after a crash using File > Open Recent > Recover Unsaved Work. Auto-saves are stored temporarily before being deleted in the default location for your operating system.
Saving Changes Manually
Photoshop users should make it a habit to manually save their work frequently as a precaution against data loss or corruption. According to Adobe’s help documentation, “To save a file in Photoshop, go to the File menu and select any of the Save commands — Save, Save As, or Save a Copy.”
The keyboard shortcut for Save is Ctrl+S (Win) / Command+S (Mac). This will overwrite the existing file with your changes. The keyboard shortcut for Save As is Ctrl+Shift+S (Win) / Command+Shift+S (Mac). This allows you to save the file with a new name, location, or format.
Saving manually provides multiple versions of a file as you work on it over time. Saving often ensures you don’t lose much progress if Photoshop crashes or you encounter a power outage. It also gives you the flexibility to revert to an older version if needed. While Photoshop’s Auto-Save is useful, manually saving at key points is still recommended as a failsafe.
Recovering Deleted Files
If you accidentally delete a Photoshop temp file before saving your work, recovery software can help retrieve it. File recovery apps scan your storage devices to find deleted files that can still be restored. There are both free and paid options:
- EaseUS Data Recovery Free is a free file recovery tool that can restore lost or deleted Photoshop temp files. It has a simple interface and quick scan features.
- Stellar Data Recovery has a free trial and paid versions starting at $79.99. It offers deep scanning capabilities to thoroughly search for deleted files.
- Disk Drill ($89 for a single PC license) can recover deleted files from internal and external drives, including SD cards and USB drives.
Run a deleted file recovery as soon as possible after a file is lost. The sooner you start the scan, the more likely the file can be fully restored before being overwritten. Temp files should be recoverable unless the storage space has already been reused.
Avoiding Data Loss
There are a few strategies you can employ to avoid losing important Photoshop temp files and work:
Regularly backup your files – Make it a habit to frequently save copies of your Photoshop files and temp files to an external hard drive or cloud storage. This way if something happens to the originals, you have a backup ready to restore from.
Work from a copy – When starting edits on an important photo in Photoshop, rather than working directly on the original, open a copy of it. This ensures the original stays intact in case of any data loss issues.
Enable Auto-Save – Turn on Photoshop’s Auto-Save functionality from the Preferences to have it automatically save your open documents at set intervals. This saves you from forgetting to manually save and losing changes if the program crashes.
Save incrementally – As you work, save iterations of the file using version numbers like “image_v1”, “image_v2”, etc. This creates checkpoints you can revert to if needed.
Store files both locally and in cloud – Keep copies of your files in at least 2 places like your local drive and backed up to a cloud service. That way a drive failure doesn’t result in complete data loss.
By putting diligent backup practices and precautionary working methods in place, you can avoid the frustration of lost temp files and work in Photoshop.
When Temp Files Become Corrupt
Photoshop temp files can become corrupt for a variety of reasons, including sudden crashes, power outages, or faulty storage devices. Corruption occurs when the file structure or data itself gets damaged, often rendering the file unusable. Typical signs of a corrupt temp file are inability to open, missing layers and content, or errors trying to save or export the file.
Troubleshooting and repairing a corrupt temp file is very difficult and usually unsuccessful. The corruption often cannot be fixed. Adobe recommends discarding the file and starting over rather than wasting time trying to repair it. The best option is to close Photoshop without saving, then reopen the last auto-saved version or manually saved version to recover work prior to corruption.
To avoid corrupt temp files, it’s recommended to save your work frequently, use the Auto Save feature, and work from a reliable storage device. Closing Photoshop properly allows the temp file to be deleted. Sudden crashes or force quits often lead to corruption, so avoid these scenarios when possible. Overall, prevention is better than trying to recover a corrupt temp file.
Sources:
https://repairit.wondershare.com/photo-recovery/repair-psd-file.html
Other Photoshop Recovery Options
If the built-in recovery options in Photoshop don’t work, there are some other methods you can try to recover lost or unsaved PSD files.
One option is to look through your file history or cloud storage backups. Services like iCloud Drive, Google Drive, and Dropbox will often keep previous versions of files that you can restore. Check the version history in these cloud services to see if you can recover an older copy of your Photoshop file before the changes were made or the file was deleted. Just keep in mind that you may lose some of your most recent work if you restore an older version.
There are also dedicated Photoshop file repair and recovery tools available from third parties. Software like Stellar Repair for Photoshop can scan corrupted PSD files and rebuild them to recover lost data. https://www.stellarinfo.com/photoshop-repair.php These types of utilities may be able to salvage files that Photoshop itself struggles to open.
As a last resort, you may need to turn to a data recovery service to attempt to extract the PSD file from your hard drive or storage device. This process can be expensive, but can potentially recover deleted files even after they have been emptied from the trash or recycle bin.