Recovering data after a disk failure in a RAID 5 array can seem daunting, but with the right steps it is very doable. RAID 5 is a popular RAID configuration that provides redundancy by striping data and parity information across multiple disks. This allows the array to withstand the failure of one disk without data loss. When a disk does fail, the parity information can be used to reconstruct the missing data from the failed disk onto a replacement disk.
What is RAID 5?
RAID 5 is a storage technology that combines multiple disks into a logical unit using distributed parity. Data is striped across the disks along with parity information that is distributed across the array. The parity allows for the reconstruction of data if one of the disks fails. Key characteristics of RAID 5:
- Data and parity information are striped across multiple disks
- Parity allows for reconstruction of data if a single disk fails
- Minimum of 3 disks required
- Good balance of storage capacity and redundancy
- Write performance better than RAID 1 and RAID 10 due to striping
In summary, RAID 5 provides protection against a single disk failure along with good storage capacity and write performance.
How data is stored in RAID 5
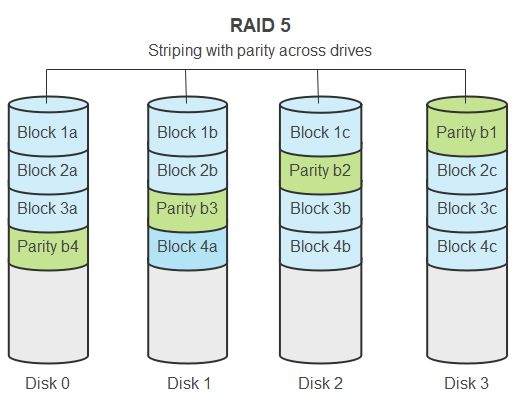
Data is written to a RAID 5 array in stripes across multiple disks along with parity information that is rotated across the disks. Here is a visualization of how data might be stored across 5 disks in a RAID 5 configuration:
| Disk 1 | Disk 2 | Disk 3 | Disk 4 | Disk 5 |
| Data A1 | Data B1 | Parity 1 | Data C1 | Data D1 |
| Data A2 | Parity 2 | Data B2 | Data C2 | Data D2 |
| Data A3 | Data B3 | Data C3 | Parity 3 | Data D3 |
| Parity 4 | Data B4 | Data C4 | Data D4 | Data A4 |
As you can see, data is striped across the disks in chunks while the parity is rotated across the disks for each stripe. This allows for balanced read and write performance while still providing redundancy.
How does parity work?
Parity in RAID 5 allows the array to reconstruct data in the event of a single disk failure. Parity is calculated by performing an XOR operation across corresponding data chunks on each disk in the stripe. If one disk was to fail, the parity chunk could be used to reconstruct the data from the failed drive. For example:
Data A1 = 11111111
Data B1 = 10101010
Parity 1 = XOR(Data A1, Data B1) = 01010101
If Data A1 was lost due to disk failure, we could reconstruct it by performing XOR across Parity 1 and Data B1:
Data A1 = XOR(Parity 1, Data B1) = XOR(01010101, 10101010) = 11111111
This demonstrates how parity allows data to be reconstructed in the event of a disk failure in RAID 5.
How to recover data when a disk fails
When a disk failure occurs in a RAID 5 array, follow these steps to recover the data:
- Identify and replace the failed disk – The RAID management software will indicate which disk failed. Replace it with a new disk that matches the specs of the other array disks.
- Rebuild the drive and data – The RAID controller will rebuild the drive by reconstructing the data and parity onto the new replacement disk. This rebuild process can take several hours depending on the size of the disks and amount of data.
- Restore from backups – While the array is rebuilding, you can start restoring any data you need immediately from backups. This will provide access to your data without waiting for the full rebuild.
- Relocate data if needed – If any data was not able to be fully reconstructed through parity, you may need to relocate it from other sources like backups or drives outside of the array.
- Test and monitor the system – Once the rebuild completes, thoroughly test the system to ensure data integrity. Monitor system health closely afterward in case of issues.
With proper backups and by following these steps, you can successfully recover data after a failed disk in a RAID 5 array.
Factors that affect RAID 5 rebuild time
There are several key factors that impact how long it takes to rebuild a RAID 5 array after disk failure:
- Disk size – Larger capacity disks mean more data to reconstruct so rebuilds will take longer.
- Amount of data – The more data stored on the array, the longer the rebuild.
- Drive speed – Faster HDDs and SSDs allow rebuilds to complete quicker.
- Workload – Rebuild times are extended if there are disk reads/writes taking place from applications.
- Hardware – The RAID controller and server CPU/memory impact rebuild times.
- Rebuild priority – Some systems allow you to set rebuild priority from low to high.
Understanding these factors can help estimate and plan for rebuild times when recovering from disk failures in RAID 5 arrays.
Should I switch from RAID 5 to RAID 6?
With larger disk sizes leading to prolonged rebuild times, some organizations switch from RAID 5 to RAID 6 after experiencing issues recovering from disk failures. RAID 6 differs from RAID 5 in that it uses a second set of parity data, allowing the array to withstand the failure of two disks.
There are a few considerations when deciding between RAID 5 vs RAID 6:
- Storage overhead – RAID 6 requires more disks and has higher overhead for parity storage than RAID 5.
- Rebuild times – Rebuild times are longer with RAID 6 than RAID 5 in most cases.
- Read performance – RAID 5 generally has better read performance than RAID 6.
- Risk tolerance – RAID 6 provides an extra layer of redundancy that may be warranted for highly critical data.
In general, the larger your array and the more critical your data, the more you may want to consider moving to RAID 6. But RAID 5 can still be a good option for smaller arrays where rapid rebuilds are feasible.
Best practices for recovering RAID 5
Follow these best practices when recovering from disk failures in RAID 5 arrays:
- Use matching disks from the same batch – This promotes consistency when rebuilding.
- Have hot spares ready – Warm standby drives allow rebuilds to start immediately.
- Test parity and backups regularly – Ensure they can restore data properly when needed.
- Monitor disk health – Watch for warning signs like high error rates.
- Consider larger redundancy – Move to RAID 6 or RAID 10 for large arrays or critical data.
- Balance performance and redundancy – Adding more parity disks can impact write speeds.
- Rebuild immediately after disk swaps – Don’t delay rebuilds to avoid multi-disk failures.
- Control workload during rebuilds – Reduce disk activity from applications if possible.
Planning ahead and testing recovery procedures will help ensure you can rebuild RAID 5 arrays effectively when disk failures inevitably occur.
Software tools for RAID 5 recovery
There are a variety of software tools available to assist with RAID 5 recovery and provide additional flexility:
- Mdadm – Linux software RAID tool for managing arrays and rebuilds.
- Linux RAID Recovery – Recovery tool for Linux MD RAID arrays.
- Stellar Data Recovery – Multi-platform tool for reconstructing RAID 5 arrays.
- ReclaiMe RAID Recovery – Software specifically focused on RAID recovery for Windows and Linux.
- R-Studio – Data recovery software with RAID 5 rebuild capability.
- Acronis Snap Deploy – Disk imaging tool that can restore RAID arrays.
The native RAID utilities provided by array manufacturers will meet most rebuild needs. But third-party software can provide additional flexibility for more complex recovery scenarios.
Concerns when rebuilding RAID 5 arrays
There are a few key concerns to be aware of when rebuilding failed RAID 5 arrays:
- Rebuild time – Larger arrays take longer to rebuild, increasing risk of additional failures.
- Degraded performance – Response times are slower during rebuilds due to added load.
- Undetected disk errors – Latent disk errors can lead to multi-disk failure if not detected early.
- Data consistency – Ensure parity data matches striped data after rebuilding.
- Rebuild interruption – Power loss or other issues interrupting rebuild may corrupt data.
Proper monitoring, testing, and preparations can mitigate these concerns when recovering RAID 5 arrays after disk failures.
When to choose an alternative RAID type over RAID 5
For certain use cases, alternative RAID levels may be preferable to RAID 5:
- RAID 10 – Optimized for performance and can withstand multiple disk failures.
- RAID 6 – Additional parity provides extra redundancy for large arrays.
- RAID 60 – Combination of RAID 6 and 0 provides speed and multi-disk fault tolerance.
- ZFS RAIDZ – Software RAID with flexibility for mixed drive sizes and parity schemes.
- Storage Spaces – Microsoft’s software RAID allows pools of mixed drive types.
RAID 5 is a good general purpose option combining good performance and redundancy. But for large arrays, critical data, or faster performance, alternate RAID configurations may be preferable.
Conclusion
Recovering data after a failed disk in a RAID 5 array involves identifying the bad disk, swapping in a replacement, and allowing the RAID system to rebuild the data and parity. Larger arrays will take longer to rebuild, so plan ahead with hot spares, parity testing, and performance monitoring. Evaluate switching to RAID 6 or an alternate RAID type if rebuild times become excessively long or multiple disk failures occur. With proper preparation and procedure, RAID 5 arrays can be recovered reliably even after disk failures.
