Assessing the Damage
When a USB drive stops working due to physical damage, the first step is to thoroughly inspect the device to determine the extent of the damage. Some common types of physical damage include:
- Cracked or broken outer casing – This exposes the internal components to damage but does not always mean the storage media itself is corrupted.
- Bent or broken USB connector – Prevents the drive from properly connecting to a computer, but the data may still be intact.
- Water damage or corrosion – Can cause shorts and make data recovery extremely difficult if the chipset is affected.
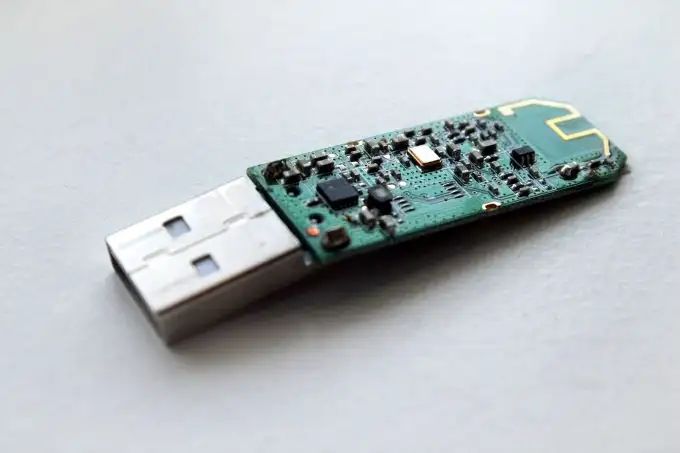
- Visible scratches or dents on the USB drive circuit board – May potentially damage storage chips.
After visual inspection, attempt to plug the damaged drive into a computer. If the computer recognizes the USB device or drive letter, even if unable to open files, then the storage media is likely still intact. However, if the computer does not recognize the USB at all, the internal storage components may be corrupted.
For minor damage like a cracked case or bent USB connector, a DIY data recovery is often possible. But if the circuit board or storage media is damaged, expert data recovery services may be required. The more extensive the physical damage, the lower the chances of recovering data without professional help. Water damage in particular can make DIY data recovery futile (Source).
Back Up Any Accessible Data
Before attempting any repairs, first try plugging the damaged USB drive into your computer to see if you can access any of the files. Even if the drive seems completely broken, some or even all data may still be accessible. If you can open the USB drive and view any files, immediately back up whatever you can access to avoid permanent data loss.
Use data recovery software like Recuva or Disk Drill to copy any accessible files from the damaged drive to your computer or an external hard drive. These programs can help read data from drives with corrupted file systems or directories. Take this opportunity to back up important files before trying any physical repairs which could further damage the drive.
Backing up accessible data right away ensures you have those files safely stored and avoids irrevocable data loss. Having a backup prevents needing to rely solely on repairing the damaged drive.
Opening the USB Casing
Before attempting to open the USB casing, it’s important to take precautions against electrostatic discharge which could further damage the drive. Make sure to ground yourself by touching a metal object or working on an anti-static mat.
You’ll need a small precision screwdriver and possibly tweezers to open the casing. Gently pry at the seams around the edges until you can separate the two halves of the casing to expose the circuit board inside. Take care not to damage any small components or detach any connectors when opening.
Some tips for opening USB casings safely:
- Work in a clean, organized area so small parts don’t get lost.
- Go slowly and carefully when prying at the casing.
- Keep track of which screws go where for reassembly.
- Avoid twisting or bending any flexible circuit board pieces.
- Use latex gloves to avoid skin oils damaging components.
For more details, refer to this excellent guide: https://www.instructables.com/How-to-Fix-a-USB-Flash-Drive/
Assessing the Internal Damage
Once you have opened the USB casing, you need to visually inspect the internal components to identify any damaged parts. Look closely at the USB connector pins to see if any are bent or broken. Examine the circuit board for any burnt components or damaged traces. Pay special attention to the data storage chips – these are usually labeled and are the most important component for data recovery. If the chips are intact, there is a good chance your data can be recovered.
Some signs of damage that may prevent DIY data recovery include:
- Burnt or missing data chips
- Severely damaged circuit board
- Corroded or broken connector pins
If the damage is relatively minor, such as some bent pins or scratches on the board, you may be able to repair the drive yourself using fine tip tweezers and isopropyl alcohol. However, if any of the data chips or storage components are damaged, it is best to stop any DIY attempts and send the drive to a professional data recovery service. They have specialized tools and clean room facilities to repair drives and extract data without causing further damage. For example, EProvided offers professional USB data recovery and will assess your drive damage to determine the best repair and recovery options.
Performing a DIY Repair
If the USB flash drive has minor physical damage, you may be able to repair it yourself before resorting to data recovery software or professional services. Some common DIY techniques include:
Fixing damaged connector pins – Carefully straighten any bent pins on the USB connector using small tweezers. Ensure the pins align properly so the flash drive can make a solid connection.
Cleaning corrosion on circuit board – Use a cotton swab dipped in rubbing alcohol to gently clean any corrosion on the contacts or circuit board. This can help restore connectivity.
Bypassing damaged controller board – If the controller chip is damaged but the flash memory is intact, you may be able to solder wires to bypass the controller and access data directly from the flash memory. However, this requires moderate soldering skills and knowledge of electronics.
While DIY repairs are possible, they require a steady hand and technical skill. If you damage the drive further, you could make data recovery impossible. Consider the extent of repair needed before attempting it yourself. For significant damage, seek professional assistance.[1]
Using Data Recovery Software
There are many software options for recovering data from a physically damaged USB drive once repairs have been made. Some top data recovery programs include:
Recuva, Disk Drill, and Stellar Data Recovery. These tools work by scanning the USB drive and locating lost or deleted files. Even if the file system is corrupted or the drive was reformatted, data recovery software can often restore the files.
The process involves first downloading and installing the data recovery program on a working computer. Then connect the repaired USB drive and select it as the target drive to scan. The software will scan the drive and attempt to locate recoverable files based on the file headers and directory structure.
Once the scan completes, the data recovery program will display the files it found that can be recovered. You can then select which files to restore and save them to another drive. Data recovery success depends on the extent of the physical damage and repairs needed. But quality software maximizes the chance of getting files back after fixing the USB.
Sending for Professional Recovery
Sometimes DIY data recovery is not possible or the lost data is too critical to risk a mistake. In these cases, your best option is to send the USB drive to a professional data recovery lab. Professional data recovery labs have access to specialized tools and techniques that give them the highest chance of recovering your files.
The general process involves signing paperwork to authorize the recovery, then shipping the device to the lab. The technicians will assess the damage, determine the best approach, and attempt to recover the data using various hardware and software solutions. This may involve repairing control boards, chip-off extraction, imaging, file carving, etc. Throughout the process, the lab will provide updates on the recovery’s status and chances of success.
Costs for professional USB data recovery can range from a few hundred to over a thousand dollars depending on the extent of damage and amount of data. However, for critical data, the cost is often worth it compared to permanent data loss. Reputable labs like Secure Data Recovery offer free evaluations and quotes upfront.
With the right tools and experience, professional labs retrieve data other methods cannot. So when DIY recovery is not feasible, rely on the experts as your best chance for recovering files off even severely damaged USB drives.
Reassembling the USB
After inspecting the internal components and attempting any repairs, it’s time to reassemble the USB drive’s casing. Be very careful when putting the pieces back together, as the small parts can easily break if forced.
First, reconnect any detached connector pins or cables inside the USB. Refer to disassembly photos to ensure each connector is restored to its original position. If any pins or ports are damaged, you may be able to bypass them, but this could result in reduced functionality.
Next, carefully rejoin the plastic casing, starting by fitting the back piece over the circuit board. Apply gentle but firm pressure to snap the case together. Don’t force it if the parts won’t join smoothly, as this could crack the casing.
Inspect the reassembled USB port and make sure the metal contacts are aligned and intact. If the port is damaged, you may need to replace it with a new USB connector.
Finally, reattach any outer layers like caps or sleeves that were originally part of the casing. Again, take care not to break any small plastic clips or snaps when pressing the components together.
Now the USB drive can be tested to see if data accessibility and functionality have been restored after the repair process. However, physical damage may still prevent full data recovery in some cases.
Trying the USB and Verifying
After completing the repair, you’ll want to try plugging in the USB drive to see if it is now functional and can access the files. However, be very careful when first plugging in a repaired USB drive, as you don’t want to damage it further.
Plug the USB drive directly into your computer’s USB port, don’t use a hub. Gently insert the USB connector, don’t force it. Use a USB port on the back of your desktop if possible, as they tend to be more robust than ports on the front of the case.
Once inserted, navigate to the USB drive in Windows Explorer. Try opening folders and accessing files. You may want to run a scan using error checking tools to verify the disk’s health. Any data you can access, copy it off the drive immediately to your hard drive or another external disk. Don’t continue storing data on a questionable USB drive.
If the files seem accessible, your DIY physical repair was successful. Quickly copy all the data off the disk before using it again for storage, as the repair may only be temporary. Any inaccessible corrupted files can be attempted with data recovery software after you’ve copied off what you can access.
If the drive is still not being recognized or you can’t access files, the repair attempt unfortunately was not successful. You may need to repeat the repair process or send it to a professional recovery service if the data is valuable enough to justify the high financial cost.
Data Recovery Alternatives
If your USB is beyond DIY repair, you have a couple options to recover the data:
You can use a professional data recovery service like SalvageData or CleverFiles. They have technicians and advanced tools that can recover data from severely damaged drives. This costs a few hundred dollars on average.
Another option is to purchase a new USB drive and use data recovery software like Disk Drill or Recuva to extract any retrievable data from the broken drive and migrate it to the new one. This is a more affordable DIY solution if the data is not critically important.
At the end of the day, if the USB is beyond physical repair, migrating the data to a new drive or enlisting professional help are your best options for recovering your files.
