We all make mistakes and accidentally delete files that we actually need. Thankfully, macOS has a safety net that lets you restore deleted files, even if you’ve emptied the Trash. In this guide, we’ll walk through the various ways to recover deleted files on a Mac.
Can I recover files from the Trash on Mac?
Yes, it is possible to recover deleted files from the Trash on a Mac, as long as you don’t permanently erase the Trash. When you delete a file on your Mac, it gets moved to the Trash. The files in the Trash remain there until you choose to permanently delete them by emptying the Trash.
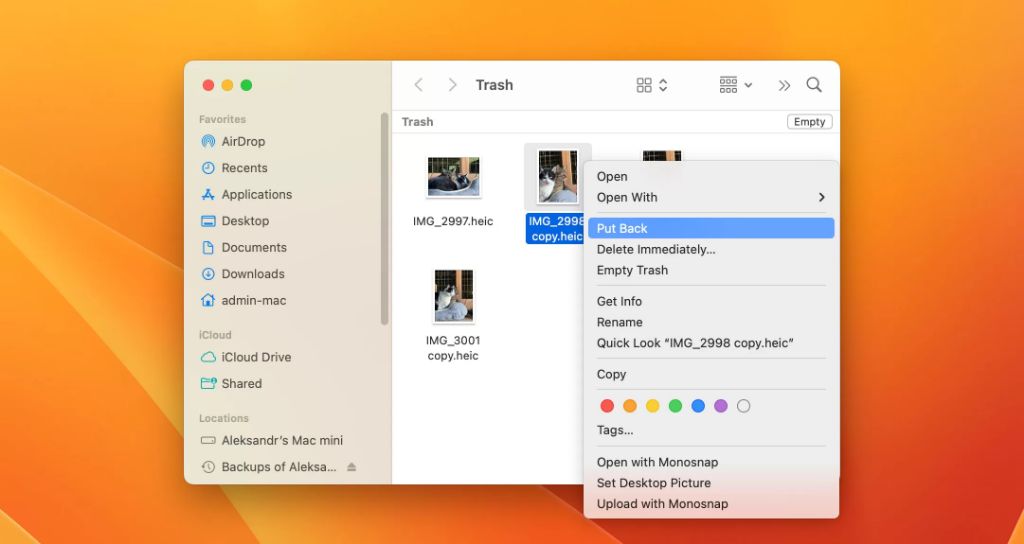
As long as you have not emptied the Trash, you can easily recover deleted files by opening the Trash folder and moving the files back to their original location. Simply right-click on the file and choose “Put Back” to restore it.
How to recover emptied Trash on Mac?
If you have emptied the Trash, the files are no longer stored in the Trash folder. However, that does not mean they are completely erased from your Mac. When you empty the Trash, the physical space containing those deleted files is simply marked as available to rewrite new data.
Until new data overwrites the deleted files, recovery is still possible using data recovery software. Here are some options to recover deleted files after emptying Trash on Mac:
- Use Time Machine backups – If you have Time Machine backups enabled, you can restore deleted files from a previous backup.
- Try data recovery software – Apps like Stellar Data Recovery, EaseUS Data Recovery Wizard, Disk Drill can scan your Mac’s drive and recover deleted files.
- Undelete files with Terminal – The native macOS terminal offers a way to recover recently deleted files, if you know the original file path.
Recover emptied Trash with Time Machine
Time Machine is the built-in backup software in macOS which can help you easily recover lost files. If you have Time Machine backups enabled, follow these steps to restore deleted files from a backup:
- Open Finder and click on Enter Time Machine in the menu bar.
- Navigate to your Time Machine backup in the timeline interface.
- Find and select the files or folders you want to restore.
- Click on the Restore button to retrieve them to their original location.
This allows you to rollback to a previous version of a file or folder before it was deleted. Time Machine makes it easy to recover deleted files, as long as the backups are recent enough to contain the missing data.
Use data recovery software to retrieve deleted files
If you don’t have Time Machine backups, the next best option is to use a data recovery program. They scan your Mac’s hard drive and can find deleted files that have not yet been overwritten.
We recommend Stellar Data Recovery as it has a user-friendly interface and comprehensive scanning features. Follow these steps:
- Download and install Stellar Data Recovery.
- Select the drive you want to scan for deleted files.
- Click Scan to search for recoverable data.
- Preview found files and select those you want to recover.
- Choose a location to save the recovered data.
Stellar Data Recovery has different scan modes to find lost files. The ‘Deleted File Recovery’ mode can quickly retrieve deleted files that have not been permanently erased.
Undelete files using Terminal on Mac
Terminal offers a native command-line interface to recover deleted files on Mac, if you know the original path of the file. Here are the steps:
- Launch the Terminal app from /Applications/Utilities/
- Type
cd .Trashesand press Enter to navigate to the Trashes folder. - Then enter
sudo rm -rf .Trashesand enter your admin password when prompted. This will clear the Trashes folder. - Now type
cd /Path/to/original/file/locationand hit Enter. Navigate to the folder path where the deleted file was originally located. - Type
ls -latand look for your deleted file name near the end of the output. - Take note of the File ID next to the deleted file name.
- Finally, type
sudo cp /.Trashes/FileID /Path/to/restorereplacing FileID with the ID noted earlier, and the restore path with where you want to recover the file.
This will restore the deleted file from the hidden Trashes folder in Terminal. Do note that this method only works if the file was recently deleted and has not been permanently overwritten.
How to recover Trash on external hard drives?
The process to recover deleted files from external hard drives or USB flash drives is the same as recovering files from your Mac’s internal drive. As long as the drive is connected to your Mac, Time Machine and data recovery apps can scan and restore data.
However, do not save any new data onto the external drive, as it could overwrite deleted files making recovery difficult. Follow these best practices when recovering data from external drives:
- Connect the external drive to your Mac.
- Avoid writing any new files to the drive.
- Use Time Machine backup or recovery software to scan and restore deleted data.
- Save the recovered files to your Mac or another external drive.
Recover Time Machine backups from external drive
If your Time Machine backup drive is an external USB disk, you can recover deleted files from it this way:
- Connect the Time Machine backup drive to your Mac.
- Open Time Machine from the menu bar and navigate to the backups.
- Select the backup version containing the deleted file.
- Restore the file to its original or new location.
Scan external drive with data recovery software
Data recovery apps like Disk Drill have the ability to restore deleted data from external drives as long as they can access the drive’s file system.
Follow these steps in Disk Drill to recover deleted files from an external drive:
- Connect the external drive to Mac and launch Disk Drill.
- Select the external drive partition you want to recover data from.
- Click Recovery Vault or Quick Scan for faster results.
- Preview and select the files you wish to restore.
- Choose a folder on your Mac to save the recovered data.
Be sure not to save the recovered files onto the external drive itself as it could overwrite the deleted data. Disk Drill makes it easy to restore lost data from external drives in just a few clicks.
What files can be recovered after emptying Trash?
When you empty the Trash on your Mac, most common file types can still be recovered as long as the storage space has not been overwritten. Here are some of the file types that can be retrieved after emptying the Trash:
- Documents – DOC/DOCX, XLS/XLSX, PPT/PPTX, PDF, TXT
- Media – JPG/JPEG, PNG, GIF, MP3, MP4, AVI
- Archives – ZIP, RAR
- Other – EXE, HTML, JS, CSS
In general, text-based documents, images, audio/video files, archives, and source code files have a good chance of recovery if not overwritten. However, there are certain file types that may be difficult to recover after being deleted:
- Encrypted or DRM protected files – Files with encryption will be unreadable without the password or license key.
- Databases – The structure of database files often gets corrupted making recovery incomplete.
- System files – Critical OS files like .plist, .dylib, .framework may not be restorable.
Factors affecting chances of recovery
There are a few factors that determine whether a file can be successfully recovered after deleting it from Trash:
- Time since deletion – The sooner you attempt recovery, the higher the chances.
- Drive usage – If new data has overwritten the deleted files, they cannot be retrieved.
- File size – Larger files have a greater probability of partial or full overwriting.
- File system – Files deleted on macOS extendable HFS+ have better recovery rates.
Tips to increase chances of recovery
Follow these best practices to improve your chances of recovering deleted files from the Trash on your Mac:
- Avoid writing new data to the drive after deletion.
- Use Time Machine backups to restore older versions of files.
- Use data recovery software as soon as possible.
- Save recovered files to a different drive than original.
- Quit other running apps during scan and recovery process.
How to prevent deleting files permanently on Mac?
Here are some tips to help prevent permanent deletion of files and improve recoverability on your Mac:
Disable Secure Empty Trash
By default, Macs are configured to securely erase files on Trash emptying using multi-pass writes. This makes recovery close to impossible. Disable it in Finder > Preferences > Advanced tab.
Setup Time Machine backups
Time Machine auto-backups let you rollback system files, documents, and other data to restore from deleted states. Having backups avoids need for recovery.
Use Trash apps like TrashMagic
Tools like TrashMagic add extra security by requiring password confirmation before emptying Trash. This can prevent accidental permanent erasures.
Install data protection software
Apps like BackupBuddy and CrashPlan create continuous backups in the background. They save you from data loss situations and recovery needs.
Create volume snapshots
Via Time Machine or apps like Carbon Copy Cloner, you can take file system snapshots. These can act as restore points to revert back after mistaken deletions.
Conclusion
While accidentally deleting important files can be frustrating, there are several effective techniques to recover deleted data on Mac. Stop using the drive, use Time Machine backups, run data recovery software, or try Terminal commands to retrieve recently deleted files.
Just make sure vital data has not been overwritten by new content. Avoiding permanent erasures by monitoring Trash emptying and setting up automatic backups provides an added data protection safety net on your Mac.
With the right recovery process, you can rescue your lost documents, media, app data and get back on track quickly after unintended deletions on macOS.