Opening Summary
Having access to your iCloud data is crucial, as it contains your contacts, photos, documents, and more. If you lose access to your iCloud account or accidentally delete iCloud data, don’t panic – in most cases, you can recover your iCloud data with a few simple steps. There are a few different methods you can try to restore deleted files or regain access to a locked iCloud account.
How Does iCloud Work?
Before diving into iCloud data recovery methods, it helps to understand what iCloud is and how it works. iCloud is Apple’s cloud storage service that keeps your data synced across devices. When you enable iCloud on your iPhone, iPad, Mac, or other Apple devices, it automatically backs up your data to Apple’s servers. This includes:
- Photos and videos in your Camera Roll
- Contacts, calendars, bookmarks, notes, reminders, and other data
- Documents and app data
- iOS device backups
- iCloud Drive files
- iCloud email, contacts, calendars
iCloud data is accessible from all of your devices logged into the same iCloud account. So if you take a photo on your iPhone, it will automatically sync to your Mac and iPad through iCloud. This keeps your data consistent and up-to-date everywhere.
iCloud also provides backup services to prevent data loss. It can automatically back up your iOS devices each night when plugged in, wi-fi connected, and with the screen locked. It also backs up data like photos to iCloud Photo Library, a feature you can enable in Settings.
Understanding what types of data get stored in iCloud will help you know what’s recoverable if you ever lose access. Next, let’s look at some common iCloud data loss scenarios and how to address them.
Recovering Data from a Lost or Stolen iOS Device
If you lose your iPhone, iPad, or iPod touch, you may fear losing the data stored on it permanently. Fortunately, there are ways to recover or restore your information even if you can’t physically get your device back.
First, if you have iCloud backups enabled, you can use iCloud to restore your data to a new device. Simply connect the new device to your iCloud account during setup and choose to restore it from an iCloud backup. This will load the backup data from your lost device onto your new one.
All iCloud backups include:
- Device settings
- App data
- Home screen and app organization
- Messages
- Photos and videos on your Camera Roll
- Apple Watch backups
They can also include:
- Contacts
- Calendars
- Reminders
- Notes
- Voice Memos
- Siri Shortcuts
- Health data
- Keychain passwords and passwords
So as long as you have iCloud Backup enabled, you can retrieve much of your lost device’s data this way.
If you don’t have a backup, your options are more limited. You can try putting your device in Lost Mode via Find My app which locks it with a passcode. This lets you display a custom message with a contact number on your lost device’s screen, in case someone finds it. You can also remotely erase your device if you believe it’s fallen into the wrong hands.
While you may not recover the data, remote wipe ensures no one else can access your personal information. Sign into iCloud.com to access these features.
As a last resort, you can take your original proof of purchase to an Apple Store. They can contact their AppleCare team to remove Activation Lock so you can use the device again, if you can provide sufficient proof you own it.
In summary, enabling iCloud backups is the best way to protect your data on an iOS device. Rely on these backups to restore your information if you ever lose your device.
Recovering Data from a Dead or Damaged Device
Physical device damage – like a cracked screen, water exposure, or component failure – can also cause you to lose access to your data. If your iPhone, iPad, or Mac won’t turn on due to damage, there are still options to recover or extract your files.
First, repair the device if possible. Apple or authorized service providers may be able to fix hardware issues and recover data at the same time. Costs vary based on your device and damage type.
Second, restore from an iCloud or iTunes backup after repairing or replacing your damaged device. Just connect and select the option to restore from your most recent backup during setup.
Third, for iOS devices, you can pay data recovery services to extract files from damaged phones and tablets. They disassemble devices in a clean room and use specialized tools to access memory chips and storage. Services charge several hundred dollars, but can rescue thousands of photos, messages, and other data.
Finally, if your Mac won’t boot or you can’t access the hard drive, you can remove it and connect it to another Mac using a drive enclosure or adapter cable. Then you may be able to recover files by starting the computer in Target Disk mode and scanning the drive; using advanced data recovery software; or taking it to a repair shop. The sooner you do this after damage, the better.
Prevent the problem in the first place by consistently backing up your devices. Also make sure you know your Apple ID and password – this will be key to restoring your data on any new devices.
Recovering Deleted iCloud Files
Accidentally deleting important iCloud documents or photos is a common problem. Luckily, with an iCloud backup in place, you can recover deleted data with ease.
First, check the Recently Deleted folder on your iOS device or Mac. Items deleted within the last 30 days go to this folder before being permanently erased. Just open it and restore anything you still need.
If the files aren’t there, sign into iCloud.com and look in the iCloud Drive Trash folder. Similarly, deleted iCloud Drive files sit in the Trash for 30 days before being deleted forever. You can restore them from here.
If you don’t see the files anywhere, your last option is to restore your iCloud data from a backup. On an iOS device, tap Settings > [Your Name] > iCloud > Manage Storage > Backups to find your most recent backup. Select it and choose Restore to get the deleted files back.
On a Mac, you can restore from either a Time Machine backup or your iCloud backup by going to System Preferences > Time Machine to enter Time Machine recovery. Or sign into iCloud, select System Preferences > Apple ID > iCloud, click Manage to find your backups and choose Restore from Backup.
Set your backups to run regularly so you have multiple options to restore from if needed. Also be cautious when permanently deleting iCloud data – always double check the Trash folder before emptying it.
Recovering Data after a Failed iOS Update
Sometimes an iOS update fails, resulting in data loss or device issues. If this happens, don’t worry – you can typically recover your information.
First, force restart your device – press and hold the Home and Power buttons together until you see the Apple logo. This may resolve any temporary system glitches.
Next, connect to iTunes on a computer and see if it detects your device in Recovery mode. If so, you can kickstart the restore process and load the previous iOS version and data from a backup.
If that doesn’t work, try your backup options:
- Restore from your most recent iCloud backup by going to Settings > [Your Name] > iCloud > Manage Storage > Backups. Tap the backup and Restore.
- Connect to iTunes and restore from your latest iTunes backup.
For additional assistance, schedule a Genius Bar appointment at an Apple Store. Apple professionals can diagnose any underlying issues and help restore your device.
To avoid update issues in the future:
- Make sure you have sufficient storage space for the update.
- Only update over a stable wi-fi connection.
- Backup your device before updating.
- Avoid updating or restarting mid-installation.
Following these best practices will ensure any data loss from a bungled update is minimized and recoverable. Keep regular iCloud and iTunes backups as a safety net.
Recovering Data after an iOS Restore
If you chose to reset or restore your iPhone or iPad through the Settings app, you may have lost access to some personal files and data. Not to worry – there are options for recovering data after an iOS restore.
First, check your Recently Deleted folder for any deleted photos, messages, or files and restore them from there if available.
Next, go to Settings > [Your Name] > iCloud > Manage Storage > Backups to restore from your most recent iCloud backup. This will retrieve photos, messages, contacts, and most app data. Tap the backup file then “Restore” to bring everything back.
You can also reconnect to iTunes and restore from your most recent iTunes backup, if you use iTunes for backups.
For iOS 15 or later, try using iCloud Plus Private Relay to access Safari history and tabs from other devices signed into your Apple ID. You can also use the new Passkeys feature to auto-fill your logins on apps and sites you had saved.
A clean iOS restore should not affect data in cloud storage apps like Dropbox and Google Drive. Reinstall them to get files back. Similarly, redownloading apps brings back app-specific data stored remotely.
To avoid permanent data loss after an iOS restore, diligently maintain iCloud and iTunes backups so you always have multiple restore points for your device and files. Enable auto-backup options for maximum protection.
Recovering an iCloud Account
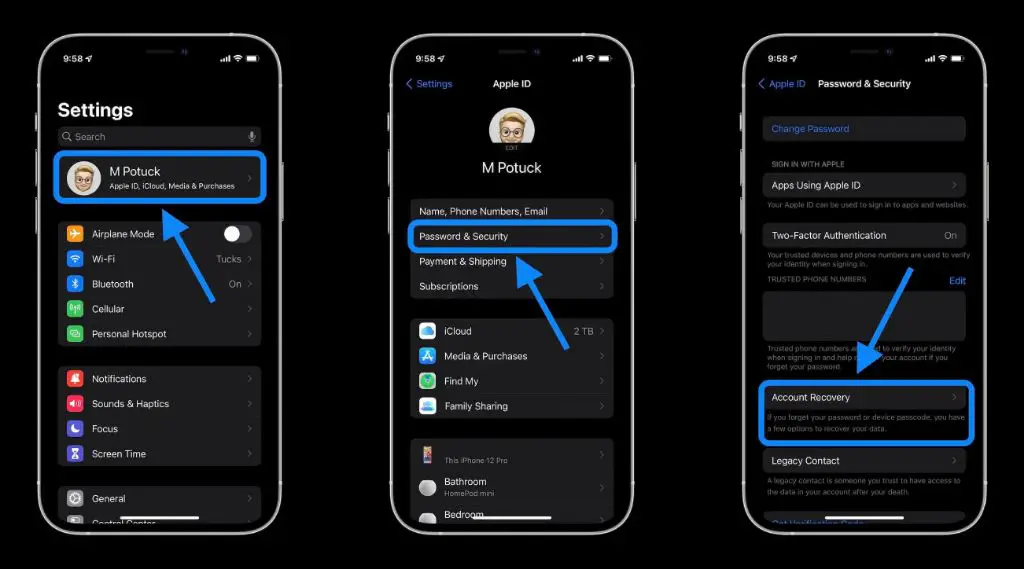
Losing access to your iCloud account can cut off your access to important services like Find My iPhone, iCloud Drive, iCloud email, and more. If you get logged out and can’t log back in, there are account recovery options.
First, try resetting your password if you forgot it. Go to iForgot.apple.com and enter your Apple ID email to trigger a password reset. Follow the email prompts to create a new password and regain account access.
If that doesn’t work, complete account recovery steps:
- Go to iforgot.apple.com on a browser.
- Enter your Apple ID and complete the captcha.
- Select “Get Started” to begin the account recovery process.
- Choose to verify your identity through email, phone, or security questions.
- Follow the on-screen instructions to complete required steps.
- Create a new password when prompted to regain full iCloud access.
This process ensures you are the account owner before granting access. As long as you can verify your identity with trusted information, you will recover your account.
If you still cannot regain access, contact Apple Support for personalized help. Provide your Apple ID, desired recovery email/phone, purchase receipts, and any other details to allow Apple to fully verify your identity as the account holder. This gives you the best chance for a successful iCloud account recovery.
Recovering Data from a Hacked or Disabled iCloud Account
If someone gains unauthorized access to your iCloud account, or Apple disables it due to suspicious activity, how do you get your data back? Follow these steps for the best chance of recovering hacked or disabled iCloud account data.
First, immediately change your iCloud password and security questions by completing the account recovery steps outlined above. Regaining control of the account prevents further data loss.
Second, contact Apple Support and clearly explain your account was hacked. Provide Apple with the details needed to verify your identity as the true account owner.
Third, request Apple completely reset your account security measures. This ensures any backdoors created by hackers are eliminated. It also gives you new secure credentials.
Fourth, thoroughly scan all devices linked to the compromised iCloud account for malware or spyware. A hacker could have installed software to steal your data. Perform a factory reset on all devices to wipe any malware.
Fifth, once your account is reset and secured, restore your data from an iCloud backup. You may lose some data stored during the period of unauthorized access. But you can retrieve the majority from your last legitimate iCloud backup.
If your account was disabled by Apple, following the same process to verify your identity with Apple Support should allow you to reactive the account and restore your data. Maintain good security practices going forward to avoid repeat issues.
Using Third-Party Apps to Recover iCloud Files
Besides Apple’s own tools, third-party software exists to help recover deleted iCloud files and data. Examples include:
- FoneDog Toolkit – iOS Data Recovery: Scans your device and extracts residual data left after deletion. Can restore Contacts, Messages, Call History, Photos, Notes, and more.
- iMyFone iBypasser: Unlocks disabled or password protected iOS devices. Helps regain access and extract data if you forgot your passcode.
- Dr. Fone – iOS Data Recovery:Recovers data directly from iOS devices or from iTunes and iCloud backups for 20+ data types.
- Disk Drill: Restores files on Mac and Windows by scanning internal and external drives for residual data.
These tools provide alternative options beyond Apple’s official recovery methods. However, be cautious when downloading third-party software and granting access to your accounts or devices. Only use reputable recovery apps from well-known developers.
Check reviews, assure the tool uses encryption, and avoid questionable apps that could further compromise your data. Also back up your device before running recovery tools as a precaution.
Tips to Prevent Losing iCloud Data
While you have many options to recover lost and deleted iCloud data, prevention is always best to avoid hassle and permanent data loss. Follow these proactive tips:
- Enable iCloud and iTunes backups: Regularly back up your iOS devices so you have multiple restore points.
- Use strong iCloud security:Complex password, two-factor authentication, security questions only you know.
- Monitor account activity: Check recent sign-ins in Settings to watch for unauthorized access.
- Update devices/software: Maintain the latest OS and apps to patch security flaws.
- Avoid public Wi-Fi: Only access iCloud accounts on private, password-protected networks to prevent snooping.
- Install antivirus software: Scan all devices linked to your iCloud account against malware.
- Back up locally too: Keep local backups of important iCloud files on your computer or external drives.
No data recovery solution is foolproof. But taking preventative measures maximizes the chances your iCloud information stays safe and accessible. Use multiple backup sources, enable security protections, and avoid account access on public Wi-Fi for best results.
Conclusion
Losing access to your iCloud data can be stressful. But in most cases, you can recover deleted files, restore disabled accounts, or extract data from damaged devices with the right tools and techniques.
Enable iCloud and iTunes backups regularly to safeguard your photos, contacts, notes, and other important data. Understand the iCloud recovery options available through Apple and trusted third-parties. And take proactive security measures to avoid needing data recovery in the first place.
With diligent backup habits and robust security practices, you can feel confident your iCloud information is protected. But if you ever face data loss, use the solutions covered here to regain access and restore your files quickly. Consistent backups and preparation for recovery will keep your iCloud data safe, available, and ready to sync across all your Apple devices.