Having a hard drive or partition suddenly go missing in Windows 10 can be alarming. The D drive contains important files and data that you rely on accessing. When it vanishes without warning, you’ll want to get it back as soon as possible.
There are several potential causes for a D drive disappearing in Windows 10. The good news is that in many cases, you can recover or restore access to the missing drive with a few troubleshooting steps.
What Causes a Hard Drive to Go Missing in Windows 10?
Here are some of the most common reasons why your D drive may suddenly disappear in Windows 10:
- Drive letter changed – Windows may have changed the drive letter assignment, causing your D drive to appear to be missing.
- Drive disconnected – An external hard drive may have been unplugged or become disconnected from its port.
- Driver issues – Outdated, buggy, or incompatible drivers may cause drives to not be recognized.
- Partition issues – If the partition information gets corrupted or changed, the partition could seem to go missing.
- Virus or malware – Viruses or malware infections could potentially hide or delete partitions.
- System file corruption – Critical system files related to storage could have become corrupted.
- Dead hard drive – In rare cases, a hard drive failure could cause the drive to disappear entirely.
So in summary, the main possibilities are drive letter changes, hardware disconnection issues, driver problems, partition and file system issues, malware, or dead drives. By troubleshooting each of these potential causes, you can determine why your D drive went missing in Windows 10.
How to Find Out If Your Hard Drive Is Really Missing
Before you panic, first check whether your D drive is truly missing or has just become unassigned. Here’s how to check for the existence of the drive:
- Open the Disk Management tool. You can access this by right-clicking the Start menu and selecting “Disk Management”.
- In the Disk Management window, look at the list of disks and volumes. See if you spot your drive here.
- Check the Volumes tab for any volumes without drive letters assigned. This may be your missing D drive.
- Look for disk capacity sizes matching your missing drive. An unallocated space may represent your D drive.
- If you see the drive or partition here, then the drive is still present – it likely just lost its drive letter assignment somehow.
- If you do not see the D drive or partition listed anywhere, then the drive itself is actually missing from your system.
This quick check in Disk Management will reveal whether Windows has simply lost track of the D drive, or if the drive itself is no longer connecting or accessible for some reason.
How to Reassign a Drive Letter
If you find the D drive still present but without a drive letter assignment, follow these steps to reassign its drive letter:
- In Disk Management, right-click on the volume representing the D drive.
- Choose “Change Drive Letter and Paths”.
- Click “Add”.
- Select the drive letter D from the dropdown.
- Click “OK” to reassign the D letter to that volume.
This will restore your missing D drive with its original drive letter. After a reboot, you should then be able to access the D drive again as normal in Windows Explorer.
How to Troubleshoot an External Hard Drive Not Showing Up
For an external hard drive that’s no longer visible, try these basic troubleshooting steps:
- Reconnect the drive – Unplug the USB cable and plug it back in. Try a different USB port if possible.
- Restart your computer – Shut down and restart your PC to refresh drive connections.
- Check for physical damage – Inspect the drive, cables, and ports for any sign of damage.
- Update USB drivers – Use Device Manager to update any outdated USB controller or hard drive drivers.
- Test on another PC – Try connecting the drive to a different computer to isolate the issue.
- Check Disk Management – Open Disk Management to see if the external drive shows up there.
This will cover any basic cable, connection, power, driver, or hardware issues that could be preventing your external USB hard drive from being detected. If you see the drive in Disk Management, you can assign a new drive letter to access the data again.
How to Troubleshoot an Internal Hard Drive Not Detected
For an internal hard drive that’s disappeared, first visually inspect it and try the following steps:
- Check connections – Make sure both the power cable and data cable are properly plugged in.
- Try a new SATA cable – Swap out the existing SATA cable for a new one.
- Change SATA port – Move the cable to a different SATA port on the motherboard.
- Update drivers – Use Device Manager to update your SATA controller and hard drive drivers.
- Check BIOS – Enter your system BIOS and see if the drive is detected there.
- Test the drive – Try installing the drive in another computer to see if it works there.
This will help rule out any loose connections, damaged cables, driver issues, dead SATA ports, or even motherboard controller failures that could cause an internal physical drive to not show up in Windows.
How to Fix Disk Drive Errors
If your drive disappears due to file system errors or partition corruption, try using the CHKDSK utility:
- Open an elevated Command Prompt window.
- Type “chkdsk D: /f” and hit Enter to run a scan on D drive.
- Type “Y” and hit Enter to confirm the volume check.
- Let the scan complete. CHKDSK will attempt to repair any file system errors found.
- Restart your computer afterwards.
CHKDSK can fix many logical drive errors that could cause your drive to not show up. Be aware that you may lose files in the process of corruption repair.
How to Restore Drives Not Showing in Disk Management
If a drive is not even showing up in Disk Management, try using the Partition Recovery feature:
- Right-click the disk that may contain the missing drive.
- Choose “Properties” and go to the Volumes tab.
- Click “Partition Recovery” in the Disk Properties window.
- Select the partition representing the missing drive.
- Click “Scan” to search for lost partitions.
- If found, you can Format and Assign a drive letter to the partition here.
Partition Recovery can help restore partitions that have had their partition tables or other metadata corrupted or erased. This helps recover missing drives that are not visible in Disk Management.
How to Use Data Recovery Software
If no partitions show the missing drive and the physical hard drive seems to have failed completely, use data recovery software as a last resort:
- Stop using the drive immediately to avoid overwriting data.
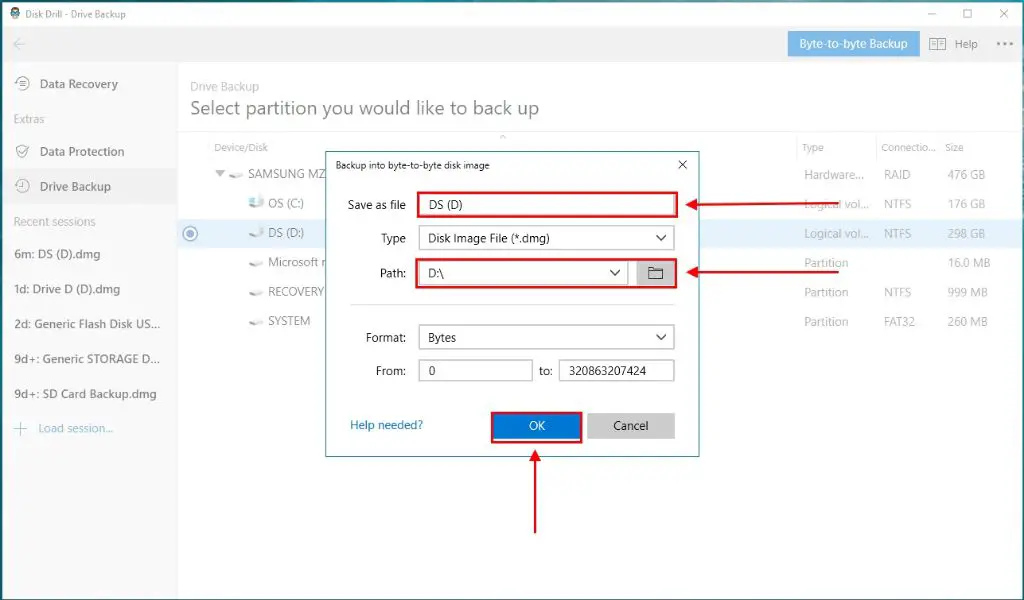
- Download and install a reliable data recovery program like Recuva or Disk Drill.
- Connect the affected drive to the PC.
- Scan the drive with the recovery software.
- Preview found files and select those you want to recover.
- Choose a recovery destination folder on another healthy drive.
- Recover the data. Avoid saving to the problem drive.
Data recovery software can retrieve files from dead, damaged, or corrupted drives that are undetectable by normal means. Note that this doesn’t actually repair the damaged drive.
When to Contact a Professional
If you’ve exhausted all the above troubleshooting without success, your last option may be to enlist the help of a professional drive recovery service. Send your drive to a reputable data recovery company, who have specialized tools and clean room facilities to potentially repair and recover data from truly dead drives.
This level of service is usually expensive but may be worth it for irreplaceable data. Professional recovery can also help if a drive was encrypted, has mechanical failures, or has severe logical damage beyond DIY methods.
How to Avoid Drive Failure in the Future
To help avoid catastrophic drive failure down the road:
- Regularly backup your data to an external location.
- Use a UPS to prevent sudden power loss corruption.
- Install OS and program updates promptly.
- Avoid risky downloads that could introduce malware.
- Handle drives gently and ensure proper ventilation.
- Monitor drive health with tools like S.M.A.R.T. checks.
While you can’t prevent every possible drive failure, following best practices for drive care, maintenance, and data backup will give you peace of mind.
Recap and Conclusion
Having your D drive or partition suddenly disappear in Windows 10 can certainly be scary. But in many cases, you can recover the missing drive with one of these troubleshooting techniques:
- Check Disk Management for a drive without a letter assignment and reassign a drive letter.
- Reconnect problematic external drives and update drivers.
- Inspect internal drive connections and check computer BIOS.
- Use CHKDSK to fix file system errors.
- Employ Partition Recovery tools built into Windows.
- As a last resort, try data recovery software or professional services.
With persistence and methodical troubleshooting, there’s a good chance you can restore access to a missing D drive on your own. But be sure to have backups as well, as unrecoverable drive failure is always a possibility. By understanding the troubleshooting steps, you’ll be prepared next time a drive disappears unexpectedly in Windows 10.