What is RAID 5?
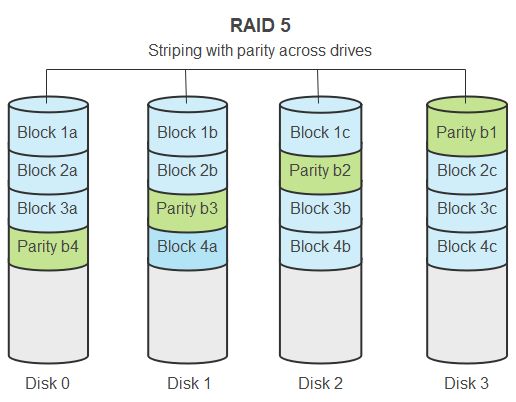
RAID 5 is a storage technology that combines multiple disks into one logical unit. Data is striped across the disks, along with parity information that allows for data recovery in case one of the disks fails.
The key characteristics of RAID 5 are:
- Data is striped across multiple disks (minimum of 3)
- Parity information is distributed across the disks
- Can withstand the failure of 1 disk without data loss
- Read performance is fast since data is striped
- Write performance slower than RAID 0 due to parity calculation
RAID 5 provides a good balance of speed, capacity, and redundancy for a relatively low cost. It is commonly used in servers, network attached storage devices, and other applications that require high availability.
How does disk failure impact a RAID 5 array?
When a disk in a RAID 5 array fails, the data on that disk becomes inaccessible. However, the array is still operational and your data is still accessible due to the parity information distributed across the other disks.
The failed disk simply needs to be replaced with a new one, and then the array can rebuild the lost data onto the new disk using the parity information. This rebuild process occurs automatically and transparently while the RAID 5 array remains online and accessible.
So in summary, a single disk failure in RAID 5 does not result in any data loss or downtime. The array remains operational while the failed disk is replaced and rebuilt in the background.
Steps to recover from a failed disk in RAID 5
Recovering from a failed disk in a RAID 5 array involves a few simple steps:
- Physically replace the failed disk with a new disk of equal or greater capacity.
- Allow the RAID controller to automatically rebuild the lost data onto the new disk using the parity information.
- Monitor the rebuild progress until it reaches 100% completion.
- Verify the array is healthy again by checking the RAID configuration utility.
- Restore full redundancy by adding another disk to the array if desired.
The automatic rebuild process will occur in the background while the RAID 5 array remains online and accessible. Rebuild times will vary depending on the size of the disks and the controller, but could take several hours for large disk sizes.
Let’s examine each of these steps in more detail:
Step 1: Replace the failed disk
The first step is to physically replace the failed hard disk with a new one. The new disk must have the same interface type as the existing disks (e.g. SATA, SAS) and should have equal or greater storage capacity. Using a smaller disk is not recommended.
Power down the storage system if necessary and follow the instructions for your hardware to remove the failed disk and insert the replacement. Most RAID enclosures are hot-swappable, allowing you to replace a failed drive without powering down.
Once the new disk is physically installed, the RAID controller will detect it and automatically begin the rebuild process.
Step 2: Allow RAID to rebuild
With the new disk in place, the RAID controller will start rebuilding the data and parity onto the disk in the background. The rebuild priority can be adjusted in some controllers, but generally occurs at a medium priority by default.
No action is required on your part during the rebuild – the process occurs automatically. The storage system will remain up and fully operational during the rebuild. However, performance may be degraded until rebuilding is complete.
Monitor the progress through your RAID configuration utility. Actual rebuild times depend on many factors but could take several hours for large disks.
Step 3: Monitor rebuild progress
Keep an eye on the rebuild progress to ensure it completes successfully. The RAID utility will show status such as:
- Rebuilding – process is underway
- Rebuild completed successfully – finished without issue
- Rebuild failed – an error occurred, requires investigation
If the rebuild fails or encounters errors, the new disk you inserted may be faulty. Replace it with another new disk and restart the rebuild.
Step 4: Verify healthy state
Once rebuild completes to 100%, verify that the RAID configuration shows a normal and healthy state. All disks should now be shown as online. The array should be fully redundant again.
Run read/write tests on the array if desired to confirm normal performance. At this point your RAID 5 is restored and you can resume normal operation.
Step 5: Restore full redundancy (optional)
RAID 5 provides fault tolerance by allowing one disk failure without data loss. However, once you experience a failure, redundancy is reduced until you add a new disk.
To restore full protection against another failure, consider adding an additional disk to the array. Expanding from a 3-disk to 4-disk RAID 5 for example, would allow the array to withstand a second disk failure.
Adding a disk may require expanding the array with unused capacity on the existing disks. Work with your vendor or admin to understand the best way to restore full redundancy.
Troubleshooting RAID 5 rebuild failures
If the RAID 5 rebuild fails or encounters errors, there are a few things you can try:
- Confirm cables are connected properly to the new disk. Loose connections can cause failures.
- Try replacing the disk with a different brand or model. There may be compatibility issues.
- Update RAID controller firmware to the latest version in case of bugs.
- Check event logs for specific error messages from the controller.
- Monitor SMART status of existing disks to check for additional disk problems.
Repeated rebuild failures likely indicate either a faulty controller, other unreliable disks, or loose connections. Work systematically through all components until the issue is identified.
Seek assistance from the storage system vendor as needed if the root cause is unclear. Advanced troubleshooting or recovery may be required in complex scenarios.
Preventing RAID 5 disk failures
While RAID 5 can recover from a disk failure, it’s best to take proactive steps to prevent failures in the first place:
- Use enterprise-grade disks designed for RAID environments.
- Monitor disk health metrics with SMART tools.
- Ensure proper cooling, ventilation and temperatures.
- Keep firmware, drivers, and management software updated.
- Schedule regular disk scrubbing to detect latent errors.
- Consider hot spares to automatically rebuild faster.
- Back up the RAID array regularly just in case.
Detecting and replacing disks before they fail completely avoids the rebuild process altogether. Design and maintain your RAID arrays carefully for maximum performance and reliability.
When to seek professional RAID recovery
In most cases, a single failed disk in RAID 5 can be rebuilt by simply swapping in a replacement. However, if you experience multiple disk failures or complete array failure, professional data recovery may be required. For example:
- 2 or more disks fail at the same time (beyond RAID 5 redundancy)
- Critical corruption is detected during rebuild
- The controller or backplane itself has failed
- Power surges, fires, natural disasters cause damage
In these extreme scenarios, specialized RAID recovery experts extract the disk contents at the physical level and reconstruct the array. This “Level 4” data recovery can salvage data even with catastrophic array damage.
Professional RAID recovery can be expensive – from $1000 to $10,000+ in some cases. But for mission critical data, it may be worthwhile. Shop around for the best combination of price, experience and capabilities if needed.
Recovering deleted files from a RAID 5 volume
Another scenario users sometimes face is accidentally deleting files from a healthy RAID 5 array. This doesn’t involve disk failures, but rather mistaken or accidental file deletion.
In this case, the normal RAID rebuilding process won’t help recover deleted files and folders. However, there are a few options:
- Stop using the array immediately to prevent overwriting data.
- Scan the RAID for deleted files using forensic data recovery software.
- Check if backups exist to restore deleted files from.
- Use a professional data recovery service to attempt to recover deleted files.
The sooner you take action, the higher the chances of successful file recovery. After deleted data is overwritten by new data, it becomes much more difficult to recover.
Should software or hardware RAID 5 be used?
RAID 5 can be implemented in two ways:
- Software RAID – Managed by the operating system using CPU resources
- Hardware RAID – Managed by a dedicated RAID controller
Software RAID is convenient, flexible and doesn’t require additional hardware. However, it burdens the server CPU and OS. Rebuilds will take longer and overall performance is slower.
Hardware RAID overcomes these downsides by offloading the RAID processing to a dedicated controller with its own processor and cache memory. This provides much better performance and rebuild times.
In general, hardware RAID 5 is recommended for production environments and servers that require high throughput. Software RAID is OK for budget builds or secondary storage where performance demands are low.
Make sure to weigh the pros and cons of both solutions and test performance when planning a RAID deployment. Some higher end servers also support both options simultaneously.
Conclusion
Recovering from a failed disk in RAID 5 storage simply requires swapping in a replacement drive and allowing the automatic rebuild process to occur. Monitor progress until completion and validate the healthy state. Restoring full redundancy should also be considered.
More complex RAID 5 recovery involving multiple failures or complete array corruption requires professional data recovery assistance. But in most cases, following the steps outlined in this guide will get your RAID 5 back online and accessible again after a routine disk failure.