Quick Overview
There are a few ways to recover deleted photos from your Samsung Galaxy device’s gallery:
– Use a file recovery app to scan your phone’s internal storage and SD card for deleted media files that can be restored. Some good options are DiskDigger Photo Recovery, Dumpster, and EaseUS MobiSaver.
– Retrieve photos from your phone’s trash bin/recycle bin, which stores deleted files for a certain period before permanent deletion. Just open the trash folder and restore the photos.
– Connect your device to a computer and use data recovery software to scan for deleted files that can still be recovered from the phone’s memory. Programs like EaseUS Data Recovery Wizard can find photo files marked for deletion.
– If you previously backed up your photos to the cloud (Google Photos, Dropbox, etc), you may be able to restore the deleted images by accessing the cloud storage from your Samsung phone and downloading the files to your device again.
Using a File Recovery App
One of the easiest and most effective ways to recover deleted photos from your Samsung Galaxy device is to use a file recovery app. Here’s how it works:
First, download a data recovery app to your phone from the Google Play Store. Some top options include:
– DiskDigger Photo Recovery – Free basic photo recovery features, with option to upgrade for full functionality.
– Dumpster – Free photo and video restore for limited number of files.
– EaseUS MobiSaver – Free trial with unlimited photo recovery.
Once installed, open the recovery app and grant it access permission to read data from your phone. Most apps will ask for this when first launched.
Next, select the scan location – either the phone’s internal storage or your SD card. The app will scan the selected storage for any previously deleted photo and video files that still exist on your device.
After the scan completes, you’ll see a list of recoverable photos and videos. The app should allow you to preview the files before restoring them.
Select the images you want to recover, then hit the restore button. The app will retrieve the files and save them back into your phone’s gallery.
The recovery app acts quickly to “undelete” your photos before they get permanently overwritten with new data on your phone’s storage.
Tips for Using File Recovery Apps
– For best results, install and run a recovery app soon after you’ve deleted photos, before much new data gets written to the storage. This increases chances of retrieving the images.
– Carefully select a location to scan – internal storage or SD card. The app can’t recover files if it doesn’t scan the right spot where they were deleted from.
– Know that free recovery apps often have limited functionality, like only restoring a certain number of photos. You may need to upgrade to a premium paid version to recover all missing files.
– Avoid taking new photos or installing apps after deleting pictures and before running the file recovery app, as this overwrites deleted data.
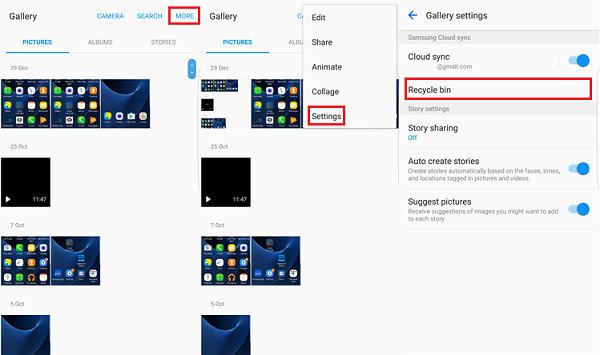
Restoring from Trash Bin or Recycle Bin
When you delete photos on your Samsung phone, they get moved to the trash bin or recycle bin rather than being immediately erased. This storage bin keeps the files for a certain period, usually around 60 days, before permanently deleting them.
So if you act quickly, you can often restore deleted photos by retrieving them from the trash bin:
To view and recover deleted files from trash bin:
1. Open the Gallery app on your phone.
2. At the top left, tap on the hamburger menu icon ≡ to open the slide-out menu.
3. Select Trash to open your trash bin containing recently deleted photos and videos.
4. Browse through the files in your trash bin and locate the images you want to recover.
5. Touch and hold on a photo to select it. Choose Restore to move the file back to your main photo gallery.
Note that files stay in the trash bin for a limited time before being permanently erased. So recover your photos from the bin sooner rather than later.
Emptying the trash bin manually will also permanently delete all photos inside it, removing the opportunity for restoration.
Other Trash Bin Tips
– You may need to enable the Trash feature in your Samsung Gallery app settings if you don’t see the Trash option.
– The trash bin can run out of storage space. It’s best to periodically restore wanted files and then empty the bin completely.
– Some Samsung devices may use “Recycle Bin” rather than Trash. But it functions the same way to temporarily store deleted files.
– Photos deleted from external SD cards may go to a different Recycle Bin location specifically for removable storage.
Using Computer Data Recovery Software
Another option is to connect your Samsung device to a computer and use data recovery software to scan for deleted photos.
This works similarly to mobile recovery apps. But running a scan from a desktop provides larger storage capacity and more powerful data recovery capabilities.
Here are the basic steps:
1. On your computer, download and install a data recovery program like EaseUS Data Recovery Wizard.
2. Connect your Samsung phone to the computer using a USB cable. Be sure to enable data transfer file access when prompted on your mobile device.
3. Open EaseUS and select the drive letter associated with your connected phone. Click Scan to have the program search the phone’s storage for recoverable files.
4. After the scan, you can preview found photos. Select the ones you want to restore.
5. Click Recover to retrieve the deleted images and save them to your computer or another external storage location.
Going through your computer allows the recovery software to dig deeper and more thoroughly search for photos deleted from your Samsung phone, increasing the chances of successful file restoration.
Computer Recovery Tips
– Avoid transferring new files to your phone between deletion and computer recovery, as this overwrites data.
– For privacy, manually delete restored photos from the recovery software after retrieving them to your main storage location.
– You may need to purchase a premium version of the desktop recovery app to unlock the full feature set and complete recovery capabilities.
– Make sure to select the correct connected phone drive letter containing your deleted photos when scanning with the software.
Photo Restore from Cloud Backups
If you previously set up a cloud backup service for your Samsung phone photos, like Google Photos or Dropbox, you may be able to easily restore deleted images by accessing the cloud from your device.
Here’s how to recover deleted photos using cloud backup:
1. Install the cloud storage app (like Google Photos) on your Samsung phone if not already set up. Sign into your account.
2. Open the app and check if the deleted photos are still available in your cloud photo library. They should be there unless you manually deleted them via the cloud service as well.
3. Tap and hold to select the photos you want to recover and download them back to your device’s local storage.
4. You can then view the restored images again in your phone’s Gallery app.
This method is quick and easy provided your lost photos were previously backed up to the cloud. The major caveat is that it only works if you had an active cloud backup in place before deleting files on your device.
Other Cloud Recovery Tips
– Double check that deleted photos are actually still accessible in your cloud account before attempting to restore them.
– Your cloud service may retain deleted files for a limited time, after which recovery is impossible, so act quickly.
– For iCloud users, utilize the Recently Deleted album to restore photos erased from an iPhone or iPad within the last 30 days.
– If using Google Photos, check the trash folder for deleted images you can restore. Emptying this folder permanently erases photos.
Preventing Photo Loss
Recovering deleted photos from your Samsung Galaxy device can be a headache. Here are some tips to avoid needing to use recovery and restoration methods in the first place:
– Enable the trash bin/recycle bin feature on your device if not already on, so deleted files are stored temporarily for recovery.
– Back up your photos regularly to cloud storage services or external drives, allowing for easy re-download if necessary.
– Use the Galaxy’s Secure Folder feature to store important photos separately from your main gallery for added protection.
– Enable the “delete confirmation” prompt when erasing images, to avoid accidental permanent deletion.
– Transfer photos you don’t access often from your phone to a computer or storage device to free up space.
– Handle your phone carefully and keep it protected to prevent hardware damage and data loss.
– Learn how to delete photos correctly from your device if intending to permanently erase them.
Recap and Conclusion
Key Points
– Use data recovery apps like DiskDigger and Dumpster to restore recently deleted photos from your phone’s internal storage or SD card.
– Retrieve images from your Samsung Gallery’s Trash or Recycle Bin before they get permanently removed.
– Connect your phone to a computer and scan for recoverable deleted files using software like EaseUS Recovery Wizard.
– Download previously backed up photos from connected cloud storage services like Google Photos or iCloud.
– Set up regular photo backups and enable delete confirmations/trash bins to avoid accidental permanent deletion.
In Closing
While accidentally losing photos stored on your Samsung phone can be upsetting, there are various effective methods to recover recently deleted images before they are gone for good. Using data recovery apps, trash bin restore, computer software scans, and cloud backup access allows you to rescue photos erased from your Galaxy device’s internal memory or SD card. With proper protections enabled, and regular external backups implemented, you can minimize future photo loss and ensure your priceless memories are securely stored for good.