What are temporary files in Photoshop?
Temporary files in Photoshop are files that are automatically created by the program to store information while you are working on an image. They allow you to revert back to earlier versions of the image if needed.
Some examples of temporary files in Photoshop include:
- Autosave files – These are created automatically at set intervals to store the current state of your work.
- Backup files – These are copies of your main PSD file created manually or when closing, saving or exporting.
- Thumbnail caches – These store preview thumbnails for faster browsing.
Temporary files are usually stored in a dedicated temp folder location on your hard drive. The default location Photoshop uses depends on your operating system:
| Operating System | Default Temp Folder Location |
|---|---|
| Windows XP | C:\Documents and Settings\{user}\Local Settings\Temp\ |
| Windows Vista/7/8/10 | C:\Users\{user}\AppData\Local\Temp\ |
| Mac OS | /Users/{user}/Library/Caches/Adobe/Photoshop/ |
However, you can customize the temp file location in Photoshop’s preferences.
Why recover temporary files in Photoshop?
There are a few reasons you may want to recover temporary files in Photoshop:
- To restore an earlier version of your work if you’ve made changes you want to undo.
- To retrieve unsaved changes if Photoshop crashes or you close the app accidentally.
- To access an autosaved copy if your original PSD file gets corrupted or deleted.
- To salvage backups if you save over your main PSD file accidentally.
Recovering temporary files lets you roll back your work to a previous state, so you don’t lose hours of edits and have to start over.
How to find temporary files in Photoshop
To recover temporary files in Photoshop, you first need to find where they are located. Here are the steps:
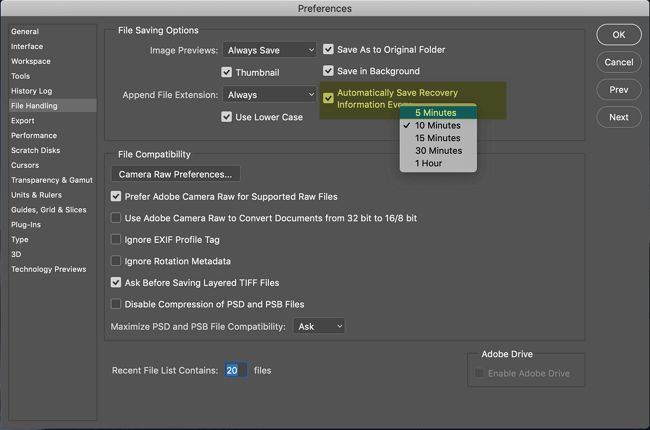
- Open Photoshop and click Edit > Preferences > File Handling (Windows) or Photoshop > Preferences > File Handling (Mac).
- Look under File Saving Options and note the location listed under “Camera Raw Temp Location” – this is where your temporary files are stored by default.
- Go to that folder location on your hard drive. On Windows it’s likely in C:\Users\{user}\AppData\Local\Temp\. On Mac it’s likely in /Users/{user}/Library/Caches/Adobe/Photoshop/.
- Here you will see multiple folders, one for each temporary file type Photoshop creates. The folders will be named with random characters.
This is where all your Photoshop temporary files are stored by default.
How to recover temp files
Once you’ve located your Photoshop temporary file folders, you can start recovering files. Here are some tips:
- Look in the “Autosaved” folder to find autosave files from your current or recent Photoshop sessions. They will be saved with your original filename followed by a number.
- Search the “Backup” folder for backup copies of your PSD files. These have your original filename followed by “.bak”.
- Browse the “ThumbnailCaches” folder for preview thumbnail images of your PSD files if the original is unavailable.
- Use the time stamps on files to determine the newest or oldest versions to recover.
- Copy any temporary files you want to recover out of the temp folders to another location like your Desktop for safekeeping.
- Double click to open the temp files and check that the content is intact. Then you can overwrite your original PSD with the recovered version.
A few things to keep in mind when recovering temporary files:
- Some temp files may be incomplete if Photoshop was still working on them when you closed the app.
- Temp files aren’t created until you’ve manually saved the original file once.
- Setting a short autosave interval increases the number of temp versions available to recover.
How to recover unsaved file changes
If Photoshop crashes or you accidentally close your working file before saving changes, you may be able to recover your work from a temporary file:
- Reopen Photoshop – your unsaved file should pop up with “Recovered” added to the filename.
- If you don’t see the recovered file, go to File > Open Recent > Recovered Files and browse for your file.
- Save the recovered file with your original name to overwrite the old version.
Photoshop stores unsaved changes temporarily in case the app closes unexpectedly, letting you pick up where you left off.
How to set a custom temp file location
To make your temporary files easier to locate, you can set a custom save location:
- Go to Edit > Preferences > File Handling (Windows) or Photoshop > Preferences > File Handling (Mac).
- Under File Saving Options, set a new folder path for Camera Raw Temp Location.
- Create a dedicated folder like “Photoshop Temp Files” to make it clear this is the temp location.
- Click OK to save the preferences when done.
Now Photoshop will store all your temporary files in one convenient, custom location for easy recovery.
How to delete temp files in Photoshop
If your temporary file folders grow too large, you can manually delete files you no longer need:
- Close any open Photoshop files so temp files are not in use.
- Browse to your temp file location and open the folders inside.
- Sort files by date modified to see the oldest files.
- Select and delete any old temp files you want to remove.
- Empty the Recycle Bin/Trash afterwards to fully delete them.
Photoshop will continue creating new temp files as you work on files. To automate deletion, adjust File Handling preferences:
- Reduce the number of Recent File List files to delete older backups.
- Check “Delete temp files on close” to delete temp files when you close Photoshop.
Keeping your temp files under control prevents slow downs from a bloated temporary folder.
Conclusion
Temporary files play an important role in Photoshop by allowing you to restore earlier versions of your work. When they go missing, you can recover temp files by navigating to your temp folder location and retrieving autosaves, backups and thumbnails. Set a custom temp folder to always know where your files are located. And remember to delete old temp files periodically to maintain speed and storage space. With a little file management, you’ll never have to lose work again even if Photoshop crashes or closes unexpectedly.
