Reformatting the hard drive on a MacBook Pro allows you to wipe the drive clean and start fresh with a new installation of macOS. This guide will walk through the step-by-step process to reformat the hard drive on a MacBook Pro.
We will cover backing up your data, checking disk permissions, erasing the hard drive, reinstalling macOS, using Migration Assistant, reinstalling apps, and restoring your data. This process will completely reformat the hard drive and provide you with a clean slate to install the latest version of macOS and apps.
By the end of this guide you will have a freshly formatted hard drive with macOS reinstalled on your MacBook Pro.
Back Up Your Data
Before reformatting your MacBook Pro’s hard drive, it is crucial that you back up all of your important files and data first. As reformatting will erase everything on the hard drive, if you don’t have a backup, you risk permanently losing all of your documents, photos, music, and other irreplaceable data.
According to experts, backing up your data is the most important preparatory step before reformatting a hard drive. As noted in an article on ubackup.com, “To sum up, AOMEI Backupper can help backup files before reformatting. It saves times when it avoids some potential backup risk, like backup corruption, missing files, etc.” https://www.ubackup.com/articles/backup-files-before-reformatting-3889.html
There are various backup options available for Macs, such as using Time Machine or creating a bootable backup disk. Choose a backup method that allows you to fully restore your files after reformatting. Test the backup to ensure it was properly created before erasing your hard drive.
Taking the time to fully back up your MacBook before reformatting will give you peace of mind that your data is safe. Don’t skip this crucial first step!
Check Disk Permissions
Before erasing and reformatting your hard drive, it’s a good idea to check for disk permission errors and repair them if needed. Disk permissions allow your Mac’s system and applications to access folders and files on your hard drive.
To check and repair disk permissions, open Disk Utility, select your hard drive on the left, and click “First Aid.” Then click “Verify Disk Permissions.” Disk Utility will scan your drive and fix any permission errors it finds (Apple Support).
You can also verify and repair disk permissions from the command line using the “diskutil” command. Refer to Apple’s support documentation for the syntax. Repairing permissions ensures your drive is in good health before reformatting.
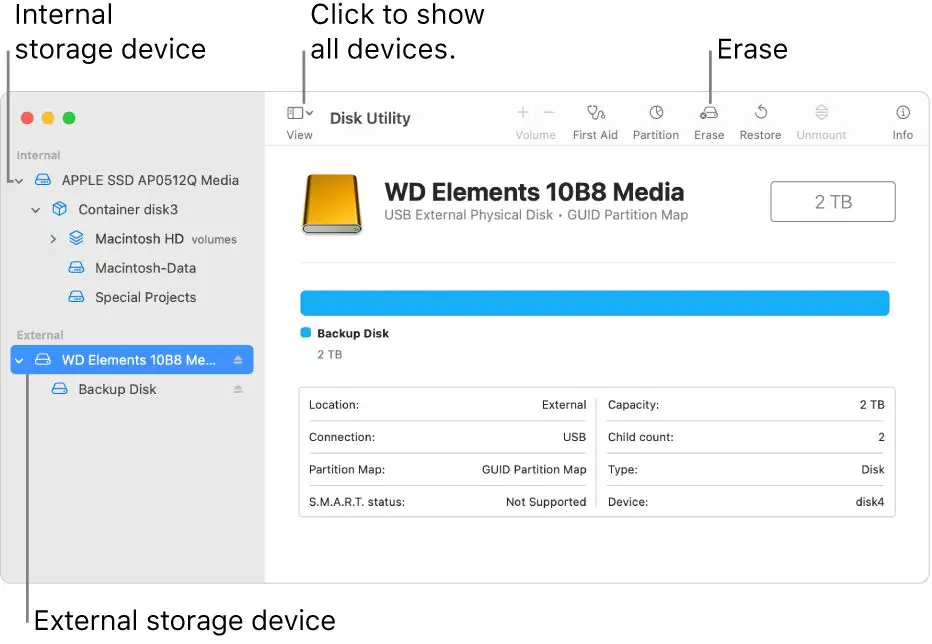
Erase the Hard Drive
The next step is to completely erase and reformat the hard drive using Disk Utility. This will wipe the drive clean and allow you to install a fresh copy of macOS. To erase the drive:
- Open Disk Utility, located in Applications > Utilities.
- In the sidebar, select the disk (not the volume) that represents your internal hard drive, usually called “Macintosh HD.”
- Click the Erase button at the top of the Disk Utility window.
- Choose a format – it’s recommended to use “APFS” for most Macs using a recent version of macOS.
- Type a name for the disk.
- Click Erase to start the process. This can take several minutes depending on your drive size.
Erasing the disk completely deletes all data stored on the drive and resets it to a clean state for installing macOS and apps. Be absolutely certain you have backups before erasing your drive. According to Apple Support, “The erase and reformat process permanently removes all files from the storage device to prevent future data recovery.” (https://support.apple.com/guide/disk-utility/erase-and-reformat-a-storage-device-dskutl14079/mac)
Reinstall macOS
The next step is to reinstall the macOS operating system. You have a couple options for reinstalling the OS:
Internet Recovery
If your Mac was introduced in or after 2011, you can use Internet Recovery to reinstall the OS directly over the internet. To start Internet Recovery, restart your Mac and hold down the Option-Command-R keys (source). This will boot into the recovery system over the internet and allow you to reinstall the OS.
USB Installer
You can also create a bootable USB installer drive to reinstall the OS. To do this, download the macOS installer from the App Store on a different Mac. Then format an 8GB or larger USB drive and use the installer app to create the bootable installer (source). Boot your Mac from the USB drive and you can reinstall the OS from there.
Either Internet Recovery or a USB installer will allow you to fully erase your hard drive and reinstall a fresh copy of the macOS operating system.
Migration Assistant
After you have reinstalled macOS and set up your user account, you can use Migration Assistant to transfer your data from your Time Machine backup to your newly formatted Mac.
Migration Assistant allows you to migrate user accounts, applications, settings, and files from a previous Mac or Time Machine backup. This makes it easy to get your Mac set up just the way it was before the reformat.
To use Migration Assistant:[1]
- Open Migration Assistant on your newly formatted Mac. You can find it in Applications > Utilities.
- Click “From a Mac, Time Machine backup, or startup disk” and select your Time Machine backup as the source.
- Migration Assistant will scan the backup and allow you to select which data to migrate.
- Make your selections, then click Continue to start the migration process.
Migration Assistant will transfer your user accounts, apps, settings, files, and other data from the backup to your newly reformatted Mac. Be patient, as this process can take some time depending on the amount of data being transferred.
Reinstall Apps
After you have reinstalled macOS and set up your user account, you will need to redownload your apps. Here are some tips for getting your apps back smoothly:
Apps purchased through the Mac App Store can be easily redownloaded. Open the App Store application and click on the Purchases tab. All apps you have previously downloaded should be listed here. Click the cloud download icon next to each app to redownload it (source).
For apps not associated with an Apple ID, check your Time Machine backup if you have one. You can search for application files and restore them to your Applications folder. Otherwise, you will need to redownload or reinstall them from the developer’s website.
Some apps may need to be reinstalled from their original installer files. Check the app developer’s website for the latest version and download the installer. Run the installer just as you did when you first installed the app.
After reinstalling apps, you may find some start re-installing on each reboot. This is generally a permissions issue that can be resolved by repairing disk permissions in Disk Utility (source).
Restore Data
After reinstalling macOS and your applications, you’ll want to restore your data from your backup. The easiest way is to use Time Machine if you had set it up previously. Time Machine automatically backs up your Mac’s files to an external drive so you can restore your system from a backup.
To restore from Time Machine, open the Time Machine app and navigate to your external backup drive. Then enter Time Machine by clicking “Enter Time Machine”. You’ll be able to navigate through your backups by date to find previous versions of your files and folders. Select the files/folders you want to restore and click the “Restore” button. Time Machine will copy those files back to your Mac. For more details, see Apple’s support article on how to restore your Mac from a Time Machine backup.
If you don’t have a Time Machine backup, you may need data recovery software to attempt to recover deleted files from the formatted drive. Some options include Disk Drill or Recuva. But recovery success depends on if the deleted files were overwritten when the drive was reformatted.
Check for Errors
After reformatting your hard drive, it’s important to verify that the process was successful. Here are some tips for checking for errors:
First, restart your MacBook Pro and hold down the Option key during startup. This will bring up the Startup Manager which allows you to select and boot to the newly formatted drive. If it boots up normally, that’s a good sign.
Next, open Disk Utility again and click on the newly formatted hard drive on the left. Go to the First Aid tab and click “Verify Disk”. This will scan the drive for errors and fix minor issues. If any errors are found, you may need to erase and reformat again [1].
You can also verify the disk from Recovery Mode. Restart your Mac, hold down Command + R to boot to Recovery, then open Disk Utility from there. Run First Aid on your new volume to double check [2].
Finally, make sure you can view files and folders on the freshly formatted drive normally in Finder. Try creating a test folder and document to confirm write access. If any errors pop up during basic use, there may still be an issue.
Following these steps will validate that the reformatting process finished properly without corruption or technical issues. If everything checks out, you can be confident your drive is ready for use.
Conclusion
In summary, reformatting the hard drive on a MacBook Pro involves several key steps. First, back up your data to prevent data loss. Check disk permissions and erase the hard drive using Disk Utility. After erasing, reinstall the macOS operating system. Use the Migration Assistant to transfer data back to the Mac. Reinstall any necessary apps, and then restore your data from the backup. Finally, check for any errors and confirm everything is working properly. The process completely erases the existing data and OS, and reformats the drive to work optimally with the newly installed OS. Following these steps allows you to refresh your MacBook Pro, resolve any performance issues, and prepare the computer for future use.
