Sometimes it becomes necessary to perform a clean install of macOS Ventura to fix problems, improve performance, or start fresh with a new Mac. Reinstalling macOS Ventura does not affect your personal data like documents, photos, or music, but it does require wiping your Mac’s drive and reinstalling the operating system from scratch.
There are a few reasons you may want to reinstall macOS Ventura. Performance issues like slowdowns, crashes, or bugs can often be resolved with a clean install. You may also want to reinstall if you’re setting up a new Mac or upgrading from an older version of macOS. A clean install can also help free up storage space by removing unnecessary files and clearing caches.
Before reinstalling macOS Ventura, it’s important to back up your files, apps, and settings using Time Machine or another backup service. You’ll also need to download the macOS Ventura installer from the App Store on your Mac. Finally, you’ll need enough free storage space to install the operating system, around 12-14 GB. With the right preparation, you can complete the reinstallation process in an hour or two.
Back Up Your Data
Before reinstalling macOS, it is crucial to back up your data. As Reddit user u/codelyoko373 notes, “if something goes wrong, you don’t want to lose data.”
The Apple support article “Back up and restore your Mac” recommends using Time Machine to back up your Mac. To set up Time Machine, open System Settings, click General > Time Machine, then click Add Backup Disk. Select the drive you want to use for backup. Time Machine will automatically back up your entire Mac.
You can also manually backup your data by copying important files to an external hard drive or cloud storage like iCloud. The Apple support article “How to back up your Mac” provides steps for backing up your photos, documents, music, movies and more.
Backing up to both a local hard drive and a cloud service provides redundancy in case one backup fails. As Apple notes, “iCloud automatically backs up your important information daily…So if you lose your Mac, you can restore your information from iCloud.”
No matter how you choose to back up your Mac, doing so before reinstalling macOS Ventura will safeguard your important data.
Sources:
https://support.apple.com/guide/mac-mini/back-up-and-restore-apdc6980d3be/mac
How necessary is doing a backup before the OS update?
byu/latetodie inMacOS
Download macOS Ventura
The easiest way to download macOS Ventura is directly from the Mac App Store. To download Ventura, open the App Store app on your Mac and search for “macOS Ventura”. The download should be around 12GB in size (1).
Before downloading, make sure your Mac meets the minimum system requirements for Ventura which includes macOS 10.12 or later. You’ll also need around 18-20GB of available storage space on your Mac’s drive to download and install Ventura (2). The amount of space needed can vary depending on your current OS version.
Once you’ve initiated the download, it may take some time to finish depending on your internet connection speed. Make sure your Mac is connected to a power source during the download. When the download is complete, the macOS Ventura installer will be saved to your Applications folder.
Create a Bootable Installer
Before installing macOS Ventura, you’ll need to create a bootable USB installer drive. This drive contains the full macOS installer so you can install it on your Mac. To create the bootable installer, you’ll need to use the createinstallmedia command in Terminal.
Here are the requirements for the USB drive you’ll use:
- The USB drive needs to be at least 12GB in size.
- The drive should be formatted as Mac OS Extended (Journaled).
- It must be blank with no files on it.
Follow these steps to create your bootable USB installer:
- Connect your blank USB drive to your Mac.
- Launch Terminal (located in /Applications/Utilities/).
- Enter the following command in Terminal, replacing “MyVolumeName” with the name of your connected USB drive:
sudo /Applications/Install\ macOS\ Ventura.app/Contents/Resources/createinstallmedia --volume /Volumes/MyVolumeName --nointeractionThis will start the process of creating your bootable installer, which can take some time to complete. Follow the prompts until the drive creation process finishes. (Apple Support)
- Once done, you’ll have a bootable USB installer ready for installing macOS Ventura.
With the bootable installer created, you can now boot your Mac from the drive and proceed with installing macOS Ventura.
Erase Your Drive
Before reinstalling macOS Ventura, you’ll want to completely erase and reformat your startup drive. This ensures you’re starting fresh with a clean installation. Use Apple’s Disk Utility app to securely erase your drive:
- Boot to macOS Recovery by restarting your Mac and holding Command + R.
- Open Disk Utility from the Utilities window.
- Select your startup drive in the sidebar.
- Click “Erase” at the top.
- Choose “APFS” as the format.
- Click “Erase Volume Group.” This will securely erase all data by overwriting it.
Choosing APFS as the format is recommended by Apple for best performance with SSD drives on modern Macs (https://support.apple.com/en-us/HT208496). This will completely wipe your drive and leave it blank, ready for a fresh install.
Be sure to backup any important data before erasing your drive, as this process is irreversible. With your drive erased, you can proceed to reinstalling macOS Ventura.
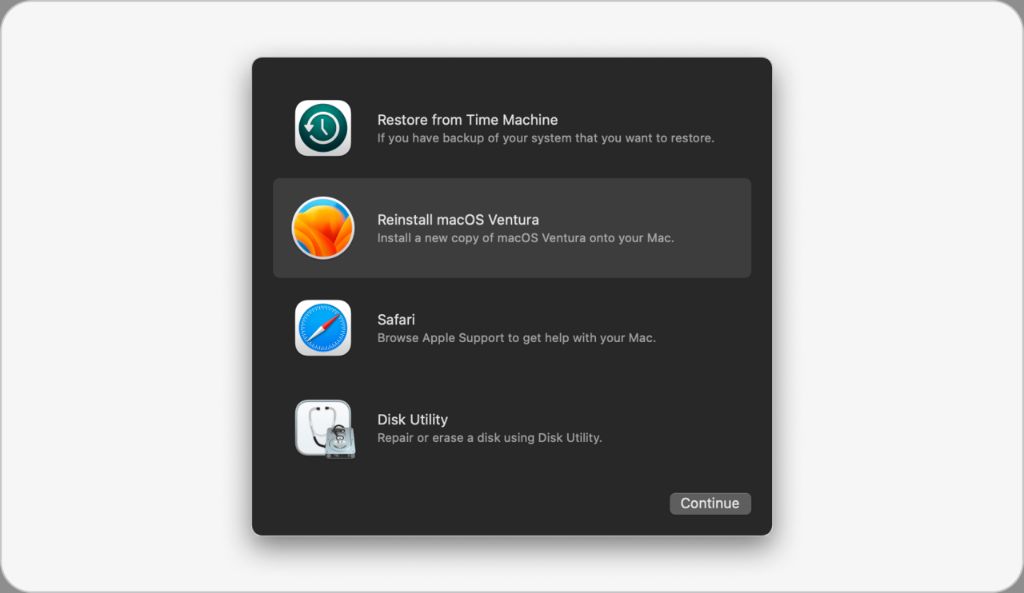
Reinstall macOS
Once you have created the bootable USB installer in the previous step, you are ready to reinstall macOS Ventura on your Mac. Here are the steps to reinstall macOS Ventura:
- Insert the bootable USB drive into an open USB port on your Mac.
- Restart your Mac and immediately press and hold the Option key after you hear the startup chime. This will bring up the startup manager.
- Select the USB drive with the macOS Ventura installer to boot from it.
- In the macOS Utilities window, select Disk Utility and format/erase the target drive where you want to install macOS Ventura. Close Disk Utility when done. It is recommended to format the drive as APFS and use GUID partitioning.
- Now select Install macOS and follow the prompts to complete the installation process. This may take 20-30 minutes or longer depending on your internet speed.
- The Mac will reboot a few times during the installation process. Keep following the prompts until you reach the setup assistant for a new macOS Ventura install.
- Complete the setup assistant prompts to configure settings and preferences for your new Ventura install. You can customize settings for your Apple ID, iCloud, location services, Siri, analytics data, and more.
Once the setup assistant is complete, macOS Ventura will finish installing and you will be brought to the desktop. Your fresh install of macOS Ventura is now ready to use.
Transfer Backups and Data
After reinstalling macOS Ventura, you’ll want to transfer your files, settings, and apps back to your Mac. There are a few ways to do this:
Restore from Time Machine
If you have a Time Machine backup, you can restore your entire system from that backup after reinstalling macOS. This will return your Mac to the state it was in when you created the backup. The time it takes to restore depends on the size of your backup and the speed of your drives, but it can take several hours for a full restore (Source). Many users find it faster to simply reinstall apps manually rather than restoring everything from Time Machine (Source).
Reload Data from Cloud/External Drives
If you stored your files on an external drive or cloud service like iCloud, Dropbox, or OneDrive, you can download them back to your Mac after reinstalling macOS. This may be faster than restoring from Time Machine since it only requires transferring your user files.
Reinstall Apps and Settings
You’ll need to manually reinstall third-party apps from their respective developers. App data stored in the cloud may sync back down automatically once you reinstall. For system settings, you can restore them from your iCloud backup during setup. You can also migrate them from another Mac using Migration Assistant.
Troubleshooting
If you run into issues while reinstalling macOS Ventura, there are some common problems and solutions to try:
If the installation fails or gets stuck, first check your internet connection and try unplugging any unnecessary peripherals (Source). Reboot your Mac and try installing again in safe mode. Safe mode loads only essential drivers and can help isolate software issues.
You may need to erase your drive and reinstall if the installer reports an error like “can’t be installed on this computer.” Boot to recovery mode and open Disk Utility to erase the drive. Then try reinstalling (Source).
For other problems like installation hanging, use Apple’s installer log to diagnose where the process is getting stuck. Hold down Command-L while trying to install to generate the log file. Review the log to pinpoint the failure (Source).
As a last resort, you can contact Apple support or take your Mac to the Genius Bar for hands-on troubleshooting help.
Reinstall Recap
Reinstalling macOS Ventura provides a fresh start by completely wiping your Mac and starting over. This can help resolve software issues, free up disk space, and improve performance. However, it also requires redownloading apps and transferring back data. Here are some key tips for a smooth reinstallation process:
- Back up your Mac fully before erasing the drive so you have all your files safely stored.
- Download the macOS installer and create a bootable USB drive so you can freshly install the OS.
- Erase the startup drive completely when prompted during installation.
- Be patient as the full OS downloads and installs. This can take over an hour.
- Once installed, transfer backups and data to your fresh system.
Reinstallation makes the most sense when experiencing major system problems or needing to wipe a Mac before selling it. For minor issues or to upgrade between macOS versions, an in-place upgrade is often sufficient and saves time. But for malware removal, significant performance issues, or preparing to pass your Mac to someone else, a clean reinstall is the way to go.
Following the steps outlined in this guide will help make the process smooth and painless. Just be sure to fully back up your data first, and have the macOS installer ready on an external drive. Take your time with the installation, transfer data back carefully, and enjoy your refreshed Mac!
Conclusion
Reinstalling macOS Ventura can provide several benefits over time. A clean install clears out any clutter, outdated software, and performance issues that may have built up on your Mac. You’ll find your Mac running faster and smoother after reinstalling the operating system.
With a fresh install of macOS, make sure to reinstall any necessary applications you need. Transfer over important files and data from backups. You may need to reconfigure some settings and preferences to get your Mac working just how you like it again.
In closing, reinstalling the operating system on your Mac is an effective way to revitalize performance and start fresh. Just be sure to fully back up your data first. Follow the steps outlined in this guide for a seamless macOS reinstallation experience.