iTunes is a media player, media library, and mobile device management software developed by Apple. It is used to play, download, and organize audio and video on desktops, iPods, iPhones, and iPads. iTunes was first released in 2001 and it quickly became the world’s most popular music player and store. However, with the rise of streaming services like Apple Music, iTunes’ market share and popularity have steadily declined over the years. Users may want to uninstall iTunes to free up disk space, upgrade to a newer version, or switch to a different media player.
Completely removing iTunes from Windows 10 requires uninstalling the iTunes software, deleting associated files and folders, removing Apple device support, and deleting registry keys. This guide will provide a step-by-step overview of how to fully purge iTunes from your Windows 10 computer. By following these instructions you can get rid of iTunes and reclaim disk space.
Check Your iTunes Version
Before uninstalling iTunes, it’s important to check which version you currently have installed. The latest versions of iTunes have transitioned to the new Apple Music app, while older versions retain the traditional iTunes interface. Here’s how to find your iTunes version on Windows 10:
1. Open iTunes. Go to the Help menu and select “About iTunes”.
2. A popup window will appear showing the version number. For example, iTunes version 12.11 or earlier is the old iTunes, while newer versions are integrated with Apple Music.
The key difference is that old iTunes versions have access to the iTunes Store for purchasing music, movies, apps, etc. The new Apple Music app is focused solely on the subscription streaming service. It no longer allows shopping directly in the app. So if you still rely on the iTunes Store for downloads, you’ll want to keep the old iTunes version.
Citing https://www.1710media.com/difference-between-itunes-and-apple-music/
Uninstall iTunes
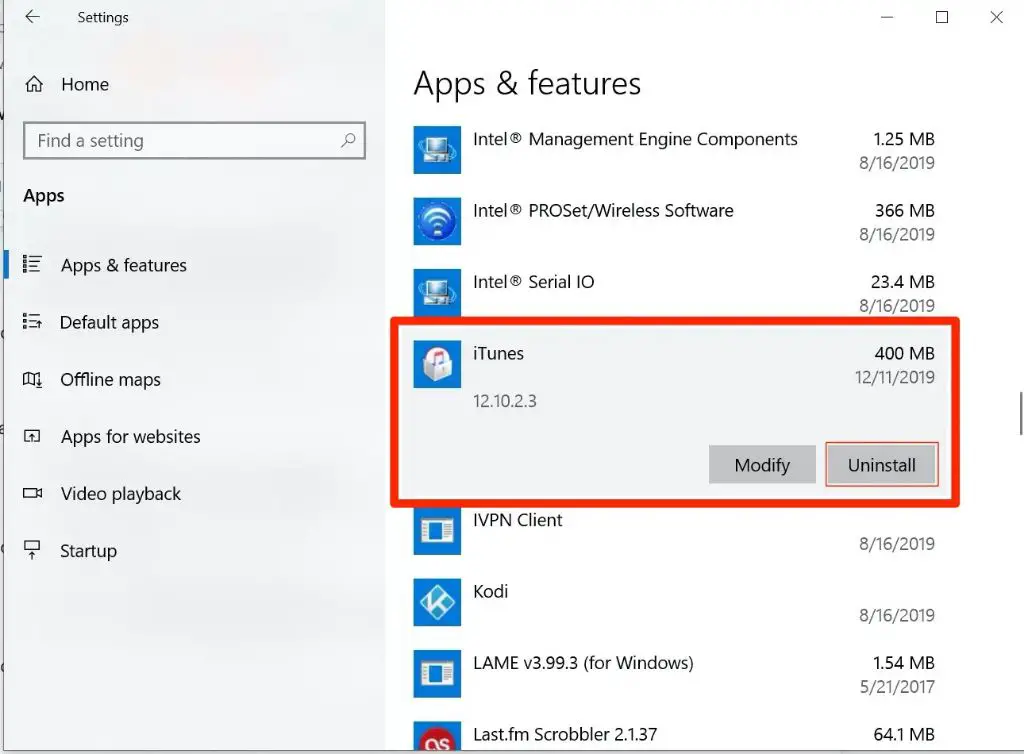
To uninstall iTunes on Windows 10, first open the Settings app and go to Apps > Apps & features. Locate iTunes in the list of installed applications. Click on it and then select Uninstall from the menu that appears.
This will launch the iTunes uninstaller. Follow the on-screen prompts to fully remove iTunes from your Windows 10 computer. The uninstaller will delete the main iTunes program files along with other associated components.
During the uninstall process, you may get an error saying “This app can’t be uninstalled” or “Access is denied.” This usually occurs if the iTunes folders are locked or in use by another process. Try closing any open iTunes windows and running the uninstaller again. If issues persist, restart your computer and then quickly try to uninstall before opening other programs.
You may also get a prompt asking if you want to delete iTunes content and settings when uninstalling. Selecting “Delete” will remove things like your library, playlists, settings etc. Choose “Don’t Delete” to keep that content on your PC for reinstalling iTunes later.
After the uninstall completes, check if any iTunes files remain in the Program Files folder. Delete any leftovers manually.
Delete Associated Files and Folders
After uninstalling iTunes, there may still be various iTunes-related files and folders on your Windows 10 computer that should be deleted. Here are some of the main locations to check:
The iTunes folder is typically located in C:\Users\{username}\Music\iTunes on Windows 10. You can delete this entire iTunes folder to remove any media files, iTunes library files, and other data associated with iTunes. Just be sure you have backups of anything you want to keep before deleting this folder.
The Application Data folder contains iTunes data stored by the program. To access it, open File Explorer and navigate to C:\Users\{username}\AppData\Roaming\Apple Computer. Delete the “iTunes” subfolder here to remove associated data.
Any standalone Apple Software Update folders can be found in C:\ProgramData\Apple\Apple Software Updates and deleted. This contains installer files for iTunes updates.
Check C:\Program Files (x86)\ for any remaining Apple or iTunes folders. The iTunes installer may leave stubs here even after uninstalling the main program.
Once all of these various iTunes-related folders are removed, your Windows 10 PC should be cleaned up from the previous iTunes installation.
Remove Apple Mobile Device Support
Apple Mobile Device Support is a background service that enables the syncing of data between iOS devices (iPhones and iPads) and iTunes on a Windows PC. It runs automatically when you connect an iOS device to your computer and facilitates device activation, backup, software updates, and media syncing.
If you are trying to completely uninstall iTunes and associated Apple software from your Windows 10 machine, you will need to remove Apple Mobile Device Support as well. Here’s how:
- Open Task Manager by right-clicking on the taskbar and selecting it.
- Go to the Processes tab and scroll down to find the AppleMobileDeviceService.exe process.
- Select it and click End Process to force quit the background service.
- Next go to C:\Program Files\Common Files\Apple\Mobile Device Support\ and delete the AppleMobileDeviceSupport folder.
- You may need to reboot your PC and then verify Apple Mobile Device Support is no longer running in the background.
With this component removed, iOS devices will no longer automatically connect and sync when plugged into your Windows computer. You can reinstall Apple Mobile Device Support later if you decide to install iTunes again and want to reconnect your iPhone or iPad.
Delete Registry Keys
iTunes installs several registry keys that allow it to integrate with Windows. You’ll need to manually delete these registry keys to do a clean uninstall of iTunes.
The main iTunes registry keys are located under HKEY_LOCAL_MACHINE\SOFTWARE\Apple Computer, Inc.\iTunes. This includes keys like Parental that store parental control settings and RecentApps that remembers recently opened files (source).
You’ll also want to delete the registry key containing the iTunes software license agreement under HKEY_LOCAL_MACHINE\SOFTWARE\Apple Inc.\Apple Application Support. This gets created when you first install and launch iTunes (source).
To delete the keys, carefully navigate to each key in the Registry Editor and delete. Avoid deleting any keys you are unsure of. After removing the iTunes registry keys, restart your computer for the changes to fully take effect.
Restart Your Computer
After uninstalling iTunes, it is recommended to restart your Windows 10 computer. There are a few reasons why restarting is necessary:
Many components of iTunes integrate deeply into Windows. According to experts, restarting flushes out all iTunes-related processes from memory and clears any registry entries that may still exist (Source: Reddit). This helps ensure a clean removal.
Critical Windows services may still be tied to the now uninstalled iTunes. Restarting reloads these services and Windows configurations. This prevents potential issues like crashes or hangups (Source: SuperUser).
Skipping the restart could lead to unexpected errors, lag, or application freezes. Lingering iTunes components can conflict with the operating system. Experts recommend restarting after any major program uninstall to avoid these problems (Source: Quora).
Overall, restarting ensures all iTunes files, processes, and registry entries are completely wiped from the system. This minimizes errors and returns Windows to a clean state after removing the large iTunes software suite.
Reinstall iTunes if Needed
In some cases, you may want to reinstall the latest version of iTunes after uninstalling the old version from your Windows 10 computer. Here are instructions for downloading and installing the newest iTunes:
Go to https://www.apple.com/itunes/ and click the “Download Now” button. This will begin downloading the iTunes installer file to your computer.
Once the installer has finished downloading, double click on it to begin the installation process. Follow the on-screen prompts to install iTunes. You may need to agree to licensing terms and select install options.
After iTunes finishes installing, you can open it from the Start Menu in Windows. iTunes will now be updated to the newest version on your computer.
Some situations where reinstalling the latest iTunes may be required include:
- You are having issues syncing your iPhone, iPad or iPod touch and want to ensure you have the newest iTunes version
- iTunes is crashing or freezing and you want to reinstall it from scratch
- You upgraded to a new version of Windows 10 and need to reinstall iTunes
- You want to upgrade to the latest features and bug fixes in iTunes
Reinstalling iTunes can often resolve common issues and ensure you have the most up-to-date software version from Apple.
Install Alternatives to iTunes
If you prefer not to reinstall iTunes after uninstalling it, there are several alternative apps you can use instead for music management and iOS device syncing. Popular iTunes alternatives for Windows include MusicBee, Winamp, MediaMonkey, and Foobar2000. These apps provide music library management, playlist creation, CD ripping, and other standard music app features.
In particular, MusicBee is a robust, full-featured music manager that makes it easy to organize your music library. It supports automatic metadata lookup and tagging, album art, and advanced organizational features like flexible views and tagging. MusicBee can also sync music, playlists, and metadata to iOS devices when used with a third-party syncing tool like iSyncr.
For iOS device syncing without iTunes, apps like iMazing, AnyTrans, and CopyTrans Manager offer direct device access and syncing capabilities. They allow you to transfer media, backups, and data between an iPhone, iPad, or iPod and your Windows computer without needing iTunes installed. These tools give you more control and options for iOS device content management.
Installing an alternate music management app like MusicBee can help you effectively organize your music collection without iTunes. And dedicated iOS sync apps provide device syncing and transfer capabilities to fully replace all iTunes functions on Windows 10 and 11.
Conclusion
In this article, we covered the main steps for removing old iTunes versions from Windows 10. This includes uninstalling iTunes through the Control Panel, deleting associated files and folders like the iTunes folder, removing Apple Mobile Device Support, and deleting any related registry keys. It’s important to restart your computer after removing iTunes so all traces are cleared from your system.
To avoid issues when removing programs in the future, it’s best to use the standard uninstall process through the Control Panel instead of manually deleting files. You should also use a trusted uninstalling tool to scan for and delete leftover files and registry entries. Backing up the registry and system restore points can also help you easily revert changes if anything goes wrong.
After removing iTunes, you may want to reinstall a newer version or explore alternative media players. Overall, following the proper uninstall process and being careful when deleting files can help you smoothly remove old programs from Windows 10.