RAID (Redundant Array of Independent Disks) is a data storage technology that combines multiple disk drive components into a logical unit. RAID configurations provide increased performance, reliability, and redundancy compared to a single hard drive (Jerronpe.com).
There are several different RAID levels, each with its own benefits. For example, RAID 0 stripes data across multiple disks for faster performance, while RAID 1 mirrors disks for redundancy (Pandorafms.com).
Occasionally, there are reasons to remove a RAID configuration from a Windows computer. For instance, you may want to switch to a standard single hard drive setup or change to a different type of RAID. Removing RAID properly avoids potential data loss.
Determine Current RAID Configuration
The first step is to determine which RAID mode is currently enabled for the hard drives. There are a few ways to check the RAID configuration in Windows:
1. Open the Disk Management utility (diskmgmt.msc). This will display all disks connected to the system. If configured as RAID, the disks will be shown as a single volume instead of individual disks.
2. Open the RAID management utility, if available. For hardware RAID using a dedicated controller, there may be a configuration utility installed by the manufacturer that can show the current RAID level.
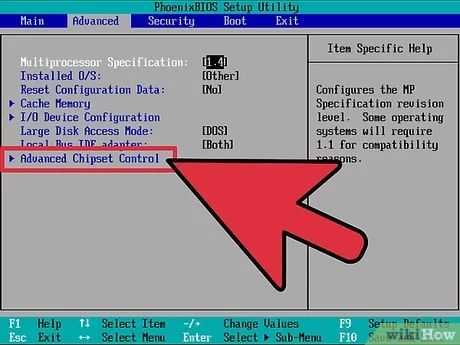
3. Check the BIOS settings during bootup. The BIOS screen may indicate if RAID mode is enabled and which disks are part of the array.
4. Use third-party disk utilities like Speccy to scan all disks and identify any that are configured as RAID arrays (https://wiscooljte.aieglobalhealthcare.com/).
Once you’ve identified that RAID is enabled and which disks are part of the array, make note of the current RAID level and configuration.
Back Up Important Data Before Removing RAID
Before making any changes to your RAID configuration, it is crucial that you back up any important data stored on the RAID drives. Once you remove the RAID settings, the data on the drives can be lost or become inaccessible. Creating a backup ensures you have a copy of your files in case anything goes wrong during the RAID removal process.
To back up your RAID data:
- Attach an external hard drive with enough storage capacity to hold the data on your RAID drives.
- Use backup software to create a full system image or file backup of the RAID drives.
- Store the backup in a safe location in case you need to restore the data later.
Backing up beforehand protects you from potential data loss as you convert the disks from RAID to standalone drives. Having a backup also provides peace of mind in case any issues occur.
Disable RAID in BIOS
The first step in removing RAID configuration is to disable RAID mode in the BIOS. This involves entering the BIOS setup utility during boot and changing the SATA Operation mode from RAID to AHCI or IDE. Here are the steps:
- Restart your computer and press the BIOS key (F2, F10, Del, etc.) during bootup to enter the BIOS setup utility.
- Navigate to the SATA settings section, often under an “Advanced” tab.
- Look for SATA Operation mode or RAID mode and change it to AHCI or IDE. Disable any RAID options.
- Save changes and exit BIOS.
Once RAID mode is disabled in BIOS, the system will no longer attempt to configure the hard drives in a RAID array. However, the RAID metadata may still be present on the disks and require additional steps to fully remove the RAID configuration (source).
Delete RAID Drivers
Before removing the RAID configuration from your disks, you’ll need to uninstall any RAID drivers or software on your Windows system. This ensures that Windows is no longer trying to manage the array or access the disks in RAID mode.
First, open Device Manager in Windows by right-clicking the Start menu and selecting it from the menu. Expand the storage controller section and look for any RAID or disk array controllers listed there. Right click on each RAID controller device and select Uninstall. Check the box to delete the driver software as well and then restart your computer.
You may also need to uninstall any proprietary RAID management software that was provided by your motherboard or RAID controller manufacturer. Refer to the software documentation on how to fully remove it. For example, AMD and Intel often include their own RAID utilities that should be uninstalled [1].
With the RAID drivers and software removed, Windows should no longer detect the disks as being part of a RAID array. However, the RAID configuration data may still remain on the disks themselves, which needs to be cleared next.
Clear RAID Config from Disks
Once you have backed up your data and disabled RAID in the BIOS, you will need to clear the RAID configuration data from the disks themselves. This can be done using the diskpart tool in Windows.
Diskpart is a command-line tool that allows you to completely clean and reformat disks by removing all existing partitions and RAID metadata. Here are the steps to use diskpart to clear RAID information:
- Open an elevated Command Prompt window.
- Type
diskpartand press Enter to launch the diskpart tool. - Type
list diskto display all disks. - Type
select disk X(where X is the disk number you want to clean). - Type
cleanto completely clean and erase the disk. - Repeat steps 3-5 for each disk you want to clear of RAID information.
The clean command will remove all existing partitions, volumes, RAID configurations etc. After cleaning the disks, they will show as raw blank disks ready to be reformatted and partitioned.
One thing to note is that cleaning disks will destroy all data, so be absolutely sure your data is backed up before using diskpart clean.
Convert Disks to Dynamic
Once the RAID drivers and configuration have been removed, the next step is to convert the RAID disks to dynamic disks. Dynamic disks provide features like spanning and striping but without the complexity of RAID.
To convert disks from RAID to dynamic, open Disk Management in Windows. Right-click each disk previously configured as RAID and select “Convert to Dynamic Disk” (Source). This will convert the partition style from RAID to dynamic. Confirm the operation when prompted.
Converting to dynamic disks allows full control over the partitions without the constraints of RAID. The disks can then be configured and formatted as desired after converting to dynamic.
Reformat RAID Drives
Once the RAID configuration has been removed from the disks, the next step is to reformat the drives to wipe the RAID signature and metadata. This requires a low-level format rather than a quick format. A low-level format will completely overwrite the existing data structures on the disks.
On Windows, you can use the diskpart command line utility to perform a low-level format. First, identify the disk numbers of your previous RAID drives using ‘list disk’. Then select each disk with ‘select disk X’ and run ‘clean’ to perform a full format [1]. This will take some time to complete.
On Mac OS X, you can use Disk Utility to erase the drives with a full overwrite. Select each RAID drive and choose ‘Erase’ with ‘Mac OS Extended (Journaled)’ format. Then enable ‘Overwrite erased data with zeros’ to perform a full low-level format [2].
This will remove all RAID metadata and signatures from the disks, allowing them to be used as normal standalone drives again.
Reinstall OS (Optional)
After removing the RAID configuration and formatting the drives, you may want to do a fresh OS installation if you had been using RAID for your operating system drive. This allows you to start with a clean slate and ensures no leftover RAID drivers or configurations remain on the system.
Before reinstalling the OS, be sure to back up any important data and software you want to keep. You’ll also want to have your OS installation media ready to go.
The general process for reinstalling the OS would be:
- Boot from the OS installation media
- Delete existing partitions and format the drive you want to use for the OS
- Go through the clean OS installation steps
- Install drivers and applications
- Restore your data and files
Doing a fresh OS installation is optional, but can help eliminate any possibility of conflicts from leftover RAID artifacts. It also gives you an opportunity to restructure your drive partitions if desired.
Just be sure to back up your data first and have your license key or account info ready for activating the OS. With preparation, reinstalling the OS can be straightforward after dismantling a RAID array.
Conclusion
In summary, removing RAID configuration from a Windows hard drive requires careful steps to avoid data loss. First, determine the current RAID configuration using disk management or RAID software. Back up important data as a precaution. Next, disable RAID in the BIOS settings. Delete any RAID drivers in Device Manager and clear the RAID configuration from the disks using diskpart. Convert the disks to dynamic to remove RAID attributes. Reformat the drives if desired, and optionally perform a clean OS install.
The key things to remember are to always backup data first and carefully follow each step to cleanly remove the RAID config. With patience and care, the RAID can be fully removed from the disks with minimal risk of issues. This allows repurposing the disks for other uses. Just be sure to research your specific RAID setup if anything is unclear before proceeding.