What Does Read Only Mean for a USB Drive?
Read only is a setting that prevents files on a storage device like a USB drive from being modified, deleted, or added. When read only is enabled, the USB drive is essentially write-protected so that its contents cannot be changed.
There are a few reasons why a USB drive may have read only enabled:
- It was intentionally set to read only to protect the files from accidental deletion or change.
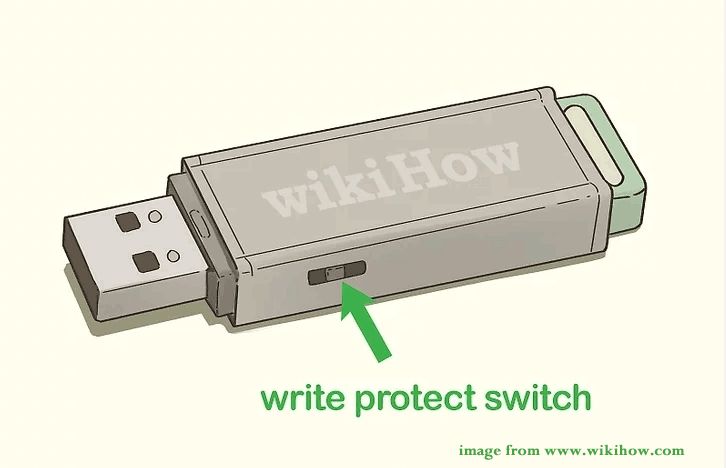
- There is a physical write-protect switch on the USB drive that is toggled to the lock position.
- The drive is formatted with a file system like NTFS that has read only attributes enabled.
- The USB drive is damaged or corrupted, causing the operating system to mount it as read only.
- There are permission issues that prevent the current user from writing to the USB drive.
When a USB is in read only mode, you’ll get errors if trying to add, edit, delete, move, or otherwise modify files on the drive. Your changes simply won’t be saved since the device is write-protected.
When Read Only Happens by Default
There are certain situations in which your operating system may automatically set a USB drive to read only mode by default:
On Windows 10, external drives may be mounted as read-only if the drive is disconnected improperly or if errors are detected on the drive (1). Windows may do this as a protective measure to prevent further data corruption.
On Mac OS, non-journaled external drives are frequently mounted read-only. Mac does this to prevent data loss, since writing to non-journaled drives has a higher risk of corruption (2).
Linux distros like Ubuntu also tend to mount removable media as read-only for data integrity reasons. The kernel recognizes the drive as a hot-swappable device and applies read only permissions by default (3).
So in summary, read only often happens by default as a precautionary measure by the OS. But in most cases, you can change the permissions to read/write once the drive is properly connected and any errors are addressed.
(1) https://superuser.com/questions/543067/why-is-my-usb-flash-drive-now-read-only
(2) https://askubuntu.com/questions/1301589/why-does-usb-stick-keep-becoming-read-only
(3) https://www.quora.com/Why-are-my-USB-drives-read-only-in-Windows-Explorer
Manually Setting a USB as Read Only
There are a few different ways to manually set a USB drive to be read only depending on your operating system.
Setting a USB as Read Only in Windows
To set a USB drive as read only in Windows 10 or 11, you can use the Diskpart command line utility:
- Plug your USB drive into your computer.
- Open the Start menu and type “cmd” to open the Command Prompt.
- Type “diskpart” and press Enter.
- Type “list disk” to list all the disks connected to your PC.
- Type “select disk x” where x is the number of your USB drive from the list.
- Type “attributes disk set readonly” to set the USB drive as read only.
- Type “exit” to close Diskpart.
Your USB drive will now be set as read only and prevent files from being modified or deleted [1].
Setting a USB as Read Only on Mac
To make a USB drive read only on Mac OS X:
- Connect the USB drive to your Mac.
- Open Disk Utility.
- Select the USB drive in the sidebar.
- Click the Erase tab.
- Under Volume Format, select “MS-DOS (FAT)” or “ExFAT”.
- Check the “Read Only” box.
- Click Erase to make the USB read only.
This will reformat the drive and set it as read only [2].
Setting a USB as Read Only on Linux
To make a USB drive read only on Linux:
- Open a terminal window.
- Type “lsblk” to list all drives.
- Identify the drive name of your USB drive (e.g. /dev/sdb1).
- Type “sudo mount -o remount,ro /dev/sdb1” using your USB’s drive name.
This will remount the USB drive in read only mode [3].
Troubleshooting Read Only USB Issues
There are a few common reasons why a USB drive may get stuck in read only mode:
The USB drive may have the read only attribute enabled in its properties. This can happen if the drive was intentionally set to read only, or sometimes occurs by default on certain brands of USB drives. The read only attribute can be cleared to make the drive writable again (Source).
Hardware issues like a damaged USB connector or faulty cable can also cause a drive to mount as read only. Trying a different USB port or cable could help determine if it’s a hardware problem (Source).
If the file system on the USB drive becomes corrupted, the operating system may mount it as read only to protect the data. This is commonly seen on drives that are improperly ejected. Running CHKDSK or a repair utility may fix file system issues (Source).
Finally, if the drive has a physical write protect switch, make sure it is not accidentally set to the lock position. This will make the entire drive read only until the switch is flipped back.
Using Diskpart to Remove Read Only in Windows
Diskpart is a powerful command-line tool built into Windows that allows you to remove the read-only attribute from a USB drive. Here is a step-by-step guide to using Diskpart to make your USB writable again:
1. Connect your read-only USB drive to your Windows PC.
2. Open the Start menu and type “cmd”. Right-click on the Command Prompt result and select “Run as Administrator”.
3. In the Command Prompt window, type “diskpart” and press Enter to launch the Diskpart tool.
4. Type “list disk” and press Enter. This will display all disks connected to your PC.
5. Identify the disk number for your USB drive, and type “select disk X” where X is the number of your USB disk. Press Enter.
6. Type “attributes disk clear readonly” and press Enter. This will remove the read-only attribute.
7. Type “exit” and press Enter to close Diskpart.
After following these steps, your USB drive should no longer be read-only and you should be able to add, edit, and delete files again. The key Diskpart commands are “attributes disk clear readonly” to reset the read-only status, and “exit” when finished.
Using Disk Utility to Remove Read Only on Mac
Disk Utility is an easy way to remove read only status from a USB drive on Mac. Follow these steps to use Disk Utility:
- Connect the read only USB drive to your Mac.
- Open Finder and go to Applications > Utilities and launch Disk Utility.
- Select the USB drive from the left side panel in Disk Utility.
- Click the Erase button at the top. This will reformat the drive and remove read only status.
- Give the drive a name and select a format like Mac OS Extended (Journaled).
- Click Erase to confirm and reformat the USB drive.
You can also remove read only from the Get Info pane:
- In Finder, right click the USB drive and select Get Info.
- Expand the Sharing & Permissions section.
- Click the lock icon to make changes and select Read & Write for everyone under privileges.
- Click the gear icon to apply changes to all enclosed items.
This resets permissions so you can write to the USB drive again. Get Info provides a less destructive way than fully erasing the disk.
Using Terminal to Remove Read Only on Linux
You can use terminal commands on Linux to remove read only from a USB drive. Here are the step-by-step instructions:
1. Open the terminal application on your Linux distro.
2. Type lsblk to list all storage devices and drives connected to your system. Identify the drive name for your USB device (e.g. /dev/sdb1).
3. Unmount the USB drive with the command sudo umount /dev/sdb1 (use your drive name).
4. Use the lsattr command to view the current attributes on the drive, like sudo lsattr /dev/sdb1. If you see the letter ‘i’ listed, it means the immutable flag is set.
5. Remove the immutable attribute with sudo chattr -i /dev/sdb1. You can also remove the ‘a’ attribute for no access time recording.
6. Remount the USB drive and it should no longer be read only. You can test by creating a file or folder on the drive.
The chattr command in Linux provides control over ext filesystem attributes like immutable and no access time recording. Using lsattr and chattr via the terminal is an easy way to reset read only USB drives on Linux.[1]
Trying a New USB Port or Cable
One potential cause of the read only error on a USB drive is a damaged USB port or cable. A bad USB port or cable can cause connectivity issues that may result in the drive being mounted in read only mode.
To troubleshoot whether this is the culprit:
- Unplug the USB drive from its current port and try inserting it into another USB port on your computer.
- If trying a new port doesn’t work, switch to a different USB cable if you have a spare available. Use the new cable to connect the drive to the original port.
- If you don’t have a spare cable, try connecting another USB device using the same cable and port. If that device works fine, then the cable is likely okay.
- If you have access to another computer, attempt plugging the USB drive into it using both the original cable and port. If the drive isn’t read only on the second computer, then the issue is with the USB hardware on the original machine.
If the USB drive functions as normal when switching cables or ports, then the original USB connection components were likely faulty. Replacing the damaged cable or having the USB port repaired would resolve the read only problem in this case.
Formatting a USB to Remove Read Only
Formatting your USB drive should be one of the last resorts to remove read only status. Before formatting, you’ll want to try the other troubleshooting tips mentioned in this guide such as checking for physical write protection switches, changing security permissions, using the command prompt or terminal, and changing USB ports. Formatting will erase all data on the drive, so make sure to backup your files first.
If you’ve tried everything else and formatting is your only option left, here are the steps to format your USB on Windows, Mac, and Linux:
On Windows
1. Insert the USB drive into your computer.
2. Open File Explorer and right-click on the USB drive.
3. Select “Format” from the menu.
4. Choose FAT32 or exFAT as the file system.
5. Give the drive a name and click “Start” to begin formatting.
6. Wait for the process to finish, this can take a few minutes.
Once completed, the USB should no longer be read only. Reformatting removes the read only attribute and gives you a blank, writable drive [1].
On Mac
1. Connect the USB drive to your Mac.
2. Launch Disk Utility.
3. Select the USB drive in the left sidebar.
4. Click “Erase” at the top.
5. Choose “MS-DOS (FAT)” for the format.
6. Give the drive a name.
7. Click “Erase” to start formatting.
This will format the drive and make it writable again [2].
On Linux
1. Insert the USB into your computer.
2. Open the terminal.
3. Type “sudo mkfs.vfat /dev/sdX” replacing X with your drive’s letter.
4. Enter your password when prompted.
5. Wait for the formatting process to finish.
The USB should now be restored to a normal writable state [3].
So in summary, formatting the USB drive can remove read only status when other options have failed. Just be sure to backup your data first, as formatting erases everything on the drive.
[1] https://www.minitool.com/backup-tips/usb-drive-read-only.html
[2] https://www.diskpart.com/articles/usb-drive-read-only-7201.html
[3] https://www.diskpart.com/articles/format-read-only-usb-0310.html
Read Only FAQs
Here are answers to some frequently asked questions about fixing the read only issue on USB drives:
What causes a USB drive to become read only? There are a few common causes: https://www.minitool.com/backup-tips/usb-drive-read-only.html
- The USB drive has a physical read only switch that is set to lock
- The drive is failing and can no longer be written to
- The permissions or security settings are restricting write access
- The USB controller has issues properly detecting the drive
How can I allow writing to a read only USB drive? Try these troubleshooting steps:
- Check for a physical lock switch and make sure it is in the unlocked position
- Try the drive in another computer or USB port
- In Windows, use diskpart to remove read only attributes
- On Mac, use Disk Utility to erase and reformat the drive
- If the drive cannot be written to, it may need to be replaced
What if my USB drive shows read only on Android? Go to Settings > Storage and tap on your USB drive. Then tap the 3 dots in the top right corner and choose “Format as internal” option.
For additional tips, see the steps outlined in this guide. With some troubleshooting, the read only error can usually be resolved.
