What is a write-protected USB drive?
A write-protected USB drive is one that has been configured to prevent new data from being written to it. Write protection restricts modifying, editing, deleting or formatting the data on the drive (Barman). There are two main ways a USB drive can be write protected:
Physically write-protected USB drives have a physical switch or tab that toggles write protection on and off. Sliding the switch to the “lock” position enables write protection while the “unlock” position disables it (Menoy, 2021). This type of write protection is done at the hardware level.
Software-enabled write protection is configured at the operating system level, usually via the registry, disk utilities or specialized third-party tools. It restricts access to writing data without a physical switch on the drive itself (Kamimura, 2022).
The main purpose of write protection is to prevent accidental or malicious modification of data. It’s commonly used to safeguard sensitive files, ensure evidence integrity, and enable read-only access for data distribution (Kent, Anindya. “What is Write Protection on a USB Drive and Why is it Useful? How Can you Enable or Disable Write Protection on a USB Drive?” Quora, 25 Sept. 2023).
Identifying a Write-Protected USB Drive
There are a few key signs that indicate your USB drive is write-protected:
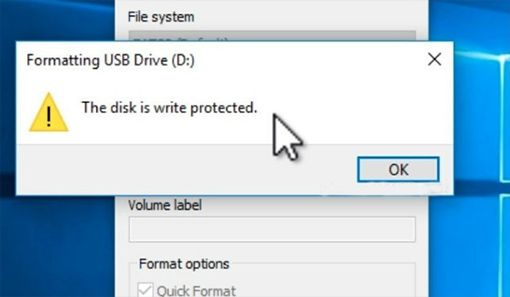
Error messages when trying to modify files
You may see error messages like “The disk is write-protected” or “Access denied” when trying to delete, move, rename or modify files on the USB drive. This indicates the disk has been set to read-only mode.
Not being able to save new files
If you are unable to copy or save new files to the USB drive, that is another clear sign of write protection. You may be able to open and view files already on the drive, but attempts to add anything new will fail.
Read-only properties
Checking the properties of the USB drive will also show if it is write-protected. In File Explorer, right-click on the drive, select Properties, and look at the Read-only checkbox. If it is checked, then the disk is write-protected.
If you notice any of these behaviors, it means write access to the drive has been disabled and you will need to remove write protection to add, modify or delete files again.
Disabling physical write protection
Many USB flash drives have a physical lock switch on the housing that toggles write protection on and off. To disable write protection, you first need to locate the lock switch on your specific USB drive. It is often a small slider on the edge or back of the drive. You may need to use a magnifying glass to see it clearly.
Once you’ve found the switch, move it to the unlocked position. This is usually slides towards the USB connector end of the drive. Be gentle when moving the switch to avoid breaking it. With the switch unlocked, the USB should now allow writing data again. Check by trying to copy a file onto the drive or format it. If it still seems write-protected, the drive may have digital write protection enabled instead.
Using Diskpart to remove write protection
Diskpart is a command-line tool built into Windows that can remove write protection from a USB drive. Here are the steps to use Diskpart:
-
Open the Command Prompt as an administrator. Right-click the Start button and select “Command Prompt (Admin)”.
-
Type
diskpartand press Enter to launch the Diskpart tool. -
Type
list diskand note the disk number of your USB drive. -
Type
select disk x(replace x with your disk number) and press Enter. -
Type
attributes disk clear readonlyand press Enter. This removes the read-only attribute. -
Type
exitto close Diskpart.
After removing the read-only property using Diskpart, you should be able to add files to your USB drive again. Diskpart is a quick and simple built-in tool in Windows for clearing write protection.
Using Registry Editor to remove write protection
Another method for removing write protection from a USB drive is by modifying registry keys. Here are the steps:
1. Open the Windows Registry Editor. You can access this by typing “regedit” into the Start menu search bar and selecting the Registry Editor app.
2. Navigate to this registry key path:
HKEY_LOCAL_MACHINE\SYSTEM\CurrentControlSet\Control\StorageDevicePolicies
3. Look for a value named “WriteProtect” in the right pane. Double click this value.
4. In the “Edit DWORD Value” window that opens, set the Value data field to “0” and click OK. This will disable write protection.
5. Close the Registry Editor and safely eject and re-insert the USB drive to apply the change.
The registry modification method essentially overrides any write protection set physically on the drive itself. However, be very careful when editing the registry as incorrect changes can cause system instability. Consider seeking professional help if unsure.
For more details on using the registry to remove USB write protection, see this guide: https://www.lifewire.com/remove-write-protection-windows-10-8-7-4586905
Formatting the USB Drive
If the USB drive has been corrupted or damaged, formatting it can often resolve write protection issues. Formatting completely erases all data on a drive and resets it to factory conditions.
To format a drive in Windows 10, use Windows File Explorer:
- Open File Explorer and locate the USB drive under This PC or Computer.
- Right click on the drive and choose Format.
- Choose NTFS or FAT32 as the file system. NTFS is recommended for larger drives as it supports larger files. FAT32 has better compatibility with other devices but only supports up to 4GB file sizes.
- Select Quick Format to format quickly, or Full format to scan the drive for errors during the format. Quick format is faster while Full provides a more thorough format.
- Click Start to begin formatting.
Once completed, the USB should no longer be write-protected and you can add or remove files as needed.
Using third-party tools
In addition to the built-in Windows options, there are third-party tools that can help remove write protection from USB drives. One popular option is a program called HCFORMAT. Some key benefits of using HCFORMAT include:
- Simple interface – The tool has a straightforward interface that is easy to use.
- Works on any drive – It can remove write protection from any USB drive, regardless of size or manufacturer.
- Bypasses restrictions – HCFORMAT is designed to bypass write protection set by all methods, including physical tabs and registry settings.
- Quick process – Removing write protection is generally very fast, taking just seconds.
The main advantage of using a dedicated third-party tool like HCFORMAT is it provides an efficient way to overcome write protection, without having to dig into Windows settings or tools. For those uncomfortable with the command prompt or registry editor, this can be a much quicker and easier option.
Tips for avoiding write protection issues
Here are some tips to help avoid encountering write protection issues with your USB drive:
Always eject the USB drive safely before removing it. Simply pulling out the drive without properly ejecting can sometimes lead to write protection being enabled. In Windows, be sure to use the “Safely Remove Hardware” option.
Do not rely solely on the write protection switch to prevent accidental changes. The switch can sometimes fail or get moved inadvertently. Use file permissions and encryption as additional safeguards.
Regularly scan external drives with antivirus software and disk utilities. This allows you to detect potential problems early before they result in write protection issues. Check for errors, bad sectors, or corruption on the drive periodically.
Handle USB drives carefully to prevent physical damage. Dropping or jostling the drive can damage internal components and enable write protection as a safety measure. Store drives in a protective case when not in use.
Avoid Force Eject utilities or similar software that does not properly dismount the drive. Always use the standard eject procedure provided within your operating system.
When to seek professional help
If you’ve exhausted all of the DIY troubleshooting options to remove write protection from a USB drive in Windows 10 and the drive still remains write protected, it may be time to seek help from a professional:
If the hardware write-protect switch is broken or damaged, that would require physically repairing or replacing the USB drive. A computer technician or data recovery professional may be able to open up the casing of the USB drive and fix or replace the write-protect switch.
After trying the software solutions like using Diskpart, Registry Editor, or third party tools, if you still cannot seem to remove the write protection, a professional may have more advanced tools and expertise to address the issue. They may be able to use forensic data recovery software or hardware equipment to override or reset the write protection.
Data recovery specialists have the best chance of being able to access protected files on the USB drive. If you have important files stored on the drive that you cannot access due to the write protection, a professional may be able to recover those files before reformatting or replacing the drive.
Professionals can also determine if the USB drive is faulty and needs to be replaced. If the write protection is a symptom of a larger hardware failure, they can advise you accordingly and help preserve your data.
Troubleshooting write protection issues requires time and technical skill. If you need your USB drive restored quickly or have limited computer expertise, relying on a technician or specialist can be worth the cost.
Summary
In summary, there are a few key options for removing write protection from a USB drive in Windows 10:
- Physically disable write protection by adjusting the lock switch on the USB drive (if it has one).
- Use the Diskpart utility in Command Prompt to remove write protection.
- Edit the registry and set the WriteProtect value for the USB drive to 0 to disable write protection.
- Format the USB drive to erase the write protection.
- Use third party software tools designed for removing USB write protection.
To recap the steps: First identify if the USB drive has physical write protection enabled. If so, disable it. Then try using Diskpart or Registry Editor. If that fails, formatting the drive should do the trick. Seek professional help if you’ve tried all options with no success.