What is RAID 0?
RAID 0, also known as disk striping, is a type of RAID configuration that spreads data across multiple disks with no parity or duplication. It offers fast read/write speeds but provides no fault tolerance. If one drive in a RAID 0 array fails, all data will be lost.
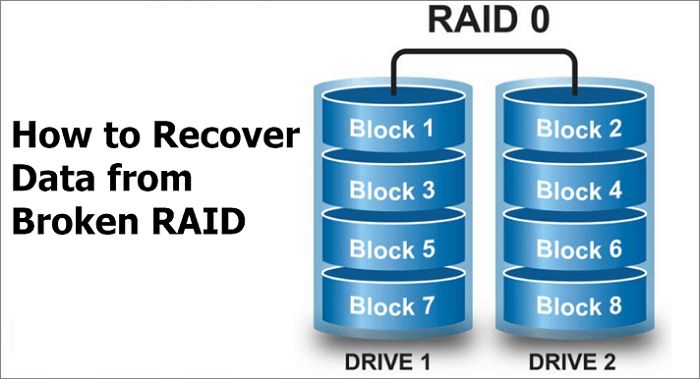
RAID 0 arrays are created by “striping” data evenly across two or more drives. For example, in a two-drive RAID 0 array, the first drive would contain all the odd numbered blocks of data while the second drive would hold all the even numbered blocks. This allows reads and writes to span both drives for enhanced performance.
The main benefits of RAID 0 include:
- Increased read/write speeds – Data is split between drives allowing for simultaneous access
- Utilizes full capacity of drives – No capacity is lost to parity or duplication
- Ideal for non-critical data – Provides fast speeds for temporary data
However, RAID 0 comes with risks:
- No fault tolerance – If one drive fails, all data will be inaccessible and lost
- Increased risk of failure – More drives means higher likelihood of failure
- Not recommended for mission critical data – Due to lack of redundancy
Overall, RAID 0 provides performance benefits but is a risky configuration for important or irreplaceable data. Routine backups are essential to protect against data loss.
Signs of a Failed RAID 0 Drive
There are several symptoms that can indicate a drive failure in a RAID 0 array:
- Inability to access data – Data becomes inaccessible if a drive goes offline
- Performance degradation – Read/write speeds will slow down
- Unusual noises from drive – Clicking, grinding, buzzing sounds
- SMART errors – Critical warnings reported in SMART drive monitoring
- OS crashes/freezes – System instability from drive errors
- RAID controller alerts – Warnings or alarms from the RAID controller
Additionally, your operating system may display alerts about the faulty drive and your RAID management software should indicate which specific drive has failed.
If you notice any signs of RAID 0 failure, power down the system immediately and replace the faulty drive to prevent permanent data loss.
Preparing for Drive Replacement
When preparing to replace a failed drive in a RAID 0 array, there are some important steps to take:
1. Stop All I/O Activity
Halt any read/write operations to the array to prevent data inconsistencies. Unmount partitions and close any applications accessing the RAID drives.
2. Verify the Failed Drive
Use RAID monitoring software to identify which specific drive has failed. The faulty drive will usually be marked by the controller as “offline” or “failed.”
3. Back Up Any Accessible Data
If any data is still accessible on the remaining healthy RAID drives, back it up immediately. Once the failed drive is physically removed, all data may be lost.
4. Have Replacement Drive Available
Obtain a new replacement drive that is at least the same size or larger than the failed drive. It should be of the same interface type and rotational speed.
5. Shut Down the Server/PC
Power down the system fully before removing the failed drive to prevent potential damage.
Taking these preparatory steps will help ensure safe replacement of the failed drive and preserve all recoverable data.
Removing the Failed RAID 0 Drive
The process for physically removing a failed drive will depend on your system setup but typically involves:
1. Locate the Failed Drive
Consult system documentation to identify the correct drive bay location. RAID monitoring software will indicate which drive has failed.
2. Unplug Cables
Disconnect any power and data cables from the back of the failed drive. This may require unplugging the drive from a hot swap bay.
3. Remove Mounting Screws
Use a Phillips-head screwdriver to remove any screws securing the drive into the drive bay.
4. Slide Drive Out
Gently pull the drive directly out of the bay once any mounting screws are removed.
5. Place in Protective Enclosure
Put the failed drive in an anti-static bag or protective enclosure for safe disposal or testing.
Always handle drives carefully and never touch exposed circuitry. The failed drive can now be replaced.
Inserting the Replacement RAID 0 Drive
To install the new replacement drive:
1. Unpack Replacement Drive
Carefully remove the new drive from its packaging. It should match the capacity and interface of the failed drive.
2. Insert in Empty Bay
Gently slide the new drive fully into the empty drive bay slot until seated.
3. Secure Mounting Screws
Reattach any mounting screws or rails to secure the replacement drive.
4. Connect Cables
Plug the power and data cables back into the replacement drive. You may need to reconnect to a hot swap bay.
5. Power Up System
With the new drive installed, power the system back on. The RAID controller should detect the new drive.
Visually verify that the replacement drive is powered on and connected. Take care when inserting to avoid damaging connectors.
Rebuilding the RAID 0 Array
With the physical drive replacement complete, the RAID 0 array can now be rebuilt:
1. Initiate Rebuild Process
Log into the RAID management utility and initiate a rebuild of the degraded array. The controller will add the new drive and recreate the RAID 0 stripe set.
2. Monitor Rebuild Progress
The rebuild process can take several hours depending on the size of drives and the RAID controller. Monitor progress until it reaches 100% completion.
3. Check Drive Functionality
Run read/write tests on the array to verify full data access and drive functionality. Reboots or restarts may be required.
4. Restore Recent Backups
If available, restore any recent backups taken before the drive failure to regain lost data. Up-to-date backups are critical for RAID 0 arrays.
Be patient during the rebuild as forcing a reboot may damage the array. Once finished, your RAID 0 should be restored to full operation.
Verifying RAID 0 Status
To confirm your RAID 0 is restored after drive replacement:
- Check the RAID management utility – Should show array as Normal status
- Look for error messages – Any warnings likely indicate an issue
- Examine array capacity – Should match what is expected
- Monitor performance – Run speed tests to check for bottlenecks
- Test drive redundancy – Simulate another drive failure
Additionally, run thorough read/write tests across the full span of the RAID drives to verify complete functionality.
If any issues arise, immediately power down and recheck drive connections. Contact technical support if the problem persists after rebuild.
Restoring Data to the New Drive
As RAID 0 offers no redundancy, all data will be lost when a drive fails. However, you have a few options to restore data:
Restore from Backups
Recent backups made before the drive failure can be restored to the new RAID array. Ensure backups are routine with RAID 0.
Recover Deleted Files
If the failed drive is still intact, data recovery software may be able to restore deleted files by reading the drive directly.
Reconstruct Manually
For special cases, lost data may be reconstructed manually by recreating the original stripe set based on what remains on the healthy drive(s).
But preventing data loss is ideal. Consider using a redundant RAID level like RAID 1 or 10 for storage of critical data. Also maintain a tested backup strategy.
Troubleshooting Common RAID 0 Rebuild Issues
During the RAID 0 rebuild process, you may encounter various problems:
Slow Rebuild Speeds
If the rebuild is taking much longer than expected, make sure the replacement drive matches the speed of the old drive and check for performance bottlenecks.
Failed or Aborted Rebuild
This is usually caused by physical issues with the replacement drive. Try reseating cables or swap in another new drive.
Errors or Data Inconsistency
Corrupted data may indicate a problem with the controller cache, physical connections, or drives. Restore from backups.
OS Crashes or Freezes
Unstable system operation during rebuild could mean hardware incompatibility, drivers issues, or bad sectors. Troubleshoot carefully.
RAID Configuration Loss
A controller failure may require configuring the RAID again from scratch. Use caution when handling the controller.
If problems persist, don’t force a rebuild. Contact technical support or revert to backups until the underlying issue is diagnosed.
Preventing Future RAID 0 Failures
While no RAID setup prevents all failures, you can take steps to avoid future RAID 0 drive issues:
- Use enterprise-class drives rated for 24/7 operation
- Monitor drive SMART statistics regularly
- Keep firmware, drivers, OS updated
- Clean system internals and drives regularly
- Ensure proper cooling and ventilation
- Consider using higher redundancy RAID levels
- Have hot spares available to rebuild quickly
- Test redundancy by “pulling” drives periodically
- Maintain complete and routine backups
Practicing caution with RAID management, monitoring alerts, and having a backup strategy will go far in protecting uptime and data.
Conclusion
Rebuilding a RAID 0 array after a disk failure requires carefully replacing the faulty drive, initiating rebuild through the RAID controller, and restoring data from backups. With proper preparation and monitoring, the RAID 0 should come back online fully operational. But RAID 0 offers no redundancy, so backups are critical.
Consider using more fault tolerant RAID configurations like RAID 1 or 10 for mission critical storage. Also implement comprehensive backup and recovery systems along with proactive monitoring. Combining RAID with diligent backup practices is key to safeguarding data in the event of inevitable disk failures.
