Quick Answers
Restoring a file on a Mac can be done in several ways:
- Recover it from your Mac’s Time Machine backup
- Restore a previous version from Mac’s automatic file versioning
- Use data recovery software to scan and restore deleted files
- Retrieve the file from iCloud or other cloud backup services
- Recover it from your Mac’s trash bin before it’s permanently deleted
What are some common reasons for needing to restore a file on Mac?
There are several common scenarios in which you may need to restore a deleted or lost file on your Mac:
- Accidental file deletion – You may have accidentally deleted a file you needed and now need to get it back.
- Hard drive failure or corruption – Issues with your Mac’s hard drive can lead to data and file loss. A drive failure requires restoring from a backup.
- macOS upgrade issues – Sometimes bugs in system updates can cause data loss. Reverting to an earlier version of macOS or restoring from a backup may help.
- Malware or accidental overwriting – Malware infections or accidentally saving over a file can overwrite it. You’ll need to restore it from a backup in this case.
- File corruption – Important files may become corrupted and unusable. Restoring a previous good version can fix the problem.
- Accidental formatting – Formatting or initializing a drive will wipe all its data. Restoring from a backup is key to recover files.
Backing up your data regularly is crucial to protect against file loss!
How to Restore Deleted Files on Mac from Time Machine Backup
One of the best and easiest ways to restore lost or deleted files on a Mac is by using Time Machine – Apple’s built-in backup software. Here are the steps to restore files from a Time Machine backup:
- Connect the external hard drive or NAS device storing your Time Machine backups.
- Open the Time Machine app on your Mac (search for it using Spotlight or find it in /Applications/Utilities).
- After Time Machine opens, you’ll see a timeline view of your Mac’s backups stored on the Time Machine drive. Navigate through the timeline to find the date when the file you want to retrieve was last backed up.
- Once you’ve navigated to the desired date, locate the missing file you want to restore. Select the file(s).
- Click the Restore button. This will restore the selected file(s) to its original folder location on your Mac.
Time Machine makes it really easy to recover and restore deleted, lost, or corrupted files from an earlier backup. Just be sure to maintain regular backups.
Time Machine Tips
Here are some useful Time Machine tips:
- Keep your Time Machine backups up to date and do not delete old backups so you have a wider window to restore files.
- Make sure Time Machine drive has sufficient storage capacity for backups.
- Use an external hard drive or NAS as your backup disk – do not use Time Machine with a primary internal drive.
- You can restore files to a different Mac if needed by connecting the Time Machine drive to that computer.
- Exclude system files and applications from Time Machine to save space since they can be reinstalled.
Following these best practices will ensure your Time Machine backups can protect your important files and allow you to easily restore them if needed.
How to Restore Previous Versions of a File on Mac
MacOS has a useful built-in feature called versioning that automatically saves multiple versions of a file over time. This allows you to restore a previous version of a file if you’ve made changes you want to undo or have accidentally overwritten it.
Here’s how versioning works and how to restore a previous file version on Mac:
- MacOS automatically saves versions of files you edit or create, storing them locally on your Mac.
- It saves hourly versions for the past 24 hours, daily versions for the past month, and weekly versions for the months before that.
- To view/restore a previous version, find the file in the Finder and select File > Get Info.
- In the Get Info window, expand the Version section.
- Browse through the different versions and preview them.
- Once you’ve found the version to restore, click the Restore button.
The older version will be restored and the current file will be saved as a separate version. Make sure to give the restored file a new name if needed to avoid confusion.
Versioning can help recover important file states in cases like:
- Accidentally overwriting a file
- Saving incorrect changes to a document
- Undesirable formatting changes were made
- Important info was deleted from the file
Just keep in mind versioning has limits – it only stores file history locally and hourly versions for the past day. So utilize it alongside backups like Time Machine.
Other File Versioning Tips
Some other useful file versioning tips:
- It works for documents, music, photos, movies, PDFs and more.
- You can disable versioning on certain volumes if needed.
- Versions do take up disk space, so keep an eye on capacity.
- Not all apps fully support versioning and autosaving.
- You can view/restore versions when booted to Recovery as well.
Overall, make use of MacOS’s built-in versioning feature alongside Time Machine backups to easily restore previous files when needed.
Using Data Recovery Software to Restore Deleted Files
If you’ve deleted important files and did not have active backups in place, data recovery software provides another option for getting those files back. Here’s an overview:
- Data recovery software scans your Mac’s hard drive and attempts to recover deleted files that have not been fully overwritten. Look for apps like Disk Drill, Stellar Data Recovery, EaseUS Data Recovery, etc.
- Most data recovery apps create a bootable installer drive you can boot your Mac from to scan the main drive. This avoids overwriting deleted files during the scan.
- The software will scan the selected drive and show files it finds that were marked as deleted and can likely be recovered.
- You then select the recoverable files you want and restore them to a different safe location – not the original drive you’re scanning.
- Be sure to use a separate drive to store recovered files to avoid overwriting the deleted data.
- Data recovery has no guarantees, but can often recover recently deleted files, unless storage space was overwritten.
Data recovery software takes patience but can sometimes bring back deleted files. Use it cautiously and do not save recovered data back to the same drive.
Tips for Using Data Recovery Software
Follow these tips when attempting to restore files via data recovery apps:
- Stop using the drive with deleted files to avoid further overwriting.
- Try creating a cloned image of the drive before scanning if possible.
- Use the bootable recovery drive option for best results.
- Select the most important files first when recovering data.
- Avoid restoring files back to the same drive you’re scanning.
- Be prepared to try more than one data recovery app if the first doesn’t find your files.
With patience and proper usage, data recovery software can sometimes salvage deleted files when all else fails. But preventing deletions via backups is much more reliable!
Restoring Files from iCloud Backups
If you utilize iCloud backups for your Mac, you may be able to restore deleted or lost files from the cloud. Here’s how iCloud restore works:
- Enable iCloud Drive on your Mac to store files and folders you select in iCloud.
- Files in iCloud Drive are stored in the cloud and synced across devices using your Apple ID.
- You can access iCloud Drive files from System Preferences app on your Mac.
- Deleted files are moved to the Recently Deleted folder, where they stay up to 40 days.
- You can restore deleted files and folders by finding them in Recently Deleted and clicking Recover.
- For full system restores, you can erase and reinstall macOS from Recovery mode and restore from an iCloud backup.
The benefits of iCloud backup include offsite protection, multi-device syncing and limited file versioning. But unlike Time Machine, it is not a full-fledged backup solution. Utilize both for comprehensive protection.
Tips for Using iCloud Restore
To effectively leverage iCloud for file restores, keep in mind:
- Use iCloud to supplement Time Machine, not replace it.
- Manually enable iCloud Drive for specific files/folders you want to backup.
- Monitor your iCloud storage usage as capacity is limited.
- Restore recently deleted files quickly before 40 days elapses.
- For system recovery, reinstall macOS from Recovery first.
- Have a second offline backup of critical files as iCloud relies on internet.
iCloud provides useful offsite file syncing and recovery capabilities. But utilize Time Machine as well for regular, versioned whole-system backups.
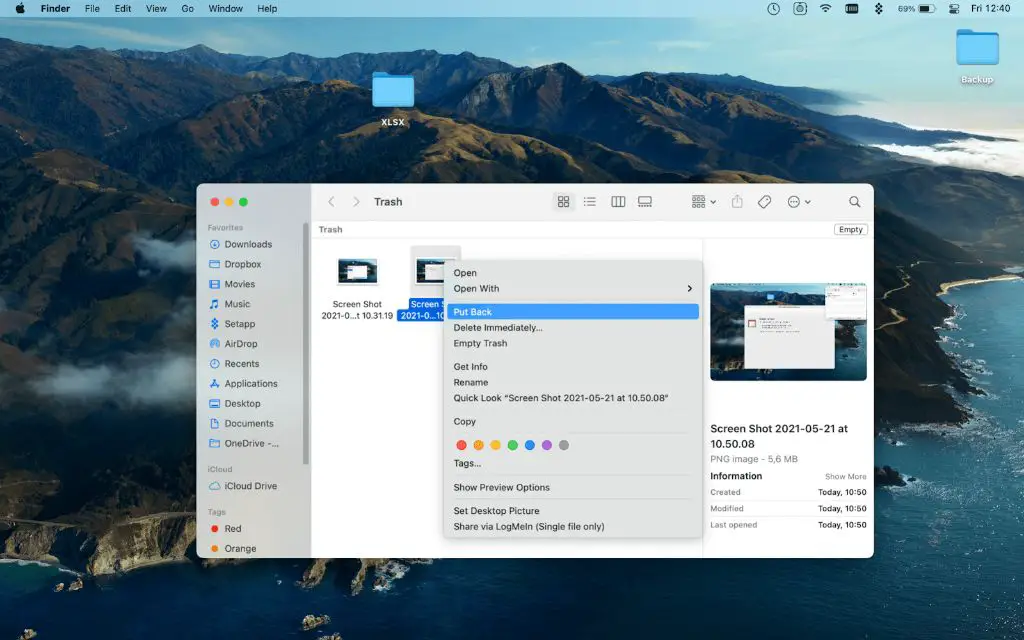
Restoring Files from the Trash on Mac
If you’ve accidentally deleted files on your Mac but haven’t emptied the Trash yet, you may be able to quickly restore them from there:
- Open the Trash folder on your Mac’s dock to view deleted files.
- Select the files/folders you want to restore.
- Right click and choose Put Back to move them back to original location.
- Alternatively, you can drag files directly out of Trash to restore.
- Emptying the Trash will permanently delete files, so act quick if you need to restore.
- Trash keeps files until manually emptied or automatic emptying after 30 days.
Restoring from the Trash can save recently deleted files, but relies on you getting to them before Trash is emptied. So don’t depend on it as your sole protection against data loss.
Other Trash Tips
Here are some other useful Trash tips:
- Files removed from external drives go to that drive’s Trash, not your main Trash.
- You can recover files from another user’s Trash on your Mac if needed.
- Trash doesn’t keep older versions of files – only the latest deleted state.
- You can quickly view Trash contents and size in Finder sidebar.
- To manually empty Trash, right click it and select Empty Trash.
- You can securely erase Trash contents by emptying it with Finder > Secure Empty Trash.
Trash provides a useful safety net against accidental deletions, but don’t rely on it as your sole backup. Use multiple layers of protection.
How to Determine Which File Restore Method to Use
With multiple file restore options on Mac, how do you know which method to use? Here are some guidelines:
- Time Machine – Use when you know approximate date of file loss and have intact Time Machine backups.
- File Versioning – Ideal for undoing recent changes to documents and reverting to earlier edits.
- Data Recovery Software – Use when you’ve lost unsaved data or lack backups. Results not guaranteed.
- iCloud Restore – Useful for files synced to iCloud Drive and recovering recently deleted files.
- Trash Restore – Recover accidentally deleted files quickly before Trash is emptied.
Also consider:
- For system-wide restores, use Time Machine.
- If files were lost due to drive issues, restore from backups.
- If you have backups, avoid less reliable recovery software.
Evaluate each restore method based on the specific situation to choose the optimal approach. Utilizing regular backups provides most reliable recovery.
| Restore Method | Use When… | Limitations |
|---|---|---|
| Time Machine | You have backup available from before data loss; System-wide restore needed | Requires existing backups; Slower for individual files |
| File Versioning | Need to revert document to earlier version or edits | Versions only go back 1 month; Only for recovering documents |
| Data Recovery Software | No backups available; Recently deleted files need recovery | Unreliable; Can’t recover overwritten data |
| iCloud Restore | Files synced to iCloud Drive need restoring | Only synced files are stored in cloud; Capacity limits |
| Trash Restore | recently deleted files still in Trash | Emptied Trash means permanent delete; No versions |
Best Practices to Keep Your Files Safe
While file restores can help recover lost data, prevention is the best approach. Here are some top tips to keep your files protected:
- Maintain regular Time Machine backups to an external drive for full system protection and easy restores.
- Store critical files in iCloud Drive for access across devices and limited versioning.
- Leverage MacOS’s built-in file versioning for quick document reverts and edits.
- Eject and safely disconnect external drives before disconnecting to avoid corruption.
- Enable encryption on your Mac and backup drives to protect against unauthorized access.
- Monitor disk health and replace aging drives before failures occur.
- Keep your Mac up to date with the latest OS and security updates.
No backup solution is perfect, which is why utilizing multiple layers of protection is key to securing your important files. Taking preventative measures will save you the headache of file recovery down the road.
Conclusion
While accidental file deletion or loss can happen to anyone, don’t panic! MacOS offers multiple effective file restore options including Time Machine, file versioning, cloud restores and data recovery tools. Make use of these options as well as backup best practices to ensure you can easily recover when disaster strikes. With a solid backup strategy in place, you can rest easy knowing your important files are protected.