Restoring the Macintosh HD can be necessary if your Mac is experiencing problems related to system files, settings, or data. A restore reformats the drive and installs a fresh copy of macOS and Apple apps. Your data, settings, and third party apps will be removed in the process.
What causes the need for a Macintosh HD restore?
There are several common scenarios that may require a full Macintosh HD restore:
- Your Mac is suffering from significant software issues or crashes that prevent it from starting up and working properly.
- You are unable to startup your Mac at all, even in Safe Mode.
- You want to wipe your Mac and reinstall macOS with a clean slate.
- Your drive is experiencing corruption or other disk errors.
- You forgot your account password and cannot reset or recover it through normal means.
In any of these situations, a full restore of the Macintosh HD will reinstall a fresh OS and erase existing data and settings that may be contributing to the issues.
Before restoring the Macintosh HD
Before embarking on a Macintosh HD restore, it’s important to:
- Backup any important data you want to keep. A full restore will wipe the drive.
- Make sure your Mac is compatible with the latest macOS version you want to install. Check Apple’s support site for details.
- Have your WiFi settings handy if you need to connect to the internet during setup.
- Clear sufficient time to complete the restore. It can take 1-2 hours in some cases.
- Have the macOS installer file ready on a USB or other external drive.
How to restore the Macintosh HD using macOS Recovery
The easiest way to restore the Macintosh HD is to use macOS Recovery, which allows you to reinstall the operating system without an external installer drive. Here are the steps:
- Fully shut down your Mac
- Restart your Mac and immediately press and hold Command + R keys on your keyboard.
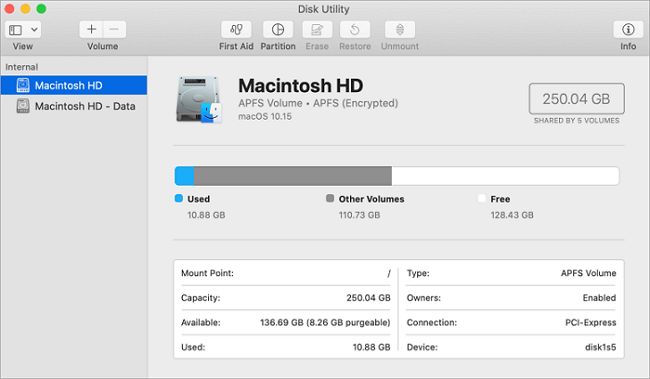
- Select “Disk Utility” from the macOS Utilities window.
- Click “Continue” if prompted to confirm Disk Utility launch.
- Select your Macintosh HD from the left sidebar.
- Click the “Erase” button near the top of the Disk Utility window.
- Give the drive a name (Macintosh HD is standard).
- Select “APFS” as the format.
- Click “Erase” to confirm.
- Quit Disk Utility once done erasing.
- Select “Reinstall macOS” from the macOS Utilities window.
- Follow the onscreen prompts to reinstall the latest macOS version compatible with your Mac.
The Mac will reboot to a fresh desktop once installation completes. You’ll need to go through the setup assistant and recreate your user account afterwards.
How to restore with an external macOS installer drive
If recovery mode is not working properly on your Mac, you can boot to an external drive containing the macOS installer instead. Here’s how:
- Use another Mac to download the macOS installer from the App Store based on your model’s requirements.
- Create a bootable installer drive with the downloaded installer. You’ll need a USB stick or external drive with at least 12GB of space.
- With the target Mac powered off, connect the installer drive.
- Boot the Mac and immediately hold the Option key after you hear the startup chime.
- Select the external installer drive when the boot manager loads.
- Open Disk Utility once booted to the installer.
- Select and erase the Macintosh HD drive.
- Quit Disk Utility.
- Run the macOS installer from the external drive.
- Follow prompts to install macOS on the freshly erased Macintosh HD volume.
The Mac will reboot from the Macintosh HD once installation finishes. You can then remove the external installer drive.
What to do after restoring the Macintosh HD
After a successful Macintosh HD restore, you’ll need to complete these steps:
- Go through the macOS setup assistant and recreate your admin account.
- Update macOS to the latest version via System Preferences.
- Reinstall third party apps from scratch.
- Restore data from backup.
- Adjust preferences and settings as needed.
With a new macOS system installed, your Mac should hopefully be back up and running normally again.
Alternative options
There are a couple other options that may help restore your Mac’s main drive if a full erase-and-reinstall is not ideal:
macOS recovery from Time Machine backup
If you have a Time Machine backup available, you can use macOS Recovery to restore the system from that backup instead of a fresh OS install. This preserves your data and settings.
Disk repair with First Aid
If you suspect drive corruption or file system damage is causing problems, try running First Aid from Disk Utility before wiping the drive. This may fix errors without an erase.
In-place OS reinstall
Some issues can be resolved by reinstalling macOS directly over your existing installation, preserving data. To try this, boot to Recovery, run Disk Utility, then choose “Reinstall macOS” from the utilities window.
Troubleshooting Macintosh HD restore problems
In some cases, you may encounter issues trying to restore the Macintosh HD. Here is how to troubleshoot the most common problems:
Mac gets stuck in Recovery Mode
If your Mac refuses to start up normally but also gets stuck trying to load Recovery, reset the NVRAM/PRAM by holding Command + Option + P + R during startup until you see the Apple logo a second time. Then try Recovery again.
Missing macOS installer drive
Without a functional Recovery partition or external installer drive, you cannot restore the Mac HD. Borrow a compatible Mac, download the installer from the App Store, and create a bootable USB installer drive.
Error creating macOS installer drive
Use Disk Utility to erase the USB drive before trying to make it a bootable installer. This removes any partitions or formatting errors. Then try creating the installer again.
Slow installer drive boot
Try plugging the installer drive into a USB 3.0 port directly on your Mac rather than through a hub. Also check the drive for corruption and reformat it if necessary.
macOS install fails halfway
Poor network conditions can disrupt downloads. Connect your Mac directly to a router via Ethernet if possible for a more reliable connection during installation.
Drive erase takes forever
Erase and format times for the Macintosh HD depend on its size and condition. SSDs are much faster than traditional hard drives. Be patient and let the process complete.
Lost data after restoring Macintosh HD
A Macintosh HD restore erases all data on the drive. Hopefully you backed up important files and folders before starting. If not, try data recovery software to retrieve deleted files after the restore.
Preventing Macintosh HD issues
Following best practices can help avoid Macintosh HD problems and the need for a full restore in the future:
- Keep macOS and apps updated
- Avoid questionable downloads or installs
- Don’t override security permissions
- Only install apps from trusted sources
- Manage drive storage wisely
- Back up regularly with Time Machine
- Monitor drive health with Disk Utility
- Run Disk Utility First Aid regularly
When to seek professional help
If you continue to experience Macintosh HD issues that prevent a restore or cause repeated system problems, it may be time to seek assistance from an Apple technician or computer repair shop. A hardware problem with the drive, logic board, cables, or other components may be at fault.
Conclusion
Restoring the Macintosh HD can revitalize a macOS system that is acting up, corrupted, or no longer boots properly. By erasing the drive and reinstalling macOS from Recovery or an external installer, you can fix many common problems. Just be sure to backup your data first and have some time set aside to complete the process. With a freshly restored Macintosh HD, your Mac should be ready to provide reliable performance once again.