What Happens When You Empty the Trash on a Mac
When you empty the Trash on your Mac, the files inside are not immediately and permanently deleted. Instead, macOS simply unlinks the files from the file system, which frees up the disk space they were taking up. The contents of the files remain on your hard drive until that space is needed for new data.
According to Apple Support, when you empty the Trash, macOS “marks the space previously used by the Trash items as available for new data.” (https://support.apple.com/guide/mac-help/mh35793/mac)
So emptying the Trash simply makes the space available to be overwritten. The actual contents of the deleted files remain intact but disjointed from the file system. They stay that way until new data saves in that location, overwriting the previously deleted data.
This means there is a window of opportunity to recover recently deleted files after emptying the Trash, before they get overwritten. But once the deleted data is overwritten by new data, the original files are generally unrecoverable.
When Deleted Files Can Still Be Recovered
When you empty the Trash on your Mac, the files are not immediately deleted from your hard drive. Instead, the space they occupied is marked as available and may be overwritten with new data over time. For the first few hours or days after emptying the Trash, it is often possible to recover deleted files using data recovery software.
According to Apple Discussions, if your Mac has not yet overwritten the data you want to recover, it can likely still be retrieved [1]. When a file is deleted, only the reference to it in the file system is removed. The actual data remains on the drive until it is overwritten by new data. This provides a window where file recovery software can scan the drive and restore deleted files.
Specialized Mac data recovery software like EaseUS Data Recovery Wizard can dig deep to find and restore deleted files even after you empty the Trash, as long as the original data clusters have not yet been overwritten. The sooner you run the recovery after deletion, the higher the chances of recovering your lost data. According to EaseUS, this type of recovery has a success rate of over 95% if done within 2 days of deletion [2].
Enabling Trash History on Mac
One handy feature built into macOS is Trash History, which stores deleted files in the Trash for 30 days by default before permanently deleting them (source: Apple Support). This provides a way to recover recently deleted files from the Trash without needing any additional software.
To enable Trash History on your Mac:
- Open Finder and click Finder > Preferences from the menu bar.
- Click the Advanced tab.
- Check the box next to “Show warning before emptying the Trash.”
- You can also adjust the “Remove items from the Trash after 30 days” setting as desired.
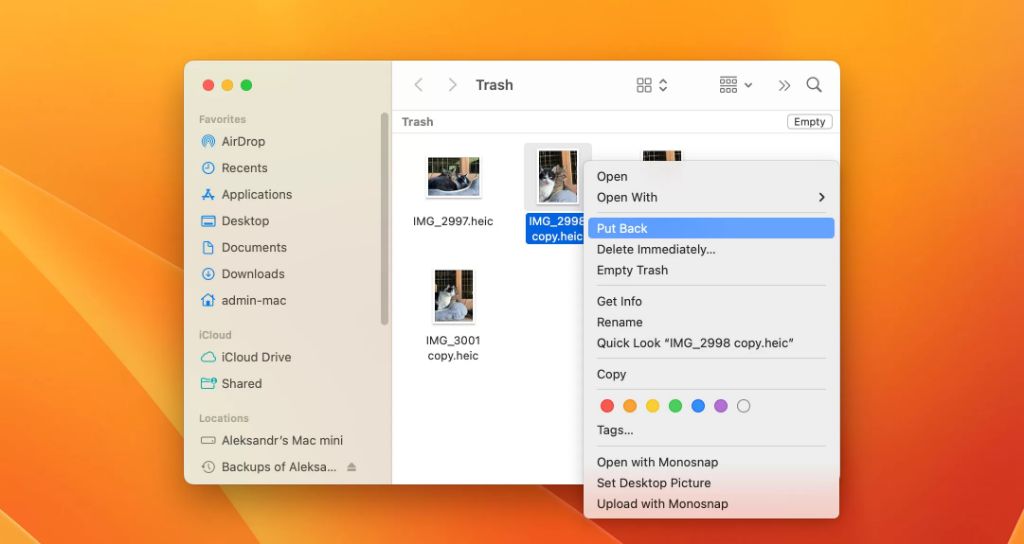
With Trash History enabled, you’ll have a 30 day window (or custom period) to recover files from the Trash before they are permanently deleted. This can save you from accidents like prematurely emptying the Trash. Just open the Trash, right click on a deleted file, and choose “Put Back” to restore it.
Recovering Deleted Files Using Time Machine
If you have Time Machine backups enabled on your Mac, you may be able to recover deleted files by going back to a previous backup snapshot taken before the Trash was emptied. Time Machine automatically creates backups of your Mac on an ongoing basis, allowing you to restore files and folders to a previous state.
To recover deleted files using Time Machine:Recover files using Time Machine and Spotlight on Mac – Apple Support
- Open Finder and click on Enter Time Machine in the menu bar
- Browse through timeline snapshots to find a backup taken before the files were deleted
- Navigate to the folder containing the deleted files and click Restore to copy them back to your Mac
With Time Machine, you can go back in time to when the files still existed before you emptied the Trash. This allows you to recover accidentally deleted files if you acted quickly enough to have a snapshot still containing them. Just navigate back and restore the files from the Time Machine backup.
Using Data Recovery Software
Data recovery software provides a way to scan your Mac’s hard drive and recover deleted files, even potentially after emptying the trash. These programs use advanced scanning algorithms to locate and restore deleted data that hasn’t yet been overwritten.
Some popular data recovery software options for Mac include Disk Drill, Stellar Data Recovery, EaseUS Data Recovery Wizard, and Wondershare Recoverit. Many of these programs offer both free trial versions with limited scanning capabilities, as well as paid versions with full functionality.
Data recovery software can often successfully recover files after the trash has been emptied, as long as the storage space hasn’t been overwritten with new data. However, for best results it’s important to avoid writing new files to the disk you want to recover deleted files from.
Overall, data recovery software provides a fairly easy way for average users to attempt to get back lost files, short of relying on professional data recovery services. Just be sure to act quickly after deletion and avoid overwriting storage space for best chances of file recovery.
Recovering from a Time Machine Backup
One way to restore deleted files on a Mac is by recovering them from a Time Machine backup. Time Machine is the built-in backup software in macOS that can periodically back up the contents of your Mac to an external hard drive or network location.
To recover deleted files using Time Machine:[1]
- Connect the external backup drive containing your Time Machine backups to your Mac.
- Open the Time Machine app on your Mac. You can find it in the Applications folder or using Spotlight search.
- Once in the Time Machine interface, you will see a timeline view of your backups. Navigate back in time to a state before the files were deleted.
- Locate the deleted files and folders and select them to restore. You can restore individual files and folders or the entire system state.
- Time Machine will restore the files to their original location.
With Time Machine’s versioning, you can easily recover previous versions of files that may have been accidentally deleted or modified. Just be sure to maintain regular backups.
[1] https://support.apple.com/guide/mac-help/restore-files-mh11422/mac
Preventing Accidental Deletion
There are a few ways to help prevent accidentally deleting important files and folders on your Mac:
Enable Trash History – Starting with macOS 10.12 Sierra, you can enable Trash history which will save deleted files in the Trash for up to 30 days before emptying [1]. To enable, open the Terminal app and run: defaults write com.apple.finder FXEnableTrashHistory -bool YES
Use Time Machine Backups – Time Machine can help recover deleted files if you have backups enabled [2]. Make sure Time Machine is set up to regularly back up your important files.
Extra Confirmation Before Emptying Trash – You can enable an extra confirmation dialog before emptying the Trash by opening the Terminal app and running: defaults write com.apple.finder WarnOnEmpty -bool YES. This adds an extra step to help prevent accidentally emptying the Trash.
When Deleted Files Are Unrecoverable
In some cases, deleted files can become completely unrecoverable on a Mac:
- After being overwritten by new data: When new files are written to the same sectors on a hard drive, they can overwrite deleted files making them unrecoverable. This occurs naturally over time as a drive fills up (source).
- After SSD wear leveling: SSDs use wear leveling to distribute writes across all cells evenly. This can result in deleted files being overwritten in the process, making them unrecoverable (source).
- If no backup available: If a file is deleted and no Time Machine or other backup exists, recovery may be impossible if the deleted file has been partially or fully overwritten.
The only way to reliably prevent deleted files from being recovered is to intentionally overwrite the storage media using a secure delete tool designed for this purpose. Options include using the Secure Empty Trash option in Finder or using a third party secure erasure tool (source). This overwrites all deleted files making recovery essentially impossible.
Securely Deleting Files
When you delete sensitive files, like financial records or personal information, you’ll want to make sure they can’t be recovered. Simply dragging files to the Trash and emptying it is not sufficient for permanent deletion. Here are some methods to securely delete files on Mac:
Use the sdelete command in Terminal – Apple recommends using the sdelete command in Terminal to overwrite files multiple times before deleting them. This prevents forensic recovery of the data.
Use file shredding software – Tools like Eraser for Mac can completely overwrite files before deletion, meeting Department of Defense standards for preventing recovery of deleted data.
By taking these extra steps to securely delete sensitive files, you can ensure the files are unrecoverable through standard means and avoid potentially compromising private data.
Summary
In summary, files deleted from the Trash on a Mac can often still be recovered, if you have enabled certain backup systems or recovery features ahead of time. The key is enabling and using Apple’s built-in Time Machine backup software or a third party data recovery program before the deleted files are overwritten with new data.
To maximize the chances of recovering deleted files, enable Trash history so deleted files are stored for 30 days in the Trash folder. Also be sure to maintain regular backups with Time Machine. With these precautions in place, you can recover deleted files by restoring from a Time Machine backup, or using data recovery software to scan the Mac’s hard drive and recover deleted files that have not yet been overwritten.
When it comes to prevention, avoiding accidental deletions comes down to being careful and selective when moving files to the Trash. It’s also wise to maintain backups as mentioned, as this provides a safety net if something important does get deleted accidentally.
In cases where a file is securely deleted or the space has already been overwritten, total recovery becomes impossible. Therefore it’s crucial to act quickly using the methods outlined here when needing to restore from an accidental Trash emptying on a Mac.
