Why You Might Want To Remove Your SSD
There are a few common reasons why you may need to remove the SSD from your laptop:
- Upgrading to a Larger SSD – As SSD prices continue to fall, upgrading to a larger SSD is an affordable way to increase your laptop’s storage capacity. According to recent statistics, the number of SSDs in use continues to grow rapidly. In 2022, SSDs accounted for 45.94% of storage drives, almost double that of HDDs at 26.62% (1). With more space for files, games, photos and videos, a larger SSD can keep your laptop running smoothly.
- Replacing a Failed or Dying SSD – While SSDs are generally reliable, they can still fail unexpectedly. If your SSD is exhibiting issues like dramatically slower speeds, failed boots, or disappearing files, it likely needs to be replaced. Carefully removing the old SSD allows you to install a new replacement drive.
- Recycling or Selling the Laptop – When preparing to recycle, donate or sell your laptop, you’ll want to remove any personal SSDs to wipe and keep for future use or resale value.
(1) https://www.tomshardware.com/news/ssd-and-hdd-statistics-from-easeus
Precautions To Take
When handling computer components like SSDs, it’s important to take precautions against static electricity discharge which can damage sensitive electronics. Make sure to discharge any built-up static by touching a metal grounded surface before handling the SSD.
Work on an anti-static mat if possible to dissipate any static charge while handling the SSD. Anti-static mats have a conductive layer that safely grounds static charges.
When disconnecting and reconnecting the SSD inside the laptop, avoid using excessive force and handle the connections gently. Don’t bend or twist the SSD and make sure connections are properly aligned before attempting to insert them.
According to [1](_The ultimate guide to proper SSD management_), “Avoid static discharge by using an anti-static wrist strap and mat.” [2](_Top 7 Tips to Get the Most from your SSDs_) also recommends to “Use proper ESD (electrostatic discharge) handling procedures like anti-static bags and mats when working with bare drives.”
Back Up Your Data
Before attempting to remove or replace your SSD, it is critical that you back up your important files and data. Backing up data involves making copies of files and storing them elsewhere so they can be restored if needed (What Is Backup and Recovery? – Why It’s Important, https://www.netapp.com/cyber-resilience/data-protection/data-backup-recovery/what-is-backup-recovery/).
There are two main options for backing up your data before working on your laptop:
- Copy files to an external hard drive or SSD. This creates a physical backup you can store safely while working on your laptop.
- Use cloud storage services like Dropbox, Google Drive, or iCloud. Sync your files to cloud storage for offsite backup access.
The key is to make sure your important personal files, documents, photos, and other data are duplicated and accessible outside your laptop before attempting any hardware changes. A complete backup protects you from data loss in case anything goes wrong during the SSD replacement process.
Power Down Properly
Before physically removing the SSD from the laptop, it is crucial to properly shut down the operating system. Simply putting the laptop into sleep or hibernate mode is not sufficient. The SSD needs to be fully powered off to avoid any potential data corruption or damage.
On Windows machines, go to the Start menu and select “Shut Down” to fully power off the system. Allow the shutdown process to complete fully until the laptop powers off. Forcefully holding down the power button to abruptly power off should be avoided, as this does not give the OS enough time to shut down properly (Source).
For Macs, go to the Apple menu and select “Shut Down.” Allow the system to power down completely until the display goes black. Do not simply put the Mac into sleep mode or close the lid (Source).
Following proper OS shutdown procedures before removing an SSD avoids any potential data corruption or damage to the drive itself. It also allows the system to write any cached data to the disk before powering off.
Open the Laptop Case
Before attempting to remove the SSD, you will need to open up the laptop case to access the internal components. It’s important to be very gentle when opening up a laptop to avoid accidentally damaging any parts. Refer to the hardware manual for your specific laptop model, which should provide details on how to properly open the case. Oftentimes, you’ll need to remove screws from the bottom panel or sides of the laptop in order to take off the bottom case cover. Use a Phillips-head screwdriver to remove any screws, making sure to keep track of their locations so you can easily reassemble later. Only remove as many screws as needed to take off the bottom panel. Once the screws are removed, you should be able to gently pry off the bottom case cover to expose the laptop’s internal layout.
As you open the laptop, be extremely careful not to tug or bend any cables inside. It’s a good idea to have a magnetic Phillips-head screwdriver, which will prevent dropped screws inside the laptop. You may also want to place down an anti-static mat before beginning. Refer to your hardware manual for the exact steps needed to remove the bottom panel of your specific laptop model.
Locate the SSD
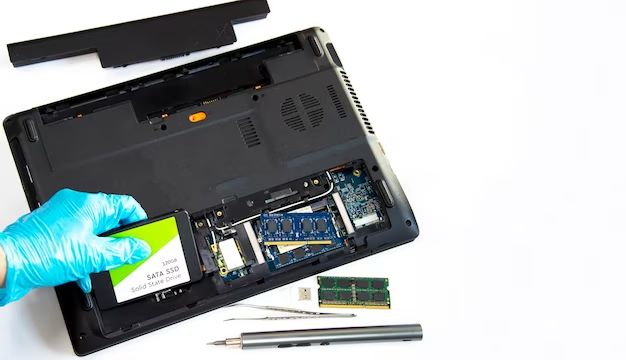
The first step in removing your SSD is identifying its form factor and location within your laptop. Most laptop SSDs come in either the 2.5″ or M.2 form factor. 2.5″ drives are rectangular in shape and plug into the SATA interface, while M.2 drives are smaller and stick directly into the motherboard [Types of SSD Form Factors](https://www.kingston.com/en/blog/pc-performance/ssd-form-factors). Locate your SSD within the laptop chassis and take note of whether it is a 2.5″ or M.2 drive. Also identify where it is connected to the motherboard or SATA interface.
Before attempting to remove the SSD, be sure to unplug any cables connected to it. This usually includes the SATA data cable for 2.5″ drives or the small connector cable for M.2 drives. Gently unplug the cable from the SSD port to disconnect it.
Remove Mounting Screw(s)
SSDs are often secured in laptops via a single screw or a plastic mounting stick. Locate the screw or mounting stick that is holding the SSD in place. This is usually near the SATA connector or along one side of the SSD. Use a Phillips head screwdriver to remove the screw if present. Gently pull out the plastic mounting stick if being used instead of a screw. Be very careful not to damage the stick as you will need to reinsert it later. Removing the screw or stick should free up one side of the SSD.[1]
Some laptops, especially gaming models, utilize mounting brackets that require removing multiple screws to release the SSD. Consult your laptop’s manual to locate all mounting points. Remove each screw slowly and carefully. Keep track of each screw and store them safely for reinstallation. Taking your time helps avoid stripping the threads or dropping and losing any small mounting screws.
[2]Gently Remove SSD
When removing the SSD, be very gentle and do not force it. The SSD likely slides into a slot or is held in place by a small bracket. Carefully slide it out evenly without rocking it back and forth. You don’t want to bend or break the pins by forcing the SSD out quickly. According to Diskpart, gently hold the body of the SSD and slowly pull it straight outward. Keep the SSD level as you slide it out, being cautious not to bend the connector pins. Once it’s fully out, set it aside safely.
Be patient and take your time removing the SSD. There’s no need to rush. Pulling too hard can damage the drive, slot, or connector pins. Take a close look to understand how the SSD is seated before attempting removal. Refer to your laptop’s manual for specific instructions if needed. With care and gentleness, you can successfully remove the SSD without any issues.
Install the Replacement
Once the old SSD is removed, you can install the replacement SSD. First, align the SSD properly in the bay, ensuring the SSD slots or connectors match up correctly. Consult your laptop’s manual for specifics on aligning the SSD. Many SSDs have notches or asymmetric shapes to help guide proper orientation. Take care not to force the SSD into place if it doesn’t align smoothly.
Next, reattach any mounting screws that were removed earlier. These help secure the SSD firmly in place. Apply gentle and even pressure when tightening the screws – overtightening can damage the SSD or mounting brackets. Consult your laptop’s manual for the recommended tightening torque if specified. See Crucial’s guide for more details on proper SSD installation and alignment: https://www.crucial.com/articles/about-ssd/how-to-install-solid-state-drive
With the replacement SSD installed securely, you can proceed to reassembling the laptop. Take care when closing up the casing that no cables or components are pinched or crimped.
Reassemble Laptop
After installing the replacement SSD, it’s time to reassemble the laptop. This is done by reversing the disassembly steps.
First, replace all the cables and connectors that were removed, being careful to connect them in the proper orientation. Push cables back into their slots and channels.https://www.crucial.com/articles/pc-builders/disassemble-and-rebuild-a-laptop
Next, replace any internal brackets or mounting hardware that secures components like the cooling system or motherboard.https://www.easeus.com/partition-manager-software/how-to-build-a-laptop.html Carefully reseat these components in their proper positions.
Replace all screws and covers in the reverse order they were removed. This includes screw covers, access panels, the bottom case, hinge covers, and so on. Tighten screws firmly but carefully to avoid stripping.
Take care to properly realign components like display hinges and panels. Make sure no cables or wires are pinched or crimped when replacing covers and closing up the laptop.
With all components secured and cables connected, the laptop can be powered back on to test that the new SSD is detected and working properly before reattaching all outer panels.