Securely erasing the free space on your Mac’s hard drive helps ensure that deleted files and sensitive data cannot be recovered by someone else accessing your computer. When files are deleted on a Mac, the space they previously occupied is marked as “free space” but the actual data is not immediately erased. This free space will be overwritten with new data over time as new files are saved, but until it is overwritten, forensic software could potentially recover deleted files.
Securely erasing the free space overwrites the free space with random data, making it much more difficult for deleted files to be recovered. This is especially important before selling, gifting or disposing of an old Mac, as well as for Macs that contain highly sensitive information. OS X includes tools like Disk Utility and Terminal commands that can be used to securely erase free space, protecting your privacy.
Determine If You Need To Secure Erase
Securely erasing free space is often unnecessary for new solid state drives (SSDs) or after freshly installing a new operating system. This is because new SSDs automatically erase deleted blocks and fresh OS installs have minimal sensitive data to begin with.
According to discussions on the Apple Support Communities forum, secure erasing is not needed for SSDs using the TRIM command, as TRIM automatically erases deleted blocks in the background.
Likewise, if you just performed a fresh OS install and have not stored any private files yet, secure erasing may be unnecessary since there is minimal sensitive data present. However, if your SSD or OS has been used extensively, secure erase can help remove trace data from disk blocks that were previously used.
In general, you may want to consider secure erasing free space if you plan on selling, gifting or disposing of your Mac, or if you have stored highly confidential data that you want to permanently remove.
Back Up Your Data
Before erasing or reformatting your hard drive, it is extremely important to back up your data. Erasing will permanently delete all files and make them unrecoverable, so you want to ensure your files are safely saved elsewhere first.
To back up your Mac, you have a few options:
- Use Time Machine to create a full system backup. This will save all your files, applications, settings, and documents.
- Manually drag and drop important folders and files to an external hard drive or cloud storage.
- Use a dedicated backup app like Carbon Copy Cloner to clone your entire hard drive.
Ideally, you should have a complete Time Machine backup as well as a clone of your startup disk before proceeding. This gives you multiple copies of your data in case something goes wrong during the erase process.
Remember – once you erase the hard drive, there is no going back. So carefully verify your backups are complete and valid before erasing. Losing data due to inadequate backups can be devastating.
Use Disk Utility
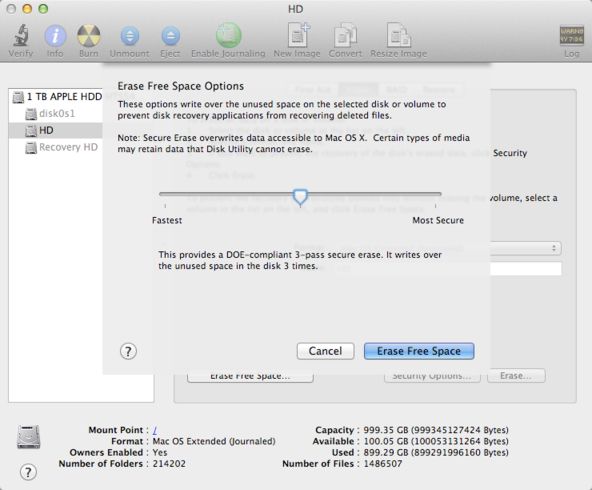
One of the easiest ways to securely erase free space on a Mac is by using the built-in Disk Utility application. Disk Utility includes an “Erase Free Space” feature specifically designed for this purpose. To use it:
- Open Disk Utility (located in Applications > Utilities)
- Select the disk you want to erase free space on from the sidebar
- Click the Erase tab
- Select the “Erase Free Space” option
This will securely overwrite all free space on the selected disk with zeros, meeting the US DoD 5220.22-M standards for securely erasing data. The process may take a while depending on how much free space is on the disk.
An advantage of using Disk Utility is that it’s built-in and easy to access for any Mac user. However, it can only erase free space on the whole disk – you cannot target specific volumes or partitions. It also may not be the most secure erase method available.
For a source on using Disk Utility’s Erase Free Space feature, see “Erasing Free Space on Hard Drives in Mac OS X” from CSULB University.
Use Third Party Tools
There are a number of third party tools available that can securely erase free space on a Mac. Some popular options include:
Eraser – Eraser is a free and open source tool that allows you to completely wipe drives, partitions, or just free space. It uses a variety of secure deletion methods to overwrite data.
Permanent Eraser – Permanent Eraser is a paid tool that can permanently erase files, folders, or wipe free space. It supports a wide range of secure erase methods and standards.
Third party tools like Eraser and Permanent Eraser are useful because they give you more flexibility and options for securely erasing. They support erasing free space specifically, allow choosing from different secure erase standards, and provide reporting/certification when wiping is complete.
The downside is you have to download and install another utility rather than using the built-in macOS tools. However, for the most comprehensive and verifiable secure erase of free space, third party tools are recommended.
Use Terminal
The terminal provides the most secure and customizable options for erasing free space on a Mac. You can use terminal commands like srm and dd to target and overwrite free space.
The srm command (secure rm) is designed to repeatedly overwrite files or disk space until recovery is impossible. To use srm to overwrite free space, run a command like srm -vfz /Volumes/MyVolume. The -v flag enables verbose status output, -f forces overwrite, and -z zeroes the data after overwriting. This will securely erase all free space on the volume MyVolume.
The dd command can also be used to write zeroes or random data to disk areas. A command like dd if=/dev/zero of=/Volumes/MyVolume/tempfile bs=1M will write zeros to fill up free space. The if specifies the input file (zeros), of is the output location, and bs controls the block size. Once done, simply delete the tempfile to free up the overwritten space.
For more details on using terminal commands like srm and dd to securely erase free space on a Mac, check out this guide from Macworld.
Overwrite Free Space
One way to securely erase free space on your Mac is to overwrite it with dummy files filled with random data. This overwrites any existing deleted files and makes recovery difficult to impossible. Here are the steps:
1. Open the Terminal app on your Mac. Terminal can be found in the Utilities folder in your Applications.
2. Type the following command and press Enter:
sudo dd if=/dev/urandom of=fillfile bs=1M
This will start writing a file called fillfile to your free space filled with random data. Adjust the “bs” value to increase or decrease the size of the dummy file written.
3. To stop the process, hit Control-C. The fillfile will be deleted but the random data is now written over your free space.
You can repeat this as needed to overwrite more free space. Just make sure you have adequate free disk space for the fill file size you specify.
This is an effective technique to thwart recovery of deleted files, as it overwrites their data clusters on disk (References: https://csulb.teamdynamix.com/TDClient/KB/ArticleDet?ID=58444, https://www.groovypost.com/howto/securely-wipe-free-space-mac/).
Encrypt Before Erasing
One alternative to securely erasing free space is to encrypt your disk before performing a standard erase. Encrypting your disk encrypts all the data stored on it, including any deleted files in free space. When you then erase the disk, the encrypted free space will be wiped as well.
The benefits of encrypting before erasing include:
- Encryption protects all your data if your device is lost or stolen before erasing.
- An encrypted disk can be erased quickly with a standard erase, without needing to completely overwrite free space.
- The encryption keys are destroyed when you erase the disk, ensuring deleted data cannot be recovered.
- Full disk encryption like FileVault is built-in to macOS, making this method simple and convenient.
One downside is that encryption can take hours or days to complete depending on your disk size and type. But for maximum security, enabling encryption prior to erasing ensures all existing data on your disk stays protected.
Consider Physical Destruction
For extremely sensitive data where secure erasure is not sufficient, physically destroying the hard drive can provide total assurance that the data is unrecoverable. There are a few ways to physically destroy a hard drive:
Shredding: Using an industrial shredder to shred the hard drive platters into small fragments is an effective destruction method. Professional shredding services like Shred-It offer hard drive shredding services.
Drilling: Using a drill to put holes through the hard drive platters will damage the disks enough to make data unrecoverable. It’s important to drill through multiple locations on each platter.
Crushing/smashing: Using a hammer or hydraulic press to smash the hard drive can render platters unusable. However, crushing may not destroy all data so drilling or shredding is more secure.
Incineration/melting: Exposing the hard drive to extreme heat from melting or incineration will destroy the physical drive components. Professional disposal services can incinerate drives safely and effectively.
Degaussing: Using strong magnets or degaussers to disrupt and erase data stored on the hard drive platters can also physically destroy data, rendering it unrecoverable.
For maximum assurance of data destruction, physical destruction is the most reliable method. However, it requires proper safety precautions and appropriate equipment to execute correctly.
Safely Dispose of Old Drives
One of the most important steps when secure erasing free space is safely disposing of the old drives once done. This prevents the drives from falling into the wrong hands where data could potentially be recovered.
Some recommendations for securely disposing of old drives include:
- Using a drive shredder or degausser – These devices are designed to completely destroy old hard drives by shredding or demagnetizing them. This renders any data unrecoverable. Many computer recyclers offer this service.
- Physically destroying the drive – Opening up the drive enclosure and removing the platter, then scratching or hammering the platter will make data unrecoverable. Wear protective equipment when doing this.
- Recycling drives through an e-waste facility – Many local e-waste recycling centers will securely wipe and dispose of old drives. This is often the easiest method for consumers.
No matter which method you choose, it’s crucial to make sure drives are completely destroyed. Simply deleting data or reformatting is not enough, as data can potentially still be recovered. Take the extra step to completely destroy drives to ensure data security.
