A boot drive is the drive or disk that your computer loads its operating system (OS) from when booting up. Selecting the proper boot drive in your BIOS settings ensures that your computer boots from the correct drive containing your desired OS installation.
Setting the boot drive priority is especially important when you have multiple drives installed, like a hard disk drive (HDD) and solid state drive (SSD), or multiple OS installations across different drives. The BIOS boot sequence determines which drive the motherboard checks first for an OS bootloader file.
If the incorrect boot drive is set, your computer may fail to boot properly or load into an unintended OS. Therefore, it is critical to know how to select your preferred boot drive in BIOS when configuring a new drive setup or dual booting operating systems.
Accessing BIOS on a Gigabyte Motherboard
To access the BIOS setup utility on a Gigabyte motherboard, you need to press the Delete key during the POST (Power-On Self-Test) process.
When you first turn on your computer, the Gigabyte logo will appear on the screen. At this point, you need to repeatedly tap the Delete key until the BIOS setup screen loads. The Delete key is typically the designated key for entering BIOS on Gigabyte boards.
If you miss the timing and the OS begins booting up, simply restart your computer and try again. You may also need to try F2, F10, or F12 if Delete does not work.
Once in the BIOS, you will see the various BIOS menus and options. The steps below will guide you through selecting the boot drive.
Navigating to Boot Menu
To navigate to the boot menu in Gigabyte BIOS, you first need to access the BIOS settings screen. This can be done by pressing the Delete key during the system startup, before Windows begins to load (see source).
Once you are in the BIOS settings screen, you need to go to the Boot tab. Use the arrow keys to highlight the Boot tab and press Enter. This will open the Boot menu.
In the Boot menu, you will see options for setting the boot mode (UEFI or legacy BIOS) and configuring the boot priorities. The boot priorities allow you to specify the order in which devices will be checked for a bootable operating system image.
By navigating to the Boot menu in BIOS, you can control how the system boots and prioritize your preferred boot device, such as a hard drive, SSD or USB drive.
Selecting Boot Mode
On a Gigabyte motherboard, you’ll need to select between UEFI and Legacy boot modes in the BIOS. UEFI (Unified Extensible Firmware Interface) is a modern boot standard that replaced the legacy BIOS. Legacy mode uses the traditional BIOS and is required for booting older operating systems.
To select the boot mode in a Gigabyte BIOS:
- Press Delete on startup to enter the BIOS.
- Go to the Boot tab.
- Set CSM Support to Enabled for Legacy mode or Disabled for UEFI mode.
- Save changes and exit the BIOS.
UEFI mode is recommended for newer Windows 10/11 installations as it offers faster boot times and advanced features like Secure Boot. However, Legacy BIOS may be required for older operating systems or certain boot configurations. Refer to your OS and hardware documentation to determine the appropriate boot mode.
For more details, see Gigabyte’s guide on CSM/UEFI dual boot.
Setting Boot Priorities
You can set the boot priority order in the BIOS to determine the sequence in which the motherboard checks for a bootable device at startup. This allows you to choose which device you want the system to boot from first.
To set boot priorities in a Gigabyte motherboard:
- Go to the Boot tab in the BIOS.
- Select “Boot Option Priorities” and press Enter.
- A list of bootable devices connected to the system will be displayed. Devices include the hard drive, USB drives, CD/DVD drives, and network devices.
- Use the + and – keys to move devices up or down in priority order. Devices at the top will be checked first for a bootable OS.
- Once the devices are in the desired priority order, press F10 to save and exit the BIOS.
For example, to boot from a USB drive first, move the USB drive to the top of the boot priorities list. The motherboard will check the USB drive before the hard drive or any other devices when booting up.
Setting proper boot priorities ensures that the system boots from the correct drive and avoids issues like booting into the wrong OS installation. It’s recommended to set the hard drive with your main OS install as top priority for general usage.
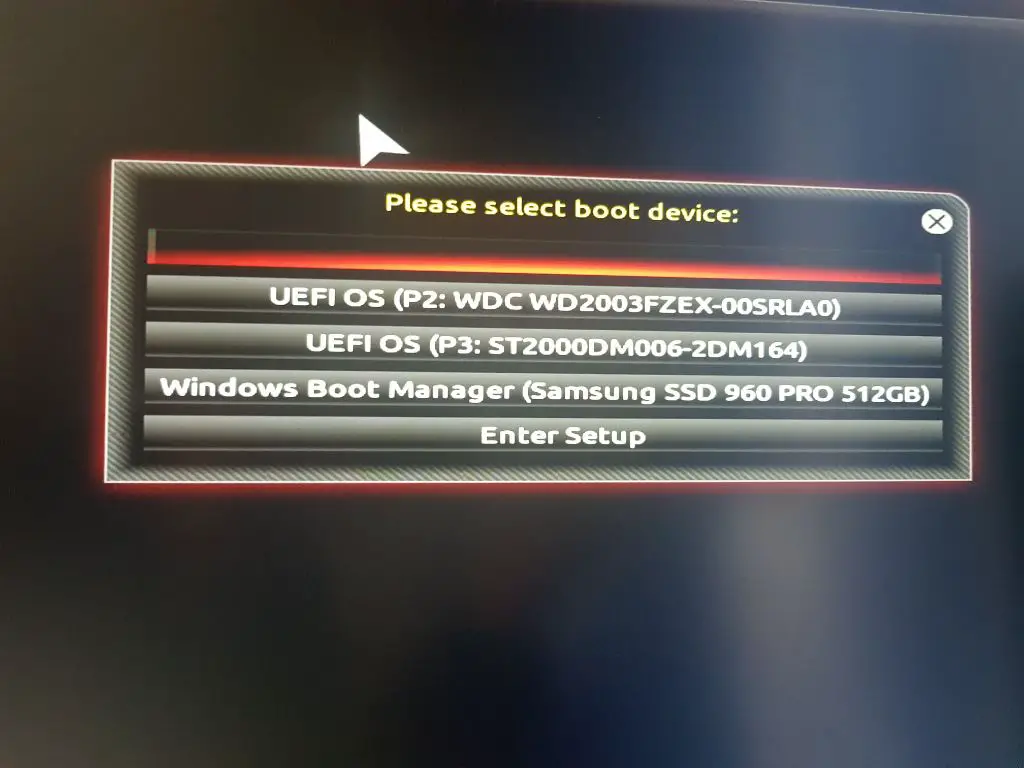
Selecting a Boot Device
To select a specific drive to boot from in Gigabyte’s BIOS, you first need to access the Boot menu. This can be done by pressing the Delete key during system startup to enter the BIOS settings. Once in the BIOS, use the arrow keys to navigate to the Boot tab.
Under the Boot Option Priorities section, you will see a list of available boot devices connected to the motherboard. These can include hard drives, USB drives, CD/DVD drives, and network boot options. Use the arrow keys to highlight the device you want to set as the primary boot drive, then press Enter.
This will move the selected boot device to the top of the priorities list. The system will attempt to boot from that device first when restarting. You can repeat this process to arrange multiple boot devices in your preferred order.
After setting the boot order, press F10 to save changes and exit the BIOS. The system will restart and attempt booting from the drive you selected. Make sure the drive contains a valid operating system or bootable media. If it does not boot, enter the BIOS again to verify the boot priorities are set correctly.
Refer to your Gigabyte motherboard manual for more details on navigating the UEFI BIOS and configuring boot options. The process may vary slightly between different Gigabyte models.
Saving Changes and Exiting
After making any changes to your BIOS settings, it is crucial to properly save the changes before exiting the BIOS. Here are the steps to save changes and exit the BIOS on a Gigabyte motherboard:
1. Navigate to the “Save & Exit” tab in the BIOS menu. This can typically be found on the far right of the top menu bar.
2. Select “Save Changes and Reset” to save any changes made and exit the BIOS. You can also choose “Discard Changes and Reset” to exit without saving.
3. A confirmation prompt will appear. Select “Yes” to confirm saving changes and resetting the system.
4. The system will restart and boot normally, applying any BIOS changes that were saved.
Some key things to note when exiting the BIOS:
- Always save changes before exiting to ensure your BIOS configuration is updated.
- If your changes fail to save, your previous settings will remain active.
- Saving changes may require confirming a second time when prompted during reboot.
Properly exiting the BIOS menu will apply your settings and allow booting into Windows or your operating system as normal. Refer to your motherboard manual if you have any difficulties saving and exiting the BIOS.
Sources:
https://download.gigabyte.com/FileList/Manual/server_system_bios_manual_cavium_10.pdf?v=dbed8c078623dfe04330f0822decbe53
Verifying Boot Drive
After making changes to the boot order in the BIOS, it’s important to verify that the correct drive is set as the first boot option. There are a couple ways to check the boot order outside of the BIOS:
In Windows 10 and 11, you can view the boot order by going to Settings > Update & Security > Recovery and clicking ‘Restart Now’ under Advanced startup. On the next screen, choose ‘Troubleshoot’ > ‘Advanced options’ > ‘UEFI Firmware Settings’ to enter the BIOS. The drives will be shown in their current boot order.
You can also check the boot order from the command prompt. Open an elevated command prompt and run ‘bcdedit /enum {bootmgr}’ to see the identifiers for each boot entry. The identifiers listed first will boot earlier in the sequence.
Finally, when your PC first turns on, it may briefly display the boot order on the splash screen. Look for which drive is listed first to verify your changes were saved correctly in the BIOS.https://www.lifewire.com/change-the-boot-order-in-bios-2624528
Troubleshooting Issues
If you are unable to select your desired boot drive in the BIOS, here are some troubleshooting steps to try:
Make sure your boot drive is properly connected to the motherboard. Verify the SATA cable connections or that the M.2 drive is fully seated in the slot.
Try resetting the BIOS to default settings by clearing the CMOS. There may be a jumper on the motherboard to short or a button to press. Refer to your motherboard manual for instructions.
If the BIOS is not detecting your boot drive at all, make sure it is getting power and double check the connections. Try connecting it to a different SATA port on the motherboard if possible.
Update to the latest BIOS version for your motherboard. Newer versions may contain fixes for drive detection issues.
If you have multiple drives installed, make sure the one you want to boot from is listed first in the boot order settings in the BIOS.
As a last resort, you may need to reinstall Windows from scratch if the drive is not being detected properly during the boot sequence.
If you continue to have issues selecting your boot drive in the BIOS, contact Gigabyte technical support for further assistance.
Conclusion
In summary, selecting the boot drive in Gigabyte BIOS involves a few key steps:
First, access the BIOS menu on startup by pressing the designated key, such as Delete or F2. Navigate to the Boot menu and select the desired boot mode – Legacy or UEFI. You can then prioritize boot devices with the Boot Priority Order or Boot Option Priorities menu.
To select a specific boot drive, choose the drive from the list of available boot options. Make sure to save changes before exiting the BIOS. You can verify the selected boot drive on the next startup.
If unable to boot from the selected drive, troubleshooting may involve resetting BIOS to default settings, ensuring the drive is properly connected, or trying a different boot mode. With the proper boot device selected in BIOS, the system should successfully boot as expected.
Selecting the boot drive is a critical BIOS setting that ensures the system boots from the intended drive. Carefully navigating the BIOS menus and configuring the boot order allows you to control the drive that loads the operating system at startup.