What is Safe Mode?
Safe Mode is a diagnostic startup mode for Windows operating systems. When Windows starts in Safe Mode, it loads only the bare essential drivers and services required to run Windows. As Techopedia explains, “Safe mode is a boot option in which the operating system starts in diagnostic mode rather than in normal operating mode. It is used primarily for troubleshooting purposes” (https://www.techopedia.com/definition/3425/safe-mode).
Safe Mode provides a clean environment to troubleshoot problems without other programs and processes interfering. It can be useful for uninstalling problematic software, diagnosing hardware or driver issues, cleaning malware infections, or resolving system errors that prevent normal startup. By loading only critical components, Safe Mode simplifies troubleshooting by isolating potential issues.
Overall, Safe Mode is an essential Windows diagnostic tool that allows users to boot up their computer with limited functionality to fix critical system problems. It provides a stripped-down, minimal environment optimized for troubleshooting.
When to Use Safe Mode on Windows 10
Safe Mode can be useful in several situations where normal Windows startup is problematic (Computer.HowStuffWorks, 2022):
- Removing malware, viruses or spyware that may be interfering with normal operation.
- Troubleshooting issues caused by faulty drivers or incompatible drivers.
- Diagnosing potential software conflicts if you recently installed a program.
- Recovering from serious errors or boot issues that prevent Windows from starting normally.
- Testing whether issues are caused by third-party startup programs by eliminating them.
- Accessing and backing up data after an operating system crash or boot failure.
- Performing system restore and reverting to a previous restore point.
- Resetting graphics, display settings or screen resolution.
- Uninstalling problematic Windows Updates.
Safe Mode loads only the bare essential drivers and services, so it can be used to isolate issues caused by third party software or drivers (Microsoft, 2022).
Requirements for Entering Safe Mode
There are a few key requirements in order to enter Safe Mode on a Windows 10 computer:
– You must be using a computer with Windows 10 installed. Safe Mode is a feature specific to Windows 10 and will not work on earlier versions of Windows.
– The computer must be able to successfully boot into Windows 10. If the computer cannot boot properly into Windows 10 normally, you will not be able to access Safe Mode.
– You need access to the sign-in screen for your Windows user account. Some methods to enter Safe Mode require selecting options at the sign-in screen.
– For certain methods like using the Settings app, you will need to be logged into your Windows 10 user account first.
As long as you meet these requirements and your computer can properly run Windows 10, you should be able to utilize Safe Mode. It is available on all versions of Windows 10.
Accessing Safe Mode through Settings
One way to restart into Safe Mode in Windows 10 is through the Settings menu. Here are the steps:
- Open the Start menu and click on the Settings icon.
- In Settings, click on “Update & Security”.
- Under “Update & Security”, click on “Recovery”.
- Under “Advanced startup”, click the “Restart now” button.
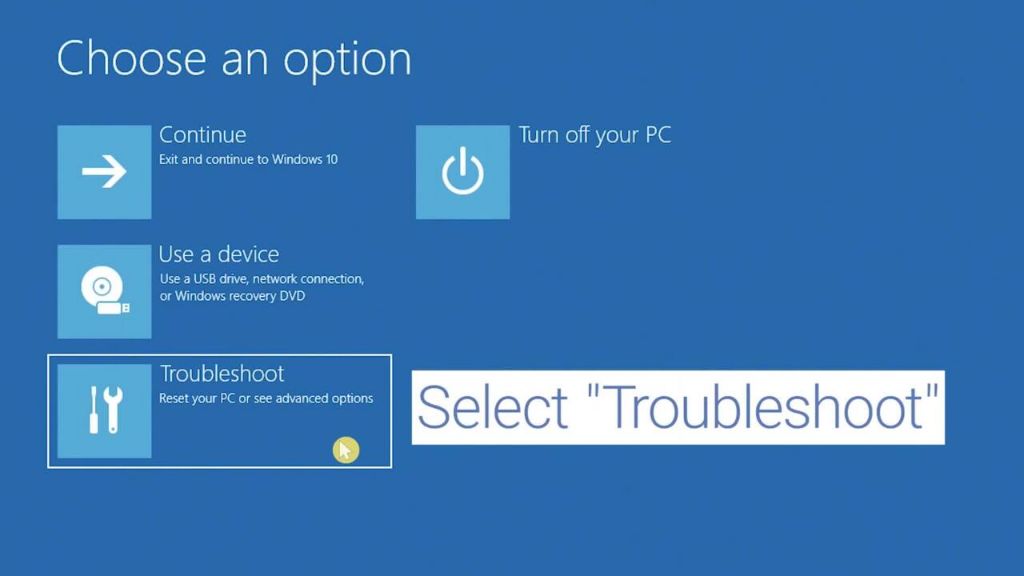
- After restarting, you will see the “Choose an option” screen.
- Click on “Troubleshoot”.
- Click on “Advanced options”.
- Click on “Startup Settings”.
- Click “Restart”.
- After restarting again, you will see a list of startup settings. Press 4 or F4 to start in Safe Mode.
Following these steps will restart your Dell Windows 10 computer directly into Safe Mode through the Settings menu. This provides a simple graphical way to access Safe Mode without interrupting the normal startup process.
For more details, refer to Microsoft’s guide on starting in Safe Mode through Settings.
Starting in Safe Mode from Login Screen
One way to access Safe Mode in Windows 10 is directly from the login screen. Here are the steps:
- Restart your computer and let it boot to the sign-in screen.
- Once at the sign-in screen, hold down the Shift key on your keyboard.
- While still holding Shift, click the Power icon in the bottom right and select Restart.
- After restarting, your computer will go to a blue Choose an option screen.
- Select Troubleshoot > Advanced options > Startup Settings.
- On the Startup Settings screen, press 5 or F5 to boot into Safe Mode. Your computer will restart again.
- You will enter Safe Mode and can then perform diagnostics or troubleshooting as needed.
This method provides a quick way to get into Safe Mode directly from the login screen without having to change any settings in Windows first. It’s useful when you need to access Safe Mode but can’t fully load Windows.
Using Advanced Startup Options
Windows 10 includes an Advanced Startup Options menu that provides access to Safe Mode and other troubleshooting tools. To access this menu:
- Open the Start menu and click the Power button.
- Hold down the Shift key while clicking Restart.
- After your PC restarts, you’ll see the Advanced Startup Options menu.
From here, you can select Troubleshoot > Advanced options > Startup Settings to restart your PC and display the full Advanced Startup Options menu. This menu allows you to start in Safe Mode or other diagnostic modes by selecting the relevant option and pressing Enter.
Using the Advanced Startup Options menu is the easiest way to start in Safe Mode on Windows 10. It provides a simple interface to choose between Safe Mode, Safe Mode with Networking, and other startup settings without interrupting the normal boot process.
Entering Safe Mode with Networking
Safe Mode with Networking allows you to start Windows 10 with just the bare essential drivers and services loaded. This can be useful for troubleshooting problems caused by third-party drivers or services interfering with normal operation. The key difference from standard Safe Mode is that Safe Mode with Networking will load the network drivers, allowing you to access the internet while in Safe Mode.
To enter Safe Mode with Networking on a Dell computer running Windows 10, follow these steps:
- Restart your computer and let it boot to the sign-in screen.
- Hold down the Shift key while clicking the Power button in the bottom right corner of the sign-in screen. This will bring up the Advanced startup options screen.
- Select Troubleshoot > Advanced options > Startup Settings. Click Restart.
- After your computer restarts, you will see a list of startup settings. Press the F5 key to select “Enable Safe Mode with Networking”.
- Windows will restart in Safe Mode with Networking. The words “Safe Mode” will appear in the corners of your screen to indicate you are in Safe Mode.
Once in Safe Mode with Networking, you can run diagnostics, install updates, uninstall problematic programs, or troubleshoot other issues while still having network access.
To exit Safe Mode, simply restart your computer normally. Be sure to save any changes or diagnostics before exiting Safe Mode.
Starting Safe Mode on Dell Computers
Dell computers feature a few different ways to enter Safe Mode that are specific to Dell hardware. According to Dell’s support documentation (source), the easiest way is to restart your Dell computer and press the F8 key repeatedly as soon as the Dell logo appears. This will open the Advanced Boot Options menu where you can select “Safe Mode” to boot into Safe Mode.
If the F8 method doesn’t work, you can also access Safe Mode through the Windows Recovery Environment on Dell computers. Restart your computer and press F11 when the Dell logo appears to boot into the Windows Recovery Environment. From there, choose “Troubleshoot” then “Advanced Options” and select “Startup Settings.” Click “Restart” which will restart your Dell into the Startup Settings screen where you can choose “Safe Mode” using the numbered keys.
Lastly, if those options fail, you can enter the BIOS on startup by pressing F2 during bootup. In the BIOS, go to the “Startup” tab and enable “Safe Boot” which will restart your Dell computer directly into Safe Mode (source). This method works as a failsafe to access Safe Mode if the other options are not working.
Using Safe Mode on Other Brands
Safe Mode works similarly on other Windows PC brands like HP, Lenovo, Acer, and Asus. The steps to access Safe Mode through Settings or the login screen are the same. However, the method to access Advanced Startup Options varies between brands and computer models. Generally, you’ll need to press a function key like F2, F10, or F12 during boot to open the BIOS, then select the Advanced Startup or Startup Settings options. For example, on many Lenovo laptops hitting F2 opens the BIOS where you can select Startup > Restart to UEFI Firmware Settings > Restart to Troubleshoot > Advanced Options > Startup Settings to access Safe Mode1. It’s best to consult your device manufacturer’s support site for the exact steps. The Safe Mode options themselves function the same to help troubleshoot problems.
Next Steps After Using Safe Mode
After you’ve diagnosed the issue using Safe Mode, you’ll likely need to take further steps to fully resolve the problem. Here are some common next actions to consider:
If you identified a recently installed app or driver causing problems, you can uninstall it in normal mode after booting up. Check if the issue is resolved after removing the problematic software.
If a system file was damaged, use the System File Checker tool (SFC) to scan and replace corrupted files. Open an admin command prompt and type “sfc /scannow”.
To undo recent system changes, run System Restore and select a restore point prior to when the issues began. This can resolve problems caused by Windows updates or software installations.
If a malware infection was found, run a full system scan with your antivirus software to remove all traces of the infection after restarting normally.
For hardware failure suspicions, use Dell’s hardware diagnostics tools from the SupportAssist application. This can identify faulty components like RAM or hard drives.
If no specific cause was determined, consider resetting Windows 10 to factory default settings and then reinstalling apps and drivers. This is a last resort but can fix many system problems.
After trying these steps, test if the issue returns when booting normally again. If not resolved, you may need OS reinstallation or professional computer repair.
