Why Your Hard Drive Goes to Sleep
Hard drives will go into a low-power sleep mode after a period of inactivity as a power saving feature built into Windows (source). This reduces overall energy use when the drive is not being actively accessed. Allowing the drive to sleep also helps prolong its lifespan by minimizing mechanical wear during idle periods.
Hard disk drives contain moving physical parts like platters and read/write heads. Keeping these parts active when not needed produces unnecessary friction and rotational strain. So Windows will automatically spin down an idle hard drive to a low-power state, usually after 10-30 minutes of no disk activity.
Waking the drive from sleep causes a slight delay, so there are reasons you may want to disable sleep. But generally the benefits of reduced energy use and extended hardware lifespan make drive sleep a useful default setting.
Effects of a Sleeping Hard Drive
When your hard drive goes to sleep, it can lead to a couple potential issues:
Delay when waking computer – When a hard drive is asleep, it takes extra time to spin back up when your computer is waking from sleep mode. This can lead to a delay of several seconds before your computer becomes responsive again [1].
Loss of unsaved data if computer crashes – If your computer crashes or loses power while the hard drive is asleep, any unsaved data can be lost. The drive has to be spinning and responsive to commit data writes. So if it’s asleep, that pending data in memory will be lost [2].
Check Your Hard Drive Sleep Settings
The first step is to open the Power & Sleep Settings. To do this:
On a desktop PC, right-click the Windows Start button and select Power Options. On a laptop, select the battery icon in the system tray and choose Power & Sleep Settings.
This will open the main settings window where you can view and adjust settings related to your hard drive sleep behavior.
The settings will look slightly different depending on whether you have a desktop or laptop. On a laptop, you’ll see sections for screen, sleep, and battery. On a desktop PC, the options are simplified without a battery section.
Look for the “Turn off hard disk after” setting to see what your current hard disk sleep timer is set to. The default is usually 20 minutes on a laptop and “Never” on a desktop PC.
Adjusting this setting is the main way to prevent your hard drive from going to sleep automatically after a period of inactivity.
Disable Hard Drive Sleep Completely
One way to stop your hard drive from going to sleep is to disable hard drive sleep completely. This will prevent your hard drive from ever entering sleep mode, whether on battery or plugged in power. To do this in Windows 10:
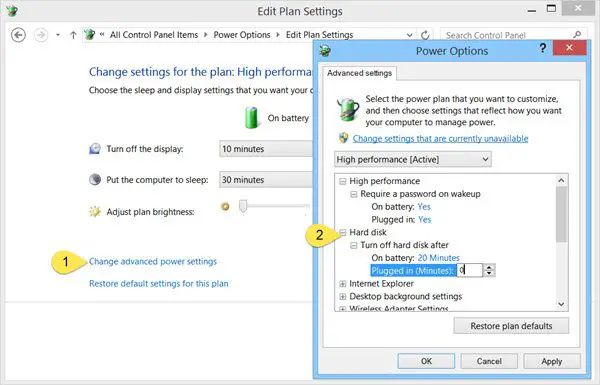
Go to Control Panel > Hardware and Sound > Power Options. Click “Change plan settings” for your active power plan. Next, click “Change advanced power settings”. Expand the “Hard disk” section and change the settings for both “Turn off hard disk after” options to “Never” [1].
This will make sure your hard drive never goes to sleep, no matter if you are on battery or plugged into power. One downside is that it may reduce battery life, especially for laptops. But it ensures your hard drive is always awake and available.
Adjust the Hard Drive Sleep Timer
One option to prevent your hard drive from going to sleep too soon is to adjust the hard drive sleep timer settings in Windows. This allows you to control how long your hard drive remains active before going into sleep mode.
To adjust the hard drive sleep timer in Windows 10:
- Open the Power & Sleep Settings window by clicking the Start button and selecting Settings > System > Power & Sleep.
- Under “Related settings” on the right, click “Additional power settings”.
- In the Power Options window, click “Change plan settings” for your active power plan.
- Click “Change advanced power settings”.
- Expand the “Hard disk” section and click on “Turn off hard disk after”.
- Adjust the setting to your preferred time. The default is usually 20 minutes. You can increase this to 60 minutes or more if you need your hard drive to remain active for longer periods.
When adjusting the hard drive sleep timer, you’ll need to balance performance versus power savings. A longer timer means your drive will stay awake and performant for more time. However, your device will use more power. If you’re noticing lag when accessing your hard drive after periods of inactivity, lengthening the sleep timer can help. Just be aware of potential impacts on battery life.
You may need to experiment with different timers to find the right balance for your usage. The optimal setting will keep your drive awake when you need it, without excessive power drain when idle.
Use Selective Power Settings
You can customize your hard drive sleep settings for different PC power states. For example, you may want your hard drive to sleep when on battery to conserve power, but remain awake when plugged in.
To do this in Windows 10:
- Go to Control Panel > Hardware and Sound > Power Options
- Click “Change plan settings” for your active power plan
- Click “Change advanced power settings”
- Expand “Hard disk” and open the dropdown for “Turn off hard disk after”
- Change the “On battery” setting to your desired time until the hard drive sleeps
- Change the “Plugged in” setting to “Never” to disable hard drive sleep while plugged in
- Click OK to save changes
Now your hard drive will sleep to save power when on battery, but remain awake while plugged in. You can customize the time thresholds to your needs.
This selective use of power settings gives you more control over hard drive behavior for different power states. Disable sleep only when the PC is plugged in to avoid interruptions while powered.
Special Cases
External hard drives and solid state drives (SSDs) can have different power settings and sleep behaviors than internal hard disk drives (HDDs). Here are some tips for those special cases:
For external hard drives, you may need to adjust the power settings in the USB hub or port where the drive is connected. Some USB hubs and computer ports allow you to disable power management for that port, which will keep an external drive awake. You can also adjust the power management settings on the drive itself, if available. Some external drives have built-in utility software with sleep settings.
With SSDs, the sleep behavior is often controlled by firmware on the drive itself. Some SSDs are designed to enter an ultra-low power sleep mode when not in use. You may be able to update the SSD’s firmware to change this behavior. Also, some SSD optimization software like Samsung Magician has settings to disable sleep. Since SSDs use less power than HDDs, allowing some sleep may extend the SSD’s lifespan.
For both external drives and SSDs, check if the manufacturer provides any software or firmware updates to customize power management and sleep settings. The optimal settings will depend on your specific drive model and usage requirements.
Check Drive Settings in Device Manager
You can check and adjust the hard drive sleep settings directly in Device Manager for more granular control. Here are the steps:
1. Open Device Manager (right-click the Start menu and select Device Manager).
2. Expand the Disk drives section.
3. Right click on your hard drive and select Properties.
4. Go to the Power Management tab.
5. Here you can see and change the hard drive’s advanced power management settings that override the default Windows settings. For example:
- Turn off hard disk after – adjust the idle time before the drive goes to sleep.
- Allow the computer to turn off this device to save power – disable this to prevent the OS from powering down the drive.
Adjust the settings as needed to prevent the hard drive from going to sleep.[1]
This gives you more fine-grained control over the hard drive sleep behavior than the basic Windows power settings.
3rd Party Tools
For more control over individual drive sleep settings and activity monitoring, third party utilities can help. Some popular options include:
Drive Power Manager allows custom power settings for each drive, preventing specific drives from sleeping.
RevoSleep lets you manually spin down drives and shows their activity status.
Utilities like IOBit Advanced SystemCare have drive optimization features to tweak sleep settings.
These give more granular control compared to Windows’ built-in settings. They can monitor and log drive sleep activity as well. So for advanced management of drive sleep, third party utilities are quite useful.
Frequently Asked Questions
Here are some common troubleshooting issues that people run into with hard drives sleeping in Windows 10:
My hard drive is still sleeping!
If you’ve disabled sleep settings but your hard drive is still going to sleep, try these steps:
- Check your power plan – Make sure it is not set to Balanced or Power Saver mode, which will allow the drive to sleep.
- Update drivers – Outdated drivers can cause sleep issues, so update chipset, SATA, and disk drivers.
- Run hardware diagnostics – Run manufacturer disk diagnostics to check for drive errors causing problems.
Error messages
You may get errors like “Disk not detected” or “Drive not accessible” when a drive wakes from sleep. Try rebooting your PC first. If the error persists, go to Device Manager, uninstall the drive, scan for hardware changes to reinstall it.
For further troubleshooting, refer to: Computer won’t wake up from sleep
