What Causes a Hard Drive to Make a Ticking Noise
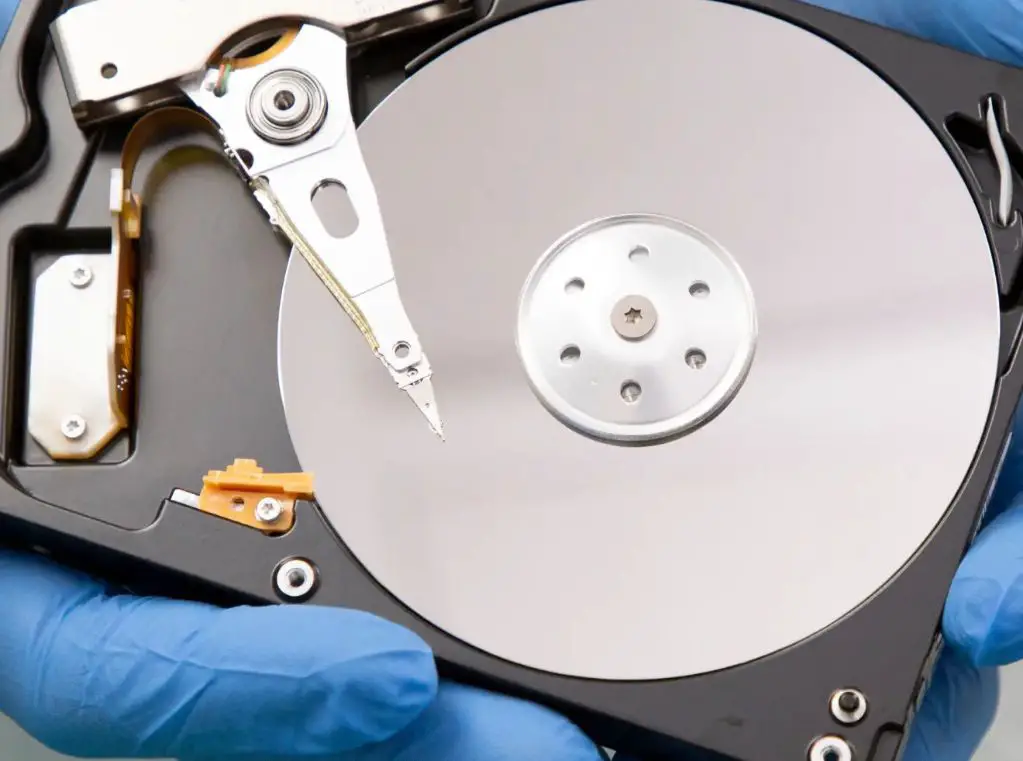
One of the most common causes of a hard drive making a ticking or clicking noise is a sign of a mechanical fault – specifically, failing or damaged read/write heads inside the hard drive. The read/write heads are responsible for reading and writing data on the hard drive’s platters. They float just above the drive’s platters on an arm and move back and forth to access data.
Over time, through normal wear and tear, the read/write heads can become misaligned or damaged. If the heads make contact with the platters, this can cause a ticking or clicking noise as the heads scrape along the platter surface. Severe damage to the heads can cause the drive to fail to read or write data. This is often referred to as the “click of death” for hard drives.
Some other potential causes according to DriveSavers and Ontrack include insufficient power from a defective PSU, firmware problems, spindle motor failure, and other mechanical problems that may result in ticking or clicking from the hard drive. But failing read/write heads are the most common culprit.
Signs Your Hard Drive Is Failing
One of the most common signs of a failing hard drive is unusual sounds coming from the drive. Ticking, clicking, beeping or grinding noises indicate issues with the mechanical components of the drive. These noises are caused by the read/write heads getting stuck or the spindle motor malfunctioning.
Clicking or ticking noises usually mean that the read/write head is tapping against the disk platter as it fails to move properly across the surface of the disk. This indicates a mechanical failure in the drive’s ability to access data on the platter. Persistent clicking or ticking is a clear sign the drive is failing (source).
Another sign is frequent disk errors such as bad sectors. As parts inside the hard drive deteriorate, it has increasing difficulty reading and writing data. This can result in corrupted files, inaccessible sectors, and disk read/write errors. Persistent disk errors indicate the drive is nearing the end of its life (source).
Performance issues like major slowdowns, freezing, and crashes also point to a failing hard drive. When the mechanical components degrade, the drive has trouble accessing data quickly and smoothly. This leads to lag, freezes, and eventual failure to boot up.
Dangers of Continued Use
Continuing to use a hard drive that is exhibiting signs of failure can lead to complete data loss. As the drive fails, it may become increasingly unstable and prone to total mechanical failure. This can result in the drive no longer being detected by the computer or data becoming inaccessible. According to research, the highest risk factor associated with a degrading drive is irreversible data loss, either through gradual corruption or sudden mechanical failure.
Drives can fail fully at any moment if they are already exhibiting problems like ticking noises. According to this source, complete failure results in all data on the drive being lost permanently unless you have backups. Continuing to use a problematic drive just puts your data at further risk.
Mechanical failure can happen abruptly at any point. Signs like ticking indicate the internal read/write heads or spindle motor are degrading. Prolonged use with these symptoms increases the chances of imminent failure. Once mechanical failure occurs, data recovery is difficult and expensive.
It’s best to stop using a drive once symptoms appear and immediately back up data before it’s too late. Continued use of a failing drive only increases your chances of a catastrophic failure leading to permanent data loss.
Back Up Your Data
Before attempting any repairs or replacing your hard drive, it is crucial to back up your data. A failing hard drive can completely stop working at any time, resulting in permanent data loss if you don’t have a backup. According to experts at PCWorld, “The best external drives will be handy for backing up important documents, photos, videos, and any other media you want to save and keep safe” (Source).
There are a few different backup methods to consider:
- External hard drive – An external HDD provides a simple way to backup your data. Look for a high capacity drive from a reliable brand like Western Digital or Seagate.
- Cloud backup – Services like Carbonite, iDrive, and Acronis True Image offer continuous cloud backup for an annual subscription fee.
- File syncing – Sync files between devices using cloud services like Google Drive, Dropbox, or OneDrive.
Experts recommend the 3-2-1 backup rule – Have at least 3 copies of your data, on 2 different media types, with 1 copy offsite in case of theft, fire, or natural disaster. Following this rule with a cloud backup and external hard drive backup will help ensure your data stays safe no matter what happens.
Try Troubleshooting
Before replacing the hard drive, it’s worth trying some troubleshooting steps that could potentially stop the ticking noise and save your drive.
First, check all the connections to your hard drive. Unplug the power and data cables and plug them back in to ensure they have a solid connection. Cables that are loose or damaged can cause issues that lead to ticking noises.
You should also update your drivers, especially the driver for the hard drive. Outdated drivers can sometimes cause problems that manifest as odd noises from a hard drive. Go to the manufacturer’s website and download the latest driver for your specific hard drive model.
Finally, run a chkdsk scan on the drive. Chkdsk scans the drive for errors and attempts to repair them. Open the Command Prompt as an Administrator and type “chkdsk C: /f” (replacing C: with the letter of your hard drive). Allow the scan to run which could take several hours for a large drive.
These basic troubleshooting steps may stop the ticking and get your hard drive working properly again without needing replacement. If the ticking persists, more advanced options like data recovery or replacement may be necessary.
Attempt Data Recovery
Before replacing the hard drive, it is worth attempting to recover the data on the failing drive first. There are software solutions as well as professional services that may be able to recover data from a drive that is ticking or clicking.
Data recovery software such as Recuva or EaseUS Data Recovery Wizard can sometimes recover data from a clicking hard drive. These programs scan the drive and attempt to rebuild directories and recover files. However, they don’t always work if the drive is severely damaged.
For best results, consider using a professional data recovery service. Companies like DriveSavers and Ontrack use specialized equipment and techniques in cleanroom environments to recover data from failed drives. This gives the highest chance of recovering data, but costs several hundred to thousands of dollars.
Before attempting recovery, be sure to backup any critical data still accessible. Also research the service’s reputation and policies regarding confidentiality and pricing.
Replace the Hard Drive
If troubleshooting and recovery methods do not resolve the ticking issue, the hard drive likely has a mechanical failure and needs to be replaced. Replacing the hard drive involves physically removing the old drive and installing a new one. It’s important to properly clone or back up the data from the old drive before replacing it.
To replace a hard drive:
- Purchase a new compatible hard drive for your computer system. Look for a drive with equal or larger storage capacity.
- Use cloning software like EaseUS Todo Backup to make an exact copy of the old drive onto the new drive. This replicates the data, operating system, and applications.
- If cloning is not possible, back up all data and files from the old drive using backup software.
- Physically install the new hard drive by opening up the computer case and swapping out the old drive.
- Initialize and format the new hard drive if cloning was not done.
- Reinstall the operating system and applications on the new drive.
- Restore your data and files that were backed up.
Once the new hard drive is installed and set up, your computer should run like normal again without the distracting ticking sound.
Choose a New Hard Drive
When replacing a failed hard drive, you’ll need to choose between a traditional hard disk drive (HDD) or a solid state drive (SSD). There are pros and cons to each:
HDDs are mechanical drives that use spinning platters and a read/write head to access data. They have larger capacities and are cheaper per gigabyte than SSDs. However, they are slower, consume more power, and are more prone to failure due to their moving parts. HDDs come in both 3.5″ and 2.5″ form factors (Tom’s Hardware, 2024).
SSDs are faster, quieter, and more reliable since they have no moving parts. They use NAND flash memory chips to store data. However, SSDs are more expensive per gigabyte and currently max out at around 4TB capacity for consumer models (Tom’s Hardware https://www.tomshardware.com/best-picks/best-ssd, 2024). SSDs typically come in the 2.5″ laptop drive size.
When choosing a new hard drive, match the form factor to your computer. Desktops take 3.5″ drives, while laptops use 2.5″. Also consider your capacity needs and budget. HDDs offer more storage for less money but are slower and less reliable. SSDs have outstanding performance and reliability but lower capacities and higher prices (Space.com https://www.space.com/best-external-hard-drives, 2023). Weigh these factors carefully when selecting a replacement drive.
Initialize the New Hard Drive
After installing the new hard drive, you’ll need to initialize it using Disk Management before it can be used. Initializing the drive will erase any data on it and prepare it to store files.
To initialize the new drive:
- Open Disk Management. You can access this by pressing Win + R and typing “diskmgmt.msc” into the Run dialog box.
- The new disk should appear in the lower panel without a drive letter and status “Unallocated”. Right-click on the disk and select “Initialize Disk”.
- Choose between MBR or GPT partitioning. MBR is compatible with older systems while GPT supports larger hard drives. [1]
- Click “OK” to initialize the disk with the selected partitioning scheme. This will divide the drive into one large partition.
- Right-click the volume and select “New Simple Volume” to format the partition.
- Follow the wizard, assigning a drive letter and formatting the volume with NTFS or another file system.
Once initialization and formatting are complete, the new hard drive will show up with its new drive letter in File Explorer, ready to use.
Restore Your Data
After installing the new hard drive, it’s time to migrate your data over from your backups or old drive. There are a few options for restoring your data:
Restore from backups – If you backed up your data to an external drive or cloud storage, you can simply restore those backup files to your new hard drive. Make sure your backups are recent to avoid missing any files.https://www.nucleustechnologies.com/blog/how-to-transfer-files-from-old-hard-drive-to-new-hard-drive/
Migrate old data – If your old hard drive still functions, you can use disk migration software to transfer files directly over to the new drive. This ensures no data is lost. Go slowly to avoid any further damage to the old drive.
Recover files – If the old drive is corrupted or damaged, use data recovery software to restore as many files as possible before transferring them to the new drive. However expect many files may not be recoverable.https://www.stellarinfo.com/article/recover-data-from-hard-drive.php
Take time restoring your files and settings to avoid missing anything important. Once your data is secure, you can be confident your new hard drive is ready to go.