What is AHCI and RAID?
AHCI (Advanced Host Controller Interface) is a communication standard that allows the operating system to recognize and manage SATA devices like hard drives and SSDs. It allows each drive to be accessed independently. AHCI transports data from a drive to a motherboard while operating in native SATA mode.
RAID (Redundant Array of Independent Disks) allows multiple drives to be combined together into a RAID array to improve performance or reliability. RAID organizes several hard drives into a single storage unit. The different RAID levels offer various combinations of increased speed, capacity, and redundancy.
The key differences between AHCI and RAID are:
- AHCI communicates with each drive independently, while RAID combines drives together into one logical unit.
- RAID offers performance and redundancy benefits, while AHCI does not.
- AHCI is simpler to configure while RAID requires creating an array.
- RAID requires matched drives while AHCI can use mismatched drives.
In summary, AHCI is a communication method for individual drives, while RAID arranges multiple drives for improved performance or fault tolerance.
Why Switch from AHCI to RAID?
There are two key advantages of switching from AHCI to RAID:
Faster disk performance. RAID allows multiple disks to be combined together for improved speed and performance. Popular RAID levels like RAID 0 can deliver faster read and write speeds by striping data across multiple disks. This allows the workload to be distributed and data to be accessed in parallel for better performance (RAID Mode Pros & Cons).
Disk failure protection with RAID 1, RAID 5, and RAID 10. With these redundant RAID levels, data is duplicated across multiple disks. If one disk fails, data integrity is maintained and no data is lost. This provides protection against hardware failure. For example, RAID 1 mirrors two disks, while RAID 5 stripes data across disks with parity information (RAID (redundant array of independent disks)).
Requirements for Switching
To switch from AHCI to RAID mode, your system must meet the following requirements:
You need a motherboard that supports RAID mode. Most modern motherboards designed for desktop computers include RAID support. According to Asus support article, Intel 500 series and AMD chipset motherboards contain RAID support in the BIOS. Always check your motherboard manual to confirm RAID capability.
Your system needs at least 2 drives to create a RAID array. Common RAID modes like RAID 1, RAID 5, and RAID 10 require a minimum of 2 drives. RAID 1 mirrors drives, RAID 5 stripes data across drives with parity, and RAID 10 creates a striped mirror. To benefit from these RAID modes, you’ll need 2 or more drives installed.
Back Up Important Data
It’s absolutely critical that you back up all your important files and data before switching from AHCI to RAID. Converting to RAID will require reconfiguring or reformatting your hard drives, which puts all existing data at risk.
Experts strongly recommend having a full, up-to-date backup before attempting to switch to RAID. As this article points out, RAID is not a backup solution. The purpose of RAID is to improve performance and uptime, not protect against data loss.
There are many excellent backup solutions available. For home users, cloud backup services like Backblaze, IDrive, and Acronis True Image are reliable and affordable options. You can also use third-party backup software like EaseUS Todo Backup or Macrium Reflect to create image backups on an external hard drive.
The key is to have at least one recent, complete backup of your important data before converting to RAID. This will allow you to restore your files and system in case anything goes wrong during the RAID setup process.
Enter RAID Mode in BIOS
To enable RAID mode, you will first need to access the BIOS settings when your computer boots up. Here are the steps to enter BIOS:
- Restart your computer and press the BIOS key during the initial boot process. This is usually the Delete, F2, F10 or F12 key, but may vary by manufacturer. The splash screen that appears when your computer first turns on will indicate the proper key to press.
- After pressing the designated key, you will enter the BIOS setup utility.
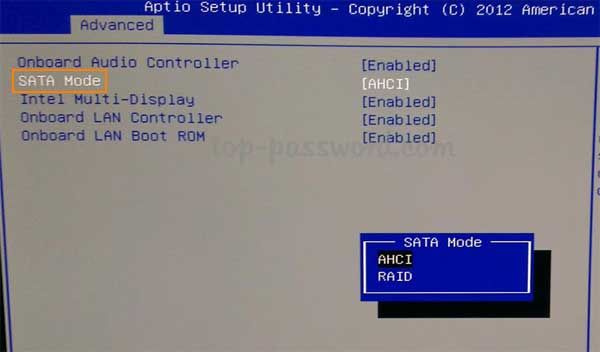
Once in BIOS, you need to navigate to the storage or SATA settings. There will be an option to switch the SATA mode from AHCI to RAID. Select RAID to enable RAID mode. The steps vary slightly for different BIOS versions:
- On Asus motherboards, go to the Advanced tab, select SATA Configuration, and change SATA Mode to RAID (cite: https://www.asus.com/support/FAQ/1045089/).
- For Gigabyte boards, go to Settings > Advanced > Integrated Peripherals and set SATA Mode Selection to RAID (cite: https://www.linkedin.com/advice/0/how-do-you-configure-raid-bios-uefi-settings-your-pc-server).
After enabling RAID mode, you can create your RAID array in the configuration utility.
Create RAID Array
To create a RAID array, you will need to access the RAID configuration utility in your computer’s BIOS or UEFI settings during system startup. The steps to create RAID arrays will vary slightly depending on your specific hardware, but generally involve:
1. Restart your computer and press the key to enter the BIOS/UEFI settings, often Delete, F2, F10, or F12 during startup.Creating a RAID Array
2. Navigate to the RAID configuration utility.
3. Select the storage drives you want to include in the RAID array.
4. Choose the RAID level:
- RAID 0 stripes data across multiple drives for faster performance.
- RAID 1 mirrors drives for redundancy in case one fails.
- RAID 5 stripes data and parity information across 3 or more drives for both speed and redundancy.
- RAID 10 mirrors stripped sets of drives for the best combination of speed and redundancy.
5. Initialize and confirm creation of the RAID array.
6. Save changes and exit the BIOS/UEFI utility.
The system will initialize the RAID array during the next reboot. You can then proceed to install your operating system and transfer data over.How To Set Up RAID On Your Windows 10 PC
Install Operating System
When installing an operating system on a RAID array, you will need to load the appropriate RAID drivers during the OS installation process. This allows the OS to recognize and interact properly with the RAID array.
For Windows, you’ll typically need to press F6 during setup to load RAID drivers from a floppy disk or USB drive. Many motherboard manufacturers provide drivers, or you can get them from the RAID controller manufacturer. Here are some tips for installing Windows on a RAID array:
- Press F6 when prompted to install third-party RAID drivers during Windows setup.
- Have the RAID driver files on floppy disk or USB drive accessible during setup.
- Follow prompts to install the RAID driver, pointing to the driver files.
- Once driver is installed, continue with OS installation to RAID array.
For Linux, you may need to pass a driver disk or initrd file at boot to load RAID drivers. Many Linux distributions have RAID drivers built-in. Consult your Linux distribution’s documentation on how to install to a hardware RAID array.
Make sure to install the RAID drivers or your OS will not detect the RAID array properly. Check with your motherboard or RAID controller manufacturer on which drivers are required.
Transfer Data to RAID
Once the RAID array is set up and the operating system is installed, the next step is to move your data from the old disks to the RAID volume. This process is known as data migration.
There are a few ways to migrate data to a RAID array:
- Use disk cloning software like Acronis True Image to make an exact copy of your old disk and write it to the RAID array.
- Connect the old disks as secondary drives and copy files over to the RAID volume.
- Use the robocopy command in Windows to mirror files from old disks to the RAID array.
For optimal migration performance:
– Break up large file copies into smaller batches if possible.
– Try to maintain as much free space as possible on the RAID array during migration.
– Schedule data transfers during off-peak hours if the server is in production use.
– Verify copied data by comparing file hashes or attributes.
Migrating data to a RAID array requires some planning but is necessary to gain the benefits of redundancy and improved performance. Take care to validate all data after the migration completes.
Verify RAID Protection
After creating the RAID array, it is crucial to verify that data redundancy and protection are working as expected. This involves checking the RAID status and performing tests to ensure data recovery in case of a failed drive.
To check the status, use the RAID management software provided by the RAID controller vendor (e.g. Intel RST, LSI MegaRAID). Look for the overall status of the array which should show as “optimal” for RAID 1, 5, 10. Also verify that all disks show a healthy status and rebuild or synchronization is not in progress.
Next, run a manual parity check on the array to validate redundancy. For Intel RST go to the Manage menu and start Parity Check. On LSI MegaRAID use Patrol Read. This will verify parity or mirror data matches the primary data 1.
To confirm recovery from disk failure, power off the system and disconnect one of the RAID disks. Restart the server – it should boot without issue though RAID status will show degraded or rebuilding. Reconnect the missing disk, the RAID should begin rebuilding data automatically. This validates the redundancy provided by the RAID array.
Maintenance Tips
Regular proactive maintenance of RAID arrays helps ensure their continued health and performance. Here are some key tips:
Periodically check the RAID health status in the controller management software. Look for any issues like failed or degraded drives that require attention (see What Proactive and Preventative Maintenance should be performed on a RAID array).
Consider implementing hot spare drives that can automatically rebuild failed drives. Having hot spares gives you built-in redundancy and recovery for drive failures without manual intervention (see tips on hot spare configuration).
Periodically replace drives proactively before they fail, especially in older arrays. Drive failures become more likely over time.
Keep firmware up to date on RAID controllers for bug fixes and new features (see firmware update procedures).
Monitor drive and array temperatures and proactively cool hot spots to avoid failures.
Test redundant paths like controllers, expanders, and connectors to verify failover protection.