What is write protection?
Write protection is a feature that prevents files on a storage device from being modified, erased, or overwritten. It essentially makes the files “read-only” and protects them from accidental changes or corruption.
Write protection is commonly used on USB flash drives, SD cards, CDs, and DVDs. It serves several purposes:
- Preventing viruses or malware from infecting the drive and modifying files
- Avoiding accidental deletion or overwriting of important files
- Ensuring files remain unchanged and intact when sharing media
- Protecting proprietary software, media files, or other commercial content
There are risks associated with disabling write protection. Doing so exposes the drive to potential file corruption from viruses or accidental changes. It also removes the safeguard preventing proprietary files from being copied or shared. Before turning off write protection, it’s important to consider why it was enabled in the first place.
When write protection gets enabled
There are a few common ways that write protection can accidentally get enabled on a USB drive or hard drive (source):
- Flipping the physical write-protect switch on the device itself to the “lock” position.
- Infecting the drive with malware that enables write protection.
- Enabling the software write-protect feature in Windows.
- Corruption of the file system due to improper ejection/removal of the drive.
You may also intentionally enable write protection on a drive for these reasons (source):
- To protect against viruses or malware modifying files.
- To prevent accidental deletion or modification of important files.
- For archival storage of data that should not change.
- To create a “clean” drive for installing operating systems or software.
Accessing command prompt
The command prompt is a text-based interface in Windows operating systems that allows users to execute commands. To open the command prompt in Windows 11 or Windows 10:
1. Press the Windows key or click the Windows icon in the taskbar to open the Start menu.
2. Type “command prompt” in the search box.
3. Click on the “Command Prompt” result that appears.
This will open a command prompt window where you can enter commands. The command prompt window has a black background by default and displays the current directory path and a blinking cursor ready for input.
Some key things to know about the command prompt:
- It gives access to many system commands and tools not available through the graphical Windows interface.
- Commands are executed by typing them after the prompt (e.g. C:\Users\) and pressing Enter.
- It allows power users to automate tasks through batch scripts.
- The commands and syntax are case-insensitive.
Now that we’ve covered the basics of accessing and using the command prompt, we can look at how to check the write protection status and turn it off using the command prompt.
Checking write protection status
To check if write protection is enabled on a drive, we can use the ‘attrib’ command in Command Prompt. The ‘attrib’ command shows the attributes set on a file or directory. For drives, it will show if the ‘R’ read-only attribute is set, indicating write protection is enabled.
To check, first open Command Prompt, then type ‘attrib [drive letter]:’ – for example ‘attrib G:’.
If the drive has the ‘R’ attribute, write protection is enabled. If ‘R’ is not listed, write protection is disabled on that drive.
For example, if the readout is ‘G:\ R’ then write protection is on for drive G:. If it simply shows ‘G:’ with no attributes, write protection is turned off.
It’s important to understand this readout, as it directly indicates whether writes are allowed to the drive. The ‘attrib’ command offers a quick way to verify the status without having to try writing to the drive.
Turning off write protection
The easiest way to turn off write protection in the command prompt is by using the attrib command. The attrib command allows you to view, change and reset file attributes like read-only, hidden, archive, etc.
To remove write protection using attrib:
- Open the command prompt window and navigate to the drive or folder you want to remove write protection from. For example:
cd D:\myfolder - Type
attrib -r *.*and hit enter. This will remove the read-only attribute from all files in the current folder and sub-folders.
You can also target specific files by replacing *.* with the filename. For example: attrib -r mydocument.docx
This will turn off write protection and allow you to edit, modify, delete and add new files again. The attributes get reset when you restart your computer, so you may need to run attrib again if write protection reappears.
Source: How To remove Write Protection | Restore USB Capacity | 2018
Confirming write protection is disabled
After removing write protection, it’s important to confirm that write protection is fully disabled before attempting to modify files. You can recheck the status using the attrib command in Command Prompt:
Open an elevated Command Prompt window and type attrib [drive letter]: (for example: attrib E:). If the R (Read-only) attribute is no longer listed, write protection is disabled.
You can also test it by attempting to create, modify, or delete a file on the drive. For example, try creating a test text file on the drive. If you’re able to successfully save changes to the file without errors, that confirms write protection is disabled.
If you still receive “access denied” errors or cannot modify files, the drive may still have read-only permission issues. You can troubleshoot further by checking your user account permissions for the drive or reaching out to your IT department if it’s a managed device.
Considerations before turning off write protection
Before turning off write protection on a USB drive or other storage device, it’s important to consider the risks involved. According to Lenovo, write protection exists as a security measure to prevent against accidental or malicious changes to data. Removing this protection exposes the data to possible corruption or loss. Some key considerations include:
Backing up the data – Prior to removing write protection, it’s highly recommended to back up the contents of the drive. This preserves a copy in case any issues arise from enabling write access. The backed up files can be restored if needed.
Weighing the risks – Determine if you absolutely require write access to the drive to justify disabling protection. Leaving protection on is the safest option. Assess if you’re willing to accept the risks of possible data loss. Also consider risks like viruses that could infect the drive and corrupt files.
Overall, proceed with caution. Try alternative options like copying files to a new drive with write access rather than disabling protection. Only do so as a last resort after backups.
When to restore write protection
It’s generally recommended to re-enable write protection after making any firmware changes or updates to your device. This helps prevent accidental or malicious modifications to the firmware down the road.
According to the MrChromebox Wiki, restoring write protection is especially important if you’ve disabled the hardware write protect screw or switch. With software write protection only, your firmware remains vulnerable to unwanted changes. Restoring hardware write protection prevents this.
You may also want to re-enable write protection if it was accidentally disabled without your knowledge. For example, a Chromebook user may not realize they disabled write protection after entering Developer Mode. If stability issues arise, restoring write protection could resolve them.
In summary, write protection is an important security measure for your firmware. Enable it again after making intentional modifications to prevent unwanted changes in the future.
Other methods of managing write protection
In addition to using the command prompt, there are a couple other ways you can manage write protection on a drive in Windows.
File properties
You can view and change the read-only attribute of a drive through its properties window. Here’s how:
- Open File Explorer and locate the drive you want to manage write protection for.
- Right click on the drive and select Properties.
- In the Properties window, go to the General tab.
- Look for the Attributes section and uncheck the Read-only checkbox to remove write protection. Check the box to enable write protection.
- Click Apply and OK to save the changes.
This toggles the write protection setting on the drive itself. It’s handy if you want to quickly enable or disable write protection without using the command line.
Group policy editor
IT administrators can use Group Policy Editor to configure write protection on drives across an organization. Below are the basic steps:
- Open the Start menu and search for gpedit.msc.
- Navigate to Computer Configuration > Administrative Templates > System > Removable Storage Access.
- Double click on All Removable Storage classes: Deny write access and enable the policy.
- Click OK to apply the policy which will enable write protection.
- To disable, simply open the policy again and disable it.
Using Group Policy allows IT staff to easily enforce write protection on removable drives for security purposes.
Summary
Here is a quick recap of the key steps to turn off write protection in the command prompt on Windows:
1. Open Command Prompt as an administrator.
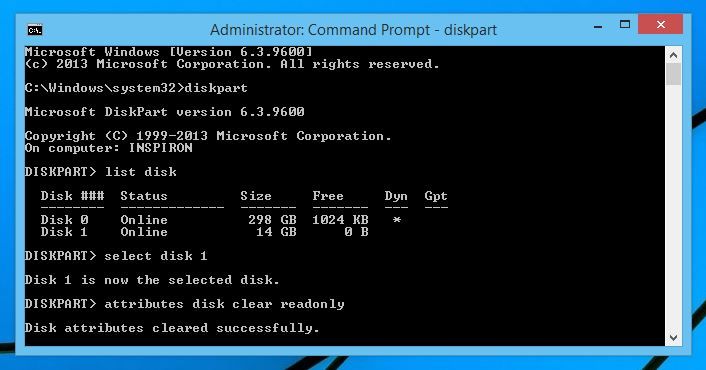
2. Type “diskpart” and press enter to open the DiskPart utility.
3. Type “list disk” to view available disks.
4. Select the disk you want to modify by typing “select disk X” where X is the disk number.
5. Type “attributes disk clear readonly” to remove write protection.
6. Type “exit” to close DiskPart.
For more details on write protection and using the command prompt, check out this DiskPart tutorial.