What is the Trash on Mac?
The Trash on Mac is a special folder that serves as a temporary holding place for files before they are permanently deleted. When you delete a file or folder on your Mac, it is not immediately erased from your hard drive. Instead, it is moved to the Trash folder, which is located at ~/.Trash on your startup disk (source: https://en.wikipedia.org/wiki/Trash_(computing)).
The purpose of the Trash is to give you a chance to recover files that were deleted accidentally. As long as the file remains in the Trash, you can restore it to its original location. This provides a safety net in case you delete something important and need to get it back. The Trash also serves as a holding place until you are ready to permanently erase files from your Mac through emptying the Trash.
So in summary, the Trash on Mac is not for permanent deletion, but for temporarily storing deleted files that can still be recovered if needed. The files in the Trash are hidden from the regular file system but are not actually erased until the Trash is emptied.
When and Why Trash Gets Hidden on Mac
There are a few common reasons why the Trash icon may become hidden on your Mac:
Running low on disk space – If your Mac’s hard drive is getting full, macOS will automatically hide the Trash icon to save space. This prevents files from being added to the Trash unnecessarily when space is limited. You can check your disk usage under Apple menu > About This Mac > Storage.
Finder view settings – The Trash icon visibility can be toggled on/off in Finder. Go to Finder > Preferences > Advanced and check/uncheck “Show warning before emptying the Trash”. You can also hide the Trash entirely by selecting a Finder view that doesn’t show desktop icons.
Desktop icon settings – If you have your desktop set to not show any icons under System Preferences > Desktop & Screen Saver, the Trash will not be visible. Deselect “Hide desktop icons” to make the Trash reappear.
Changing desktop pictures – Sometimes switching desktop backgrounds can cause the Trash and other desktop icons to become hidden. You may need to manually make the Trash visible again through Finder settings.
So in summary, the Trash icon is often hidden unintentionally due to disk space limitations, Finder view configurations, or desktop settings changes. Adjusting these preferences can usually make the Trash visible again on your Mac.
Locating the Trash Folder
Even when hidden, the Trash folder still exists in /Users/
To access this hidden folder, open Finder and go to Go > Go to Folder. Then type ~/.Trash and press return to open the folder (Apple Discussions, 2019). Alternatively, you can type ‘Trash’ in the Finder search bar, which should locate the hidden .Trash folder.
For external drives, open the drive in Finder and use Go > Go to Folder again to open the .Trash folder on that volume (EaseUS, 2023). This allows you to access Trash and its contents even if the Trash icon is not visible on your desktop or in your Dock.
Enabling Trash Through Finder
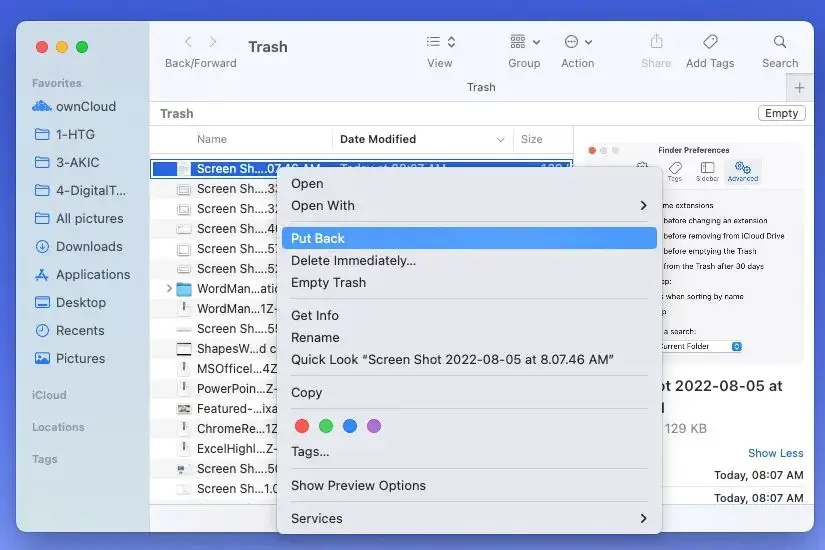
The easiest way to make the Trash folder visible again in Finder is to enable it through the Finder preferences. Here are the steps:
- Open any Finder window and click on Finder in the menu bar at the top.
- Select Preferences from the dropdown menu.
- In the Finder Preferences window, click on the Advanced tab.
- Check the box next to “Show Trash” to enable the Trash folder visibility.
- Close the Preferences window.
You should now see the Trash folder in the sidebar of any Finder windows. The Trash icon will also appear on your desktop again if you have desktop icons enabled. This method essentially toggles the Trash folder back to being visible after it was hidden [1].
Enabling Trash Through Terminal
The Terminal app provides a command line interface to control your Mac. You can use Terminal to enable the Trash icon if it is hidden.
To show the Trash icon on your desktop using Terminal, follow these steps:
- Open the Terminal app on your Mac. You can find it in the Utilities folder or use Spotlight Search.
- Type in the following command and press Enter:
defaults write com.apple.finder CreateDesktop -bool true - Close Terminal and the Trash icon will now be visible on your desktop.
The defaults write command allows you to modify system preferences from Terminal. By setting CreateDesktop to true, we are telling Finder to display desktop icons, including the Trash.1
Using Terminal to enable the Trash icon gives you more control over your Mac. The command line interface allows you to access features that are not available through the graphical interface. For advanced users, Terminal can be a powerful tool to customize and optimize your Mac.
Trash Visibility With Desktop Icons
Whether the Trash icon appears on your desktop depends on your settings for desktop icon visibility. By default, macOS shows desktop icons for key folders like Documents, Downloads, and of course, the Trash. However, you can hide desktop icons, which will remove the Trash icon as well.
To make the Trash visible again, you need to enable the display of desktop icons:
- Go to Finder > Preferences > General
- Check the box for “Allow desktop icons”
This will turn on desktop icons, including the Trash. You can also quickly toggle desktop icons on/off using the desktop keyboard shortcut Command+Shift+H.
If the Trash icon still does not appear, try logging out and back in again. The Trash should now be visible on the desktop along with other standard folders.
For more granular control, you can show/hide specific desktop icons in Finder by right clicking on the desktop and selecting “Show View Options.” From here, choose which folders you want visible.
In summary, the Trash icon visibility depends on the desktop icon settings in Finder. Enabling desktop icons will bring back the Trash so it’s accessible from the desktop.
Using Keyboard Shortcuts
One of the quickest ways to access the hidden Trash on Mac is by using keyboard shortcuts. The keyboard shortcut Cmd+Shift+Delete will immediately open the Trash folder without having to change any settings first. This allows you to view and access the files in Trash even when the icon is hidden on the desktop or Dock.
According to Apple’s support site, pressing Option-Shift-Command-Delete will also empty the Trash right away without a confirmation prompt 1. Other sources mention Shift+Command+Delete as the shortcut to empty Trash while showing a warning dialog first 2.
These keyboard shortcuts provide quick access to view, open, and empty the Trash on a Mac regardless of whether the icon is visible or hidden. They eliminate the need to change Finder settings to get access to deleted files.
Emptying Hidden Trash
Even when the Trash icon is hidden on your Mac, you can still permanently delete the files inside it. When you empty the Trash, it will fully delete all files within it, regardless of whether the Trash icon is visible in the Dock or Finder.
To empty hidden Trash on your Mac, you can use a few methods:
- Open Finder and go to Finder > Empty Trash
- Press Option + Command + Delete to empty Trash
- In Terminal, type
sudo rm -rf ~/.Trash/*and hit enter (Citation: https://macpaw.com/how-to/empty-trash-on-mac)
Emptying the Trash this way will permanently delete all files inside, even if you can’t see the Trash icon. So be certain you want to erase the contents before emptying hidden Trash.
Trash Size Limitations
The Trash on Mac has a size limit of 20% of the available disk space on the drive that contains the Trash folder (Source). Once the Trash reaches this maximum size limit, you will not be able to add any more files or folders to it until you empty some of its contents. If you try to delete additional files when the Trash is full, you will get a warning that the Trash needs to be emptied first before proceeding.
This 20% disk space limit prevents the Trash from monopolizing too much of the available storage capacity. It’s a good idea to regularly empty your Trash even before hitting this limit, as it can quickly accumulate large unused files over time. Occasionally verifying and emptying the Trash helps free up space and maintain your Mac’s performance.
If you find yourself frequently hitting the maximum Trash size limit, it may also be a sign that more aggressive file management is needed for your unused content. Being proactive about removing unneeded files can help minimize Trash build up in the first place.
Other Trash Management Tips
Here are some additional tips for managing the Trash on your Mac:
To permanently delete files and bypass the Trash, select the items then press Command + Option + Delete. This will immediately erase the files without sending them to Trash first. Be careful, as there is no way to recover items deleted this way.
If your Trash contains large files or folders, it can quickly take up storage space. To free up room, empty the Trash by going to the Finder menu and selecting Empty Trash. You can also right-click the Trash icon on the Dock and choose Empty Trash.
By default, macOS will automatically delete items that have been in the Trash for 30 days. To adjust this setting, go to Finder > Preferences > Advanced and change the “Remove items from Trash after 30 days” option.
If you need to permanently erase sensitive files, try a secure deletion tool like Permanent Eraser to overwrite the data before deletion.
Check the Trash size periodically and empty it regularly to free up disk space. An overly full Trash can slow down your Mac.