There are several common reasons why someone may need to wipe or format an external hard drive:
To erase all data before selling or disposing of the drive – It is critical to securely wipe external hard drives that contain sensitive information before selling or disposing of them. A full wipe removes all data so no one can recover it (Source).
To resolve performance issues or errors – Wiping the drive erases any corrupted files or system errors. Formatting reinitializes the drive’s file system which can improve performance and fix errors (Source).
To repurpose the drive with new data – Wiping the drive completely clears all existing data, allowing you to reuse the drive for different data or start fresh with a clean drive.
To remove viruses or malware – Formatting the drive can wipe out any malware that may have infected it.
Wiping or formatting completely erases and prepares an external hard drive for new use. It is an essential step before selling or repurposing a drive.
Back Up Important Data
The first step before formatting your Seagate external hard drive is to back up any important files you want to preserve. According to Newera, hard drive crashes account for a significant percentage of data loss. Therefore, it’s crucial to back up your most important data in case something goes wrong during the formatting process.
Make sure to copy any documents, photos, videos, or other files you don’t want to lose to a separate storage device or cloud backup. External hard drives, flash drives, and online backup services like Google Drive or Dropbox are all good options. The more copies of important files you have, the better.
Take time to identify which files are most valuable before wiping your Seagate drive. Sort through your data and separate out anything disposable from the documents and media you want to keep. Prioritizing important backups first helps prevent permanent data loss.
Formatting will completely erase all of the existing contents of your Seagate external hard drive, so backing up crucial files in advance is a necessary precaution. Save yourself the pain and hassle of losing valuable or sentimental data by taking the time to properly back up your hard drive first.
Disconnect External Hard Drive
Before wiping your Seagate external hard drive, it is crucial that you safely disconnect it from your computer. Improperly disconnecting the drive while it is still mounted and in use can lead to file corruption or data loss.
The proper way to disconnect an external hard drive depends on your operating system:
- On Windows, click the “Safely Remove Hardware and Eject Media” icon in the system tray, then select your drive and click “Eject”. You can also right-click the drive in File Explorer and select “Eject”.
- On macOS, click the eject button next to the drive name in the Finder sidebar or drag it from the desktop to the Trash.
- On Linux, use the “umount” command in the terminal or right-click the drive in your file manager and select “Unmount”.
Once disconnected, physically unplug the USB or power cable from the back of the external drive. Your Seagate external hard drive is now ready to be wiped and reformatted.
Open Disk Utility
Disk Utility is the built-in disk management and repair application on Mac. To open Disk Utility on Mac:
- Click on the Apple menu icon in the top left corner of the screen.
- Select “Disk Utility” from the dropdown menu. This will launch the Disk Utility app.
On Windows 10 and 11, the equivalent utility is called Disk Management. To open Disk Management on Windows:
- Press Windows key + R to open the Run dialog box.
- Type “diskmgmt.msc” and click OK. This will launch the Disk Management utility.
Disk Utility on Mac and Disk Management on Windows allow you to manage, configure, format, and repair disk drives connected to your computer.
Select External Hard Drive
It’s critical to correctly identify and select the external hard drive you want to wipe in Disk Utility. Connect your external hard drive and launch Disk Utility on your Mac. The left side of the Disk Utility window will display a list of available drives and volumes. Locate the external drive you want to wipe, which will likely be named something generic like “External” or “My Passport”. Be absolutely certain you have the correct drive selected, as wiping will delete all data on the drive. If you have multiple external drives connected, be sure to identify the target drive by storage capacity, manufacturer name, or other distinguishing details listed in Disk Utility.
According to The most common sizes for external hard drives are 500GB, 1TB, and 2TB. So if your external hard drive has a 1TB or 2TB capacity, that can help confirm you are selecting the correct drive to wipe.
Erase External Hard Drive
When erasing an external hard drive in Disk Utility, you have two main formatting options: quick erase and full erase. A quick erase is faster, taking just seconds to complete, while a full erase can take hours depending on the drive size. However, there are some key differences between these two options:
A quick erase simply deletes the index of files on the drive, meaning data recovery is still possible. It does not actually overwrite any data on the drive (https://www.sysdevlabs.com/articles/operations-with-storages/full-and-quick-format/).
A full erase overwrites all existing data with zeros, making data recovery extremely difficult or impossible. This ensures all previous data is completely wiped and cannot be accessed again (https://superuser.com/questions/319595/are-there-any-performance-benefits-to-fully-formatting-a-hard-drive-vs-a-quick).
For maximum security when erasing sensitive data, a full erase is recommended. However, if time is limited and you do not need to fully wipe the drive, a quick erase may suffice.
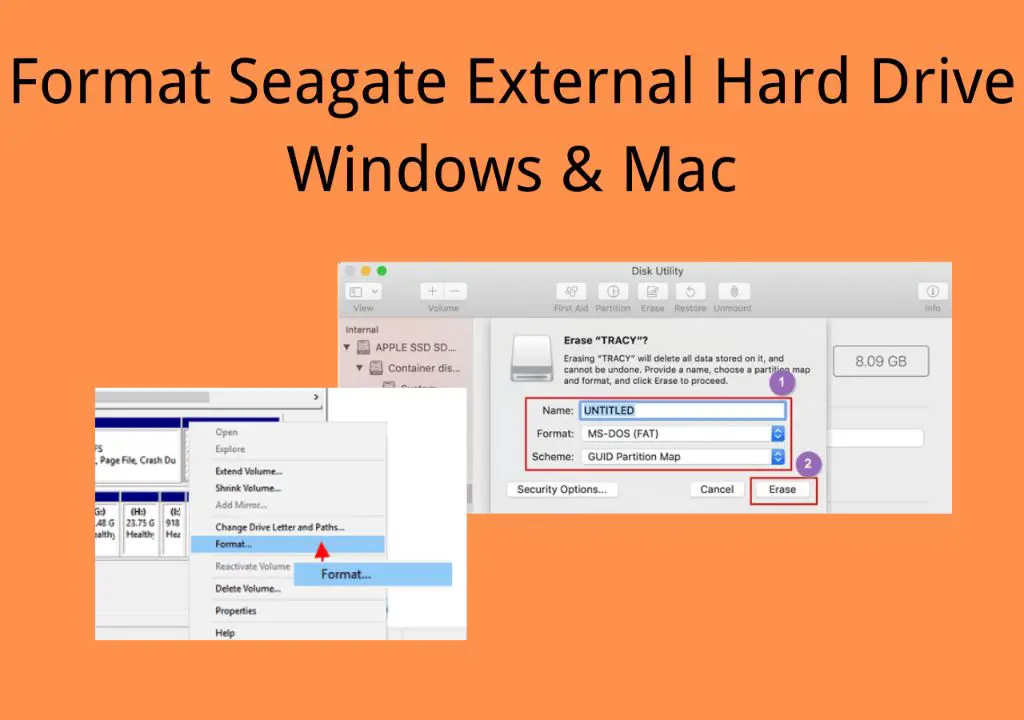
Choose Format Type
The most common format options for external hard drives are exFAT, FAT32, and NTFS. When choosing a format, you need to consider compatibility between operating systems.
exFAT is compatible with both Windows and Mac computers. It supports large file sizes over 4GB and partitions over 32GB. This makes exFAT a good option if you need to transfer large files between Windows and Mac machines. However, exFAT lacks some security features and journaling capabilities that are present in other formats like NTFS.https://www.cnet.com/tech/computing/so-youre-setting-up-an-external-hard-drive-formatting-facts-for-windows-and-mac/
FAT32 is supported by both Windows and Mac OS. However, it has a 4GB per-file size limit, which makes it unsuitable for larger files. FAT32 can be a good option if you need compatibility, but don’t have files over 4GB. https://www.pcmag.com/how-to/fat32-vs-exfat-vs-ntfs-which-format-is-best-for-your-storage-drive
Overall, exFAT is the most flexible format for an external drive used across Windows and Macs. It supports large files without the limits of FAT32.
Start Wiping Process
Once you have selected the external hard drive and chosen the format type, you are ready to begin wiping the drive. To start the process, click “Erase” at the bottom of the Disk Utility window. A pop-up will appear asking you to confirm that you want to erase the drive – click “Erase” again.
The wiping process will now begin. A progress bar will display the status. Depending on the size of the external hard drive and the format type selected, this process can take anywhere from a few minutes to several hours. According to sources, a full format of a 1TB external hard drive can take 1-2 hours on average (EaseUS, 2021; Microsoft Answers, 2021).
Do not disconnect the drive during this process. Wait for the wipe to complete fully. The Disk Utility app will let you know when it is done. Once completed, you will have a freshly formatted, empty external hard drive.
Reconnect External Hard Drive
After wiping your external hard drive, you will need to safely reconnect it to your computer. Simply plugging in the USB cable may not be enough, as your operating system may not immediately recognize that the disk has been erased and reformatted.
On Windows, you may need to go into Disk Management and rescan the disks to get the wiped external drive to show up. From the start menu, type “Disk Management” and press enter. In the Disk Management window, click the “Action” menu and select “Rescan Disks”. Now your wiped external hard drive should appear. https://answers.microsoft.com/en-us/windows/forum/all/how-to-reconnect-external-harddrive-it-is-plugged/9f27277d-9372-4303-9978-e9d722511ba8
On macOS, you may need to unmount and remount the drive. Open Finder and eject the external hard drive by right-clicking on it and selecting “Eject”. Then physically unplug the drive from your computer and plug it back in. The wiped drive should now mount on the desktop. https://www.computerhope.com/issues/ch001876.htm
Once your wiped external hard drive shows back up, you can open it and confirm it is empty and ready for use. Be sure to safely eject it before physically disconnecting it.
Confirm Successful Wipe
After the wipe process is complete, you’ll want to verify that the external hard drive was successfully wiped and formatted. Here are the steps:
- Reconnect the external hard drive to your computer. The drive should mount and appear normally.
- Open up File Explorer (Windows) or Finder (Mac). Click on the external hard drive to view the contents.
- The drive should be empty with no old files or folders present. This confirms a full wipe was performed.
- Right click on the drive and select “Properties” (Windows) or “Get Info” (Mac).
- Under the General tab, check that the File System matches the format you selected earlier (ex: exFAT, NTFS, etc.). This verifies the format was applied.
- Run a benchmark or speed test on the drive. Performance should be normal which indicates no physical damage.
- You can also reuse the drive and add a test folder and file. If you can modify, write, and delete without issue, the wipe and format was successful.
Following these steps will reliably confirm that the external drive has been fully wiped of old data and formatted for reuse. If you encounter any issues with writing files, slow speeds, or errors, additional troubleshooting may be needed.
