Completely wiping a Mac to factory settings can be useful if you plan on selling or giving away your computer. It erases all of your personal data and resets the computer to its original out-of-the-box state. Here’s a step-by-step guide to securely wipe your Mac and reset it to factory settings.
Why Would I Want to Wipe My Mac?
There are a few common reasons to completely erase your Mac:
- You’re passing your Mac onto someone else and want to remove all personal data
- You’re experiencing performance issues and want a fresh start
- You’re selling your Mac and want to wipe it to factory settings for the new owner
Resetting your Mac erases all of the data, settings, apps and personal information from your computer. It’s an easy way to completely remove sensitive information before passing your Mac onto someone else. The process resets the computer to its original factory settings.
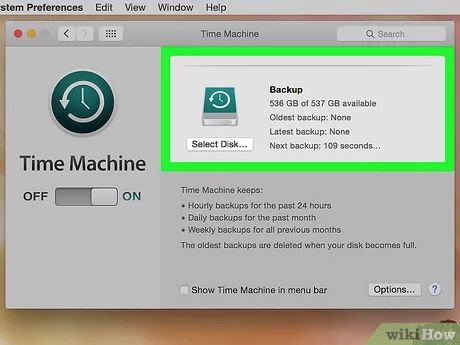
How to Back Up Your Mac Before Wiping It
Before wiping your Mac, it’s important to back up any files or data you want to keep. Here’s how to back up your Mac:
- Use Time Machine to back up to an external hard drive. Plug in an external HDD and go to System Preferences > Time Machine. Select your disk and click “Back Up Now.”
- Use Cloud Backup. Services like iCloud and Dropbox can back up your files remotely.
- Manually drag and drop files onto an external hard drive.
- Use disc burning software to back up specific files to DVDs.
Be sure to eject any external hard drives safely before proceeding with wiping your Mac. The wiping process will erase any connected drives.
How to Wipe a Mac Without Disk Utilities
You can wipe a Mac even without using Disk Utility by doing the following:
- Restart your Mac and hold down Command + R keys simultaneously after you hear the startup chime, this will boot you into Recovery Mode.
- When the Recovery window opens, click on Disk Utility.
- Click “Continue.”
- Select the disk you wish to erase from the left sidebar (usually Macintosh HD).
- Click the “Erase” tab.
- Choose a format (Mac OS Extended is recommended).
- Click “Erase.” This will begin securely erasing your hard drive.
The steps above will securely wipe your Mac and restore it to out-of-the-box factory settings without the need for Disk Utility.
How to Completely Wipe a Mac Clean
Here is the full process for totally wiping a MacBook, iMac or other Mac computer back to factory settings:
- Back up your data. Use Time Machine, cloud backup and/or disk burning to preserve any important files.
- Sign out of iCloud. Go to System Preferences > iCloud > Sign Out. This logs you out of Find My Mac.
- Restart in Recovery Mode. Hold Command + R while booting up to enter Recovery Mode.
- Open Disk Utility. Select Disk Utility from the Recovery window.
- Select your disk. Choose your main disk from the sidebar (usually Macintosh HD).
- Click Erase. Select the “Erase” tab and click the “Erase” button.
- Enable secure erase. Check the box for Secure Erase if available to fully wipe disk data.
- Choose a format. Mac OS Extended (Journaled) is recommended for Macs.
- Erase the disk. Confirm erasing in the popup window.
- Quit Disk Utility. After wiping is finished, click Done and choose “Quit Disk Utility” from the menu.
- Reinstall macOS. Choose “Reinstall macOS” from the menu and follow prompts to restore your Mac.
Following the steps above will completely factory reset your Mac by erasing all of the data and restoring macOS from scratch. The process wipes your Mac 100% clean.
How to Securely Erase Free Space on Mac
In addition to fully wiping your hard drive, you can also just erase any free space on your Mac. This helps protect erased files from being recovered later on. Here’s how to securely erase free space:
- Open Terminal (located in /Applications/Utilities/).
- Type in the following command and press enter:
diskutil secureErase freespace LEVEL /Volumes/DRIVE - Replace “LEVEL” with a number from 1-4 (4 is most secure) and “DRIVE” with your main hard drive name.
- The command will run and overwrite free space on the drive with junk data. This can take awhile.
- When finished, eject and reinsert the hard drive to remount it.
Erasing the free space on your Mac helps provide additional security when deleting sensitive files by overwriting areas of the hard drive that appear free.
How to Securely Erase Files on Mac
You can also use Terminal to securely erase specific files from your Mac. Here’s the process:
- Open Terminal
- Type in
srm /path/to/fileand press enter. - Replace “/path/to/file” with the actual path to the file, for example:
srm /Users/Jane/Documents/notes.txt - Enter your administrator password when prompted.
- The file will be immediately and securely erased by overwriting it several times.
Using the srm command in Terminal will immediately and permanently erase any file you specify in a secure manner.
How to Securely Erase an External Drive
External hard drives and USB flash drives can also be wiped securely on a Mac. Here’s how:
- Connect the external drive to your Mac.
- Open Disk Utility.
- Select the external drive from the left sidebar.
- Click the “Erase” tab.
- Choose a name and format for the drive.
- Select the “Secure Erase” option if available.
- Click “Erase.” The drive will be wiped securely.
Following the steps above will do a secure erase of any attached external drive, giving you a fresh blank slate.
Secure Erase Free Space on External Drives
Much like internal Mac hard drives, you can also just erase the free space on external USB flash drives or hard drives. Here’s how:
- Open Terminal
- Type
diskutil secureErase freespace LEVEL /Volumes/DRIVE
and press enter. - Replace “LEVEL” with a 1-4 security level and “DRIVE” with the
external drive name. - Let the Terminal command overwrite all free space on the drive.
This will help make previously deleted files on external drives much harder to recover by overwriting empty disk space.
How to Securely Erase Mac SSDs
The steps for erasing SSD drives are the same as above, but with one caveat – TRIM support helps SSDs securely erase deleted blocks automatically. To enable TRIM:
- Open Terminal
- Type
sudo trimforce enableand press enter - TRIM will now be enabled and automatically erase deleted blocks on SSD system drives.
Other than enabling TRIM, SSDs can be wiped using the same Disk Utility steps outlined above. Erasing SSDs is a quick process due to their speed advantages.
How Long Does Erasing a Mac Take?
The amount of time it takes to erase your Mac depends on the size of your hard drive and the erasing method. Here are some approximate erase times:
| Hard Drive Size | Quick Erase Time | Secure Erase Time |
|---|---|---|
| 128GB SSD | 5 minutes | 20 minutes |
| 256GB SSD | 10 minutes | 30 minutes |
| 500GB HDD | 20 minutes | 2+ hours |
| 1TB HDD | 30 minutes | 4+ hours |
Larger hard drives and more secure methods take more time. Make sure you don’t interrupt the wiping process after it begins.
Tips When Erasing Your Mac
Follow these tips for a smooth experience when wiping your Mac:
- Use a wired keyboard and mouse. Wireless peripherals may disconnect during the process.
- Plug into AC power. Don’t rely on battery alone to avoid power loss.
- Disconnect other drives. External drives can get erased too if left plugged in.
- Make a backup. Preserve your files before wiping the Mac.
- Erase the right drive. Double check you’ve selected your main system drive before erasing.
Following these best practices will help ensure the wiping process goes smoothly and avoids any unwanted surprises.
What Gets Erased When Wiping a Mac?
Resetting your Mac to factory settings erases all user data and settings, including:
- Documents, photos, music, desktop files
- Downloads, browser history, caches
- Apps and software installed
- System settings and preferences
- Keychains, passwords and login items
Wiping will delete everything except the operating system itself, which gets reinstalled fresh. Be sure to back up anything important before you wipe.
Will Wiping a Mac Improve Performance?
Resetting your Mac can potentially help improve performance, especially if you’ve been experiencing bugs or slowdowns. Here’s why:
- Removes bloated files and caches
- Deletes unneeded apps and software
- Clears out system corruption issues
- Allows fresh reinstall of macOS
Wiping your Mac gives you a clean slate environment that can remedy issues caused by filesystem fragmentation or corruption over time.
Can I Restore Files After Wiping a Mac?
No, once a Mac is wiped the previous data is permanently erased. That’s why it’s critical to have backups before wiping your computer. However, there are some potential ways data could be recovered after wiping:
- From a Time Machine backup
- From an iCloud or cloud service backup
- Using file recovery software on an unencrypted drive
But these methods have limitations. The only sure way to keep your files after wiping is by making backups beforehand.
Is Wiping a Mac Necessary Before Selling It?
It’s highly recommended to wipe your Mac before selling or gifting it to someone else. Here’s why:
- Removes all your personal data and settings
- Deletes sensitive information like passwords and browsing history
- Buyer gets a clean Mac ready for their own use
- Reduces likelihood of your data falling into the wrong hands
Resetting the Mac ensures any sensitive, personal or otherwise private information is not accessible to whoever receives your used computer.
Can I Trade In or Recycle a Mac Without Wiping?
Most recycling or trade-in programs will securely wipe Macs themselves. However, best practice is to erase it beforehand yourself. Reasons to wipe first include:
- Have assurance your data is removed before handing off
- Speeds up the trade-in process by doing wipe ahead of time
- Avoid liability if your data is ever recovered later
When in doubt, do a secure erase of your Mac before any recycling, trade-in or reselling. It protects your privacy.
Is There Any Risk of Damage When Wiping a Mac?
There is little risk of hardware damage from wiping your Mac. The process is non-destructive. However, these steps can avoid potential issues:
- Use a reliable power source during wiping to avoid crashes
- Don’t interrupt the wiping process midway through
- Check for disk errors beforehand using Disk Utility
- Wipe using standard macOS tools like Disk Utility
As long as you take some basic precautions, securely erasing your Mac should not pose any risk of damaging the physical computer hardware.
Can I Restore My Mac’s Original macOS After Wiping?
Yes, the Mac operating system gets reinstalled fresh after wiping the computer. Here’s how it works:
- The Disk Utility erase deletes all data and the existing OS
- After wiping, an option appears to Reinstall macOS
- The latest macOS compatible with your Mac will download
- A clean macOS install happens as part of the reset process
Don’t worry about losing the OS when wiping your Mac. macOS gets automatically restored to its factory defaults.
Conclusion
Completely wiping and resetting your Mac to factory settings is a multi-step process, but following the steps carefully allows you to securely erase all your personal data. Be sure to fully back up your Mac before wiping it. And remember to reinstall macOS to get your computer up and running again after the reset completes. With some precautions, wiping your Mac provides a clean slate and protects your privacy.