Assess the Damage
If your hard drive has gotten wet, the first step is to quickly assess how much water damage it has sustained. The amount of liquid exposure and length of time submerged are critical factors in determining if data can be recovered.
Examine the hard drive for signs of moisture including water droplets, condensation, or corrosion. Carefully note where any water got inside – was it fully submerged or did liquid only hit one area? Understanding how wet the drive became helps gauge the extent of damage.
Also note how long the hard drive was exposed to moisture. The quicker you can remove power and drying, the better chance your data can be saved. If it was only splashed but immediately unplugged, there is hope. However, if left wet for hours or submerged, internal components may be irreparably damaged.
By thoroughly inspecting the external condition right away, you can make an informed determination on next steps. Carefully assessing the water damage situation is key to trying to salvage components and recover data.
(https://www.ontrack.com/en-gb/blog/the-four-most-common-physical-failures-in-hard-drives) (https://www.quora.com/What-are-some-signs-that-your-hard-drive-has-failed-due-to-moisture-damage)
Disconnect the Hard Drive
Before attempting to dry a wet hard drive, it is important to safely disconnect it from the computer or external enclosure it is connected to. This helps prevent any further electrical damage to the drive or computer. Follow these steps:
Unplug the power cable from the back of the hard drive first. Gently pull the cable straight out from the port to disconnect it. Avoid tugging on the cable at an angle or applying too much force.
Next, unplug the data cable, which connects the hard drive to the motherboard or external enclosure. This is often a SATA cable or IDE ribbon cable. Gently pull it straight out.
If the hard drive is installed internally in a desktop computer or laptop, you will need to open up the case and locate where the cables connect to the hard drive. Refer to the computer/laptop manual for steps on properly removing an internal hard drive.
For an external hard drive, unplug the USB, eSATA, or Thunderbolt cable connecting it to the computer. You can now fully disconnect the hard drive.
Once disconnected, set the hard drive aside on a dry, clean surface. Avoid placing it on any towels or materials that could transfer moisture.
With the hard drive disconnected, you can safely move forward with drying it out without risking further electrical damage to your computer system (source: https://www.easeus.com/partition-manager-software/remove-hard-drive-from-computer.html). Handle the drive carefully as you proceed.
Disassemble the Hard Drive
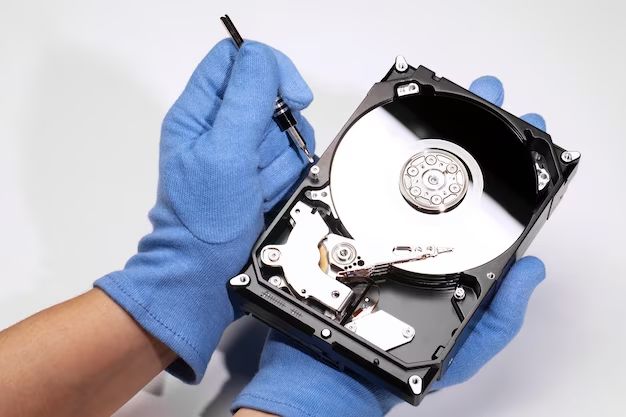
Open the hard drive casing carefully. Hard drives contain sensitive components that can be easily damaged if mishandled. Use a small Philips head screwdriver to remove the screws securing the top cover of the hard drive enclosure. Lift the top cover off slowly and set it aside.
Inside you will see the hard drive platters and read/write heads. Do not touch the platters, as the thin magnetic coating is fragile. Gently unplug the ribbon cable connecting the heads to the circuit board. Remove any screws securing the circuit board and carefully lift it out.
Now you should have access to the bare platters. Be very gentle when handling them to avoid scratching. According to a post on Reddit (source), letting the platters touch the exposed edge of the casing can damage them. Use extra caution when removing them.
Dry the Platters
After removing the platters from the hard drive, it is important to gently dry them to avoid further water damage or corrosion. Use a soft lint-free cloth or dry paper towels to lightly pat the platters dry1. Do not rub vigorously as this can damage the platters. Make sure to dry both sides. You can also use canned air to help blow away any moisture in hard to reach areas.
Be extremely careful when handling the platters, as they can get permanently scratched or damaged if mishandled. Work in a clean, dust-free environment. Once the platters are dried, inspect them closely under a light for any signs of residue or corrosion before reassembling the hard drive.
Dry the Circuit Board
The circuit board on the hard drive contains sensitive electronics that can easily be damaged by water exposure. It’s important to thoroughly dry the circuit board before attempting to power on the drive.
Carefully remove the circuit board from the hard drive housing. Use an electronics-safe air duster to blow away any loose droplets on the surface of the board. Hold the can upright and spray in short bursts to avoid freezing the components.
Be very gentle when handling the board to avoid damaging any solder joints or small components. It may help to use a soft-bristle toothbrush to lightly brush away any corrosion or minerals left behind after the water dries.
Allow the board to fully air dry for at least 24 hours before reassembling. Check for any bent pins or apparent damage before attempting to reconnect power.
Check for Residue
After thoroughly drying the hard drive’s platters and circuit board, it’s important to inspect them for any leftover residue or minerals from the evaporated water. Even tiny amounts of mineral deposits or corrosion can cause issues by creating shorts or leading to disk read/write failures.
Carefully examine all surfaces of the platters and circuit board under bright light. Look for any white or rainbow colored deposits, which may indicate evaporated minerals. Also check for any green, blue or white discoloration, which can signify early corrosion.
If you find any concerning deposits or discoloration, use a soft brush or canned air to gently remove them. Avoid using anything abrasive. Be extremely gentle so as not to damage the delicate platters or electronics. Ensuring no residue remains is crucial for safely reviving a wet hard drive.
Reassemble the Hard Drive
Once all the components of the hard drive have dried completely, it’s time to reassemble the drive. This involves carefully putting the platters and circuit board back together in the proper configuration.
First, place the platters back onto the spindle in the same order they were originally. Make sure they spin freely without rubbing. Next, reconnect the actuator arm so the read/write heads are positioned over the platters. Carefully attach any flex cables that were disconnected during disassembly.
Then, place the circuit board back onto the hard drive frame and reconnect any connectors or fasteners that were removed. It’s crucial to get the alignment right and securely fasten the board, as any instability can prevent the drive from functioning properly.
With the platters, actuator arm, and circuit board reassembled, the hard drive should be fully intact again [1]. However, proceed with caution when attempting to access or power on the drive, as internal damage may still be present.
Attempt Data Recovery
If the hard drive still functions after drying, the next step is to attempt recovering data from it. There are specialized data recovery software programs designed for retrieving data from damaged hard drives (https://computertech.com/blog/hard-drive-water-damaged). These programs can scan the drive and recover files that are still intact. Software like Disk Drill, EaseUS Data Recovery Wizard, and Stellar Phoenix Data Recovery may be able to recover files even after water damage (https://www.gcit.net/blog/7-steps-to-recover-data-from-a-water-damaged-hard-drive). The recovery software attempts to read data from the drive and salvage any files that can be accessed. The chances of data recovery depend on the extent of the water damage. The less time the hard drive spent submerged in water, the better the odds of retrieving data. It is still possible to recover some files even if the hard drive has been soaked, although heavy water damage reduces the recovery success rate. Running data recovery software is an important step to attempt recovering as much data as possible before replacing the damaged drive.
Replace Damaged Components
If testing reveals that certain components like the PCB (printed circuit board) are damaged beyond repair from the moisture exposure, they may need to be replaced. The PCB contains the hard drive’s interface and controller circuitry and is particularly susceptible to liquid damage. According to Cascadia Data Recovery, replacing the PCB can often fix drives that were damaged by liquid or power issues.
First, you’ll need to find an exact matching PCB or compatible replacement board. The part number and revision should match the original. Then carefully detach the damaged PCB and swap in the replacement. Be sure to transfer any chips or ROM from the original board. With the new PCB installed, reassemble the drive and try powering it on again. If it still doesn’t work, further internal damage is likely present.
Try the Hard Drive Again
After letting the hard drive dry thoroughly and replacing any damaged components, the next step is to reconnect it and test if it is functional again. Be very gentle when reconnecting the hard drive, as the internal components may still be fragile after being exposed to moisture.
Reconnect the hard drive to your computer or external enclosure and power it on. Listen closely for any unusual sounds like grinding or clicking noises, which could indicate further internal damage. If the drive powers on without issue, check if it is detected by your operating system.
Attempt accessing the drive and view its properties to check if it has maintained its full capacity. Run hard drive diagnostics software to scan for bad sectors or read/write issues. If the drive seems stable and passes diagnostics tests, you can try recovering data from it through data recovery software before returning it to normal use.
However, if the hard drive is still not detected, makes odd noises, or fails diagnostics, it likely sustained permanent damage. You may need to send it to a professional data recovery service if there is critical data you need to retrieve from it.[1]