What causes a beeping hard drive?
A beeping or clicking noise coming from a hard drive usually indicates some kind of physical damage or mechanical failure. Some common causes include:
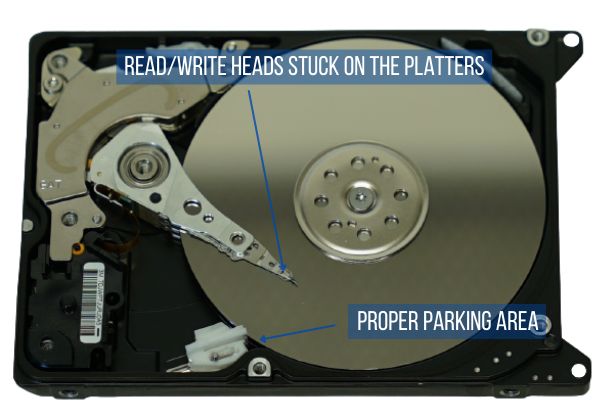
- The read/write head coming into contact with the disk platters
- Failure of the spindle motor bearing
- A loose screw or connector inside the hard drive enclosure
- Misalignment of internal hard drive components
- Physical damage from drops, impacts, or shocks
The beeping occurs because the drive’s built-in diagnostics are detecting an issue that is preventing the disk from spinning up properly. The beeps are an audible error code that can help identify what the problem is.
How to troubleshoot a beeping hard drive
If your hard drive starts beeping, here are some steps you can take to troubleshoot and attempt to fix it:
- Make sure all cables are properly connected – Loose or faulty cables can cause beeping and other issues. Check both ends of the SATA data cable and power cable.
- Try a different SATA cable – Switch out the existing SATA cable with a known good cable, in case the cable is defective.
- Try a different power connector – Use a different power cable or try a new power supply, to rule out any issues with the power supply.
- Check for loose screws or connectors – Open up the hard drive enclosure and visually inspect for any loose screws or connectors that may be causing a short.
- Check the power supply voltage – Use a multimeter to check that the power supply is providing the correct voltages to the hard drive. Look for 5V and 12V outputs.
- Attempt an external connection – Remove the hard drive and connect it externally using a hard drive enclosure or USB adapter cable, to isolate the issue.
- Update hard drive firmware – If available, download and install the latest firmware update for the make and model of the drive.
- Try data recovery software – If the drive is not accessible but still spins up, try using data recovery software to access the data before proceeding with any reformatting.
These steps can help identify any simple issues causing the beeping noise. If the beeping persists and the drive is not detected or spinning up normally, then physical repair methods may be required.
How to physically repair a beeping hard drive
If the beeping or clicking noise indicates a physical issue within the hard drive, you may need to carefully open it up in a professional cleanroom environment to inspect and replace any faulty components. Here is an overview of the physical hard drive repair process:
- Open the drive in a certified cleanroom – This prevents dust contamination which could damage heads and platters.
- Remove the outer drive casing – Access the internal components, heads, actuator arm, circuit board, etc.
- Inspect physical damage – Look for any signs of heads scraping platters, failed bearings, detached arms, etc.
- Replace damaged parts – Swap out any obviously damaged components like read/write heads, motor, or logic board.
- Realign drive heads – Use specialized tools to realign heads and ensure proper spacing from platters.
- Perform test rotations – Spin the platters to verify proper movement and spacing, listening for any grinding or scraping.
- Reassemble the drive – Put all components back together properly after replacements and adjustments.
- Repeat as needed – Fully test and retry repair steps if the beeping persists upon reassembly.
- Run diagnostics – After successful repair, perform a full suite of drive diagnostics and read/write testing.
Hard drive repair requires very specialized skills, tools like torque screwdrivers, calibration equipment, and cleanroom environments. Unless you are specifically trained in hard drive repair, it is not recommended opening up drives outside of a professional data recovery lab. Improper disassembly or reassembly often damages drives further and makes data recovery impossible.
Best practices to avoid drive failure
While even new hard drives can spontaneously fail at times, following best practices can greatly reduce the chances of having a drive die on you:
- Handle drives gently and limit shock/vibrations
- Keep drives cool with adequate ventilation and airflow
- Do not move or use drives while they are actively reading or writing
- Maintain a backup drive or other backup solution for critical data
- Use a surge protector to avoid power spikes
- Regularly scan drives for errors using built-in utilities
- Ensure proper partitioning alignment on new drive installs
Drives that are over 3 years old should also be closely monitored for any signs of issues emerging. Overall, following best practices, checking SMART diagnostics, and spot testing drives can help you identify problems early and improve the chances of recovering data from a troubled drive.
Data recovery options
If you have a drive that is beeping or malfunctioning and you need to recover important data from it, there are several data recovery options to consider:
- Try DIY recovery software – Software like [Recuva](https://www.ccleaner.com/recuva), [EaseUS](https://www.easeus.com/datarecoverywizard/free-data-recovery-software.htm), or [Stellar](https://www.stellarinfo.com/data-recovery.php) may allow you to recover data from some drive failures, if the drive is still partially accessible.
- Send to a data recovery lab – For drives with physical damage or complex issues, professional data recovery labs can disassemble drives in cleanrooms and repair issues to gain access to recover data. Success rates vary significantly based on damage type.
- Replace the circuit board – For drives with circuit board failures but no platter damage, swapping in a matching donor board can allow data recovery. Only recommended when diagnostics point to clear board issues.
- Repair and recover internally – Companies with large amounts of sensitive data often choose to setup internal data recovery labs, to keep drives onsite and control the process.
- Use data backup – Having a good backup can allow you to simply restore data from an identical copy, rather than trying to recover from the failed drive.
If the data is truly valuable or irreplaceable, a data recovery lab may offer the highest chance of significant recovery, if cost is not the primary concern. Consulting with the lab upfront on projected success rate and costs is recommended.
Preparing a drive for data recovery
If you need to ship a drive out for professional recovery, proper handling and packaging is crucial to avoid further damage in transit:
- Clearly label the drive with a tag including company name, drive model, and RMA/reference number
- Photograph the drive and label for reference prior to packing
- Keep the drive in an anti-static bag when not being actively packaged
- Use plenty of bubble wrap or foam blocks to cushion the drive
- Pad drive between two stiff boards or sheets of plywood to avoid flexing
- Secure drive in box with padding on all sides, top, and bottom
- Seal the box securely with packing tape but avoid taping directly on the drive
- Ship via tracked courier and insure the package, in case issues arise in transit
Proper handling and packaging will keep the drive in the same condition as when it left your hands, avoiding anyShipping vibration, shock, or static discharge. This gives the data recovery lab the best possible starting point.
Costs of hard drive data recovery
Data recovery does not come cheap, with costs varying based on the specific failure, timelines, and amount of data involved:
| Issue Type | Typical Cost Range |
| Logical failure | $300 – $1000+ |
| Physical failure – minor | $1000 – $2000 |
| Physical failure – major | $2000 – $5000+ |
| Expedited 1-2 day service | 50-100% surcharge |
| Large enterprise SAN/RAID | $5000+ |
The extensive labor involved in hard drive repair and the cost of class 100 cleanroom facilities drives prices upward. Mission critical data for businesses may warrant the high price, but consumers are often better off simply replacing a damaged hard drive and restoring from backup where possible.
Choosing a data recovery company
Not all data recovery firms offer the same level of experience, capabilities, and results. When selecting a provider, key factors to consider include:
- Experience – Years in business, number of clients served, and customer reviews.
- Capabilities – Types of drives, failures, and RAID configurations supported.
- Staff – In-house engineers vs outsourcing. Background and certifications.
- Process – Evaluation, diagnostics, repair methods, cleanroom rating, and security.
- Pricing – Fee structure, quotes, and payment terms. Beware very low cost providers.
- Location – Distance to shipping hub if drive needs to be sent in.
- Guarantee – Any money-back guarantee if data is unrecoverable.
Ideally you want an experienced company with strong capabilities, internal engineers, demonstrable processes, Class 100 ISO 5 cleanrooms, and reasonable transparent pricing. Location close to your facilities can help speed logistics too.
Conclusion
Hard drive failure is always an unpleasant surprise, but a beeping drive fortunately provides an early warning of issues. Quickly powering off the drive, troubleshooting connections, and turning to professional recovery services offer the best chance of recovering your valuable data. With some knowledge of the drive repair process, smart handling, and help from the experts, you can get back to business with minimal data loss downtime. Just be sure to have redundant backups already in place before hearing that ominous beeping from your hard drive.