What Does the Error Message Mean?
The “long DST check failed” error message indicates that your hard drive was unable to complete the Drive Self Test (DST). The DST is a diagnostic test that checks the physical integrity and function of the drive by scanning the platters, heads, motors and internal electronics https://www.salvagedata.com/how-to-fix-hard-disk-short-dst-check-failure/
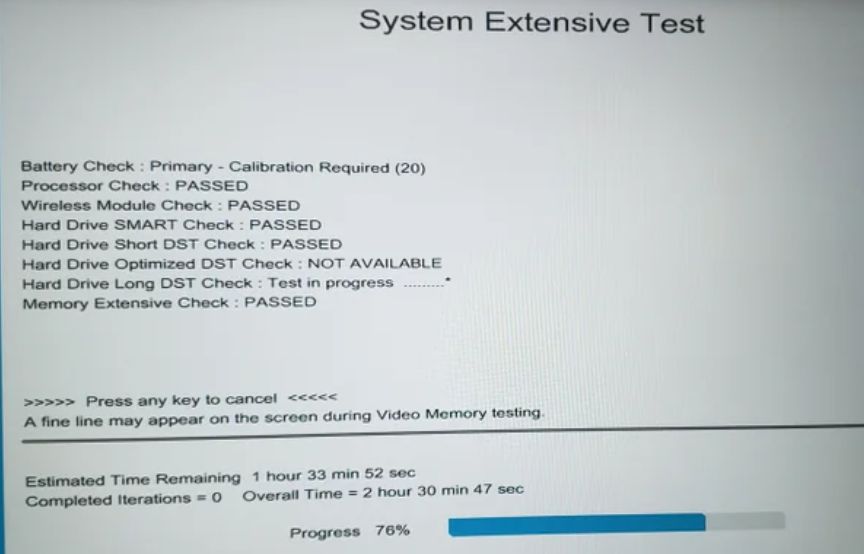
There are two types of DST – short and extended. The short DST takes just a few minutes and checks the critical drive components. The long DST is more comprehensive and can take hours to complete. If the long DST fails, it typically means there are major issues with the hard drive mechanics or internal hardware.
A “long DST check failed” error indicates your hard drive was unable to pass this comprehensive evaluation, and some part of the physical drive hardware is damaged or malfunctioning. This prevents the drive from reliably reading and writing data. Without resolving the underlying issue, you risk further deterioration or total failure of the drive.
Common Causes of the Error
There are several potential causes for the “long DST check failed” error message:
- Bad sectors on the hard drive – Over time, physical defects can develop on the platters inside a hard drive leading to sectors that cannot reliably store data. This often occurs as a hard drive ages.
- Corrupted system files – Critical operating system files like the registry, bootloader, or file system structures may have become corrupted, often following an unexpected reboot or crash during an update.
- Faulty hard drive components – Issues with the hard drive’s printed circuit board, actuator arm, spindle motor, or firmware can produce errors during diagnostic testing.
- Driver conflicts – Incompatible, outdated, or buggy drivers for components like the hard drive controller may generate incorrect results during self-tests.
- Virus infection – Some viruses and malware specifically target and damage the master boot record, partition tables, or other areas of a hard drive.
Diagnosing the root cause requires testing the drive hardware with diagnostic software and examining system files for corruption. But the “long DST check failed” error almost always indicates some internal hard drive fault rather than a problem with other hardware components or connections.
Back Up Your Data
Before attempting any repairs on a hard drive that is failing or showing errors, it is absolutely critical that you back up your data first. As the NetApp article points out, backup and recovery is an essential process for protecting against potential data loss. Once a hard drive begins to fail, the likelihood of total failure increases over time. Thus, having a regular backup routine can give you invaluable peace of mind if problems arise.
As the Shortlet Express article emphasizes, backing up your data before attempting repairs provides peace of mind that your files are securely stored elsewhere. This allows you to proceed with diagnostics, repairs, or even hard drive replacement without fear of permanent data loss. The backup gives you a safety net in case the drive fails beyond recovery.
In summary, always backup your important files and data before moving forward with any HDD troubleshooting or repairs. Having a backup eliminates the stress of potential data loss. It’s an essential precautionary step before tinkering with a drive that’s throwing errors.
Try Chkdsk to Fix File System Errors
One of the most common solutions for a hard drive with long DST check failed errors is to run the Chkdsk utility. Chkdsk scans the drive and attempts to fix file system errors and bad sectors.1 To use Chkdsk:
- Open the Command Prompt as an administrator.
- Type “chkdsk C: /f” (without quotes) and hit enter. Replace C: with the letter of your hard drive if different.
- Chkdsk will scan the drive and report any errors. If errors are found, type “Y” to have Chkdsk attempt repairs.
The /f parameter tells Chkdsk to fix any file system errors it finds. You can also add /r to locate bad sectors and recover readable data, or /x to force the volume to dismount before the scan.
After Chkdsk completes, reboot your computer and check if the long DST check failed error persists. Running chkdsk regularly can help prevent file system corruption that leads to this error.
Update or Reinstall Drivers
An outdated, buggy, or corrupted hard drive driver can sometimes cause the long DST check failed error. Updating to the latest driver from the manufacturer’s website is one of the easiest troubleshooting steps to try. You can find the specific model of your hard drive in Windows Device Manager or by using a program like Speccy.
Go to the hard drive manufacturer’s website and search for the latest driver for your specific drive model. Download and install the driver, reboot your computer, and check if the long DST error still appears. Reinstalling the existing driver by uninstalling it fully before reinstalling can also fix driver corruption issues.
Additionally, make sure your hard drive’s firmware is up to date by checking on the manufacturer’s website. Firmware handles the low-level operations of a drive, and an outdated version can lead to performance issues or hardware faults.
If updating the driver and firmware does not resolve the long DST check failure, it is likely an indication of a physical problem with the hard drive that will require further troubleshooting or replacement of the drive.
Sources:
[1] https://h30434.www3.hp.com/t5/Notebooks-Archive-Read-Only/hard-disk-long-DST-test-failed/td-p/4063766
Check SATA Cables and Connections
Faulty SATA cables can sometimes cause the “long DST check failed” error. Over time, SATA cables can become damaged or loose. Check that both ends of the SATA data cable are properly connected – one end to the hard drive and the other to the motherboard’s SATA port. Wiggling cables and connectors may reveal a loose connection. Inspect the SATA cable for any obvious damage like bent pins, frayed wires, cracked connectors etc. If you have a spare SATA cable, swap it out to see if that resolves the issue.
According to StarTech.com, “The most common issues with SATA cables are caused by frequent insertion and removal of connectors over time, which can spread or bend the connector pins” (source). Try reseating both ends of the cable or swap out for a new SATA cable if you suspect a faulty connection. Proper cable seating with undamaged locking clips can prevent connectivity issues.
Test the Drive with Diagnostic Software
Running diagnostic software tools is one of the best ways to test for issues with your hard drive. Most hard drive manufacturers provide their own free diagnostic tools. For example, Seagate offers the free SeaTools utility that can test Seagate brand hard drives for errors and bad sectors. Western Digital offers the Data Lifeguard Diagnostic tool for testing their drives.
These manufacturer-specific diagnostic tools often provide the most comprehensive testing since they are designed specifically for that brand of hard drive. They will perform various read/write tests, benchmark the drive’s performance, check the S.M.A.R.T. health status, and scan for bad sectors. Running the extended/long test is recommended for the most thorough results.
Some good free hard drive diagnostic utilities that work across brands include HD Tune, HDDScan, CrystalDiskInfo, and Hard Disk Sentinel. These will measure drive performance, temperature, S.M.A.R.T. data, and scan for issues.
Attempt Data Recovery
If the hard drive is still partially working and you are able to access it, attempt to recover important files and data before taking further action. There are many data recovery software programs available that may be able to recover deleted or corrupted files from a failing hard drive.
Some top recommended data recovery software options include:
- Stellar Data Recovery (https://www.stellarinfo.com/data-recovery.php) – offers a free trial and deep scanning capabilities to recover lost or deleted files.
- Disk Drill (https://www.cleverfiles.com/) – easy to use with free and premium versions, recoveries many file types.
- Recuva (https://www.ccleaner.com/recuva) – free damaged file recovery software from Piriform.
These programs can scan the hard drive and restore recoverable files to another drive or device. Results vary depending on the severity of the drive errors. It is a good idea to attempt data recovery before replacing the hard drive completely.
Consider Replacing the Hard Drive
If none of the previous troubleshooting steps are successful in fixing the “long DST check failed” error, it’s likely that the hard drive has failed or is failing. At this point, replacing the hard drive may be necessary as it is likely unrepairable.
Hard drives have a limited lifespan and will eventually fail, though regular drives typically last between 3-5 years on average before failure [1]. SSDs generally last longer, around 5-7 years on average [2]. Failure can happen earlier though due to manufacturing defects or heavy usage over time.
If your hard drive with the “long DST check failed” error is making odd noises, has bad sectors, or other signs of failure, replacing it is the surest way to regain full functionality. Be sure to back up any important data first if possible. Then, you can install a new hard drive and restore your OS and files from a backup.
Replacing a faulty hard drive will resolve the error and restore normal performance. While pricier than repair, a new drive will provide you with additional years of reliable use.
Preventing Future Hard Drive Failure
While there is no way to completely prevent a hard drive failure, there are steps you can take to prolong the life of your drive and avoid potential issues.
Monitor the SMART status of your drive using software like HD Sentinel. SMART provides insight into the health of your drive and can warn you about problems before failure occurs.
Manage heat levels inside your computer case. Excessive heat causes drives to wear out more quickly. Ensure proper airflow and ventilation. Consider additional cooling options if needed.
Avoid shocks and impacts to your computer during operation and transport. Sudden movements can damage drive components.
Keep your drive properly maintained. Perform occasional defragmentation, run error scans, and delete unnecessary files to maximize performance.
Replace the SATA data cable connecting your drive if you notice connection issues or errors.
Upgrade to solid state drives which have no moving parts and greater resilience than traditional HDDs.
And above all, maintain backups of your important data. That way you can easily recover should a failure occur.
