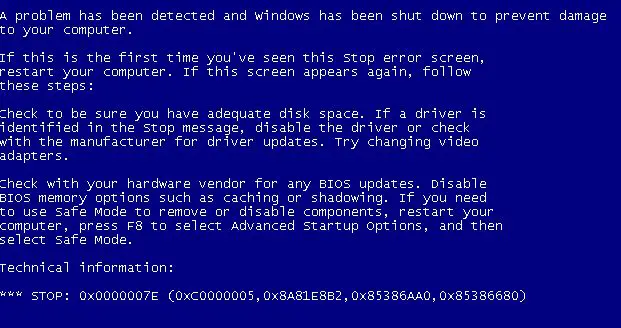
The “A problem has been detected and Windows has been shut down to prevent damage to your computer” error, also known as the Blue Screen of Death (BSOD), can be frightening when it appears on your Windows 7 computer. This critical error indicates a serious problem that forced Windows to shut down to prevent further damage. However, there are several troubleshooting steps you can take to identify and resolve the underlying issue.
What Causes the “A Problem has Been Detected” Error?
There are a few common causes behind the dreaded “A problem has been detected and Windows has been shut down” error screen:
- Faulty or incompatible drivers
- Corrupted system files or registry issues
- Failing hardware like bad RAM or a failing hard drive
- Overheating issues
- Malware, viruses, or spyware infection
- Software conflicts
The error message itself does not indicate the specific problem. You need to analyze the technical details, troubleshoot, and test components to identify the underlying cause.
How to Analyze the Technical Details
When the “A problem has been detected” error appears, Windows 7 automatically creates a memory dump file with information about the error. Analyzing this file can provide clues to identify the culprit.
To view the memory dump file:
- Restart your PC and enter the Windows Advanced Boot Options menu. To do this, restart your computer and press F8 before the Windows logo appears. Select “Disable automatic restart on system failure” and click OK.
- When the error appears again, Windows will not automatically restart. The screen displays a code like “*** STOP: 0x0000007E”. Write down the full error code.
- Restart your PC normally and log in to Windows.
- Open Event Viewer. Go to Control Panel > System and Security > Administrative Tools > Event Viewer.
- In the left pane, expand Windows Logs and click on System. Scan the list for critical errors marked as “Bugcheck” or “LiveKernelEvent”. Double click to open the details.
- Compare the Bugcheck or LiveKernalEvent error code with the code you wrote down earlier. Identify the memory dump file that matches the error.
- Right-click on the error log and select “Copy Details as Text”. Paste this into a text file for reference.
Analyzing the memory dump file code and text details provides clues about the cause of the error, such as faulty drivers, system file corruption, or hardware issues.
How to Resolve Driver Issues
Since faulty device drivers are a common culprit behind the “A problem has been detected” error, focus your troubleshooting here first.
To fix driver issues:
- Identify the problematic driver using the memory dump error details.
- Open Device Manager by right-clicking Computer and selecting Manage > Device Manager.
- Expand nodes to locate the device with driver issues. You may see a warning sign or errors.
- Right-click the device and select Update Driver Software.
- Select “Search automatically for updated driver software” to find and install an updated driver.
- If updates are not available, rollback the driver. Right-click the device, select Properties > Driver tab, and click Roll Back Driver.
- You can also uninstall the faulty driver completely, then reboot so Windows reinstalls default drivers.
- Update other outdated drivers as needed.
- Reboot and see if the error persists. Update or rollback additional drivers one by one until resolved.
This process helps eliminate bad drivers as the source of the error. Be sure to keep your drivers updated, especially for critical components like your video card, storage drives, and motherboard.
How to Fix System File Corruption
If a corrupted Windows system file is causing the error, using System File Checker can scan and restore corrupted files:
- Type cmd in the Windows search bar.
- Right-click Command Prompt and select Run as administrator.
- Type sfc /scannow and hit Enter to run the scan.
- System File Checker will scan Windows files and repair any damage found.
- Restarts may be required to fully apply repairs.
- Run additional scans until no corrupted files are found.
This scans and restores important system files that may have become corrupted or damaged. If files cannot be repaired, your Windows installation media or recovery image can provide working copies.
How to Use Windows Startup Repair
Startup Repair is another handy Windows recovery tool that can fix issues like:
- Corrupted or missing system files
- Damaged boot configuration settings
- Boot errors that crash Windows during launch
To run Startup Repair:
- Access the Windows Advanced Boot Options menu.
- Select the Windows installation drive, usually C:\, and click Repair Your Computer.
- Choose Troubleshoot > Advanced Options > Startup Repair.
- Startup Repair will scan and automatically attempt repairs.
- If it finds and fixes issues, click Restart when prompted.
Startup Repair helps identify and restore damaged system files and settings needed to load Windows properly on boot. This can resolve many causes behind the “A problem has been detected” error.
How to Resolve Registry Errors
The Windows registry stores system configuration settings that could get corrupted and cause the critical error. Use Registry Editor to fix issues:
- Type regedit in the Windows search bar and select Registry Editor.
- Navigate to problem registry keys identified in memory dump logs.
- Right-click damaged keys and select Delete to remove corrupt entries.
- Export healthy registry keys as backups before making changes.
- Reboot and see if deleting corrupt keys resolved the error.
Advanced users can carefully edit the registry to fix configuration issues causing the error. Backup your registry before making edits, and take care not to damage healthy keys.
How to Test and Replace Failing Hardware
Failing hardware like bad RAM, failing hard drives, and faulty CPU components can also trigger the “A problem has been detected” error. Test components with tools like Windows Memory Diagnostic.
To test hardware:
- Open Windows Memory Diagnostic to scan for RAM issues. Go to Control Panel > Memory Diagnostic Tool to launch it.
- Check hard drives using CHKDSK. Open the command prompt as admin and run “chkdsk C: /f” to scan drive C.
- Monitor CPU temperature with a system monitor tool to check for overheating.
- Test hardware components like RAM using manufacturer diagnostics tools if available.
- Replace any components flagged as failing.
Replacing faulty RAM, hard drives, power supplies, CPUs, and motherboards can resolve the error if a hardware component is causing the BSOD crashes.
How to Clean Malware Infections
Malware like viruses, spyware, and rootkits can sometimes trigger a “A problem has been detected” error. Scan your system and clean infections:
- Run a quick scan with your antivirus software like Windows Defender.
- Download and run more comprehensive scanners like Malwarebytes to detect deeply hidden malware.
- Update your antivirus software and scan again to clean quarantined infections.
- Reset your browser settings to default and remove unwanted extensions that may contain malware.
Wiping out malware removes harmful files, processes, and registry entries that can cause Windows crashes. Make sure your scan any connected drives or devices as well.
How to Troubleshoot Software Conflicts
Incompatible or buggy software programs can also sometimes trigger the error. Troubleshoot installed software:
- Boot to Safe Mode to isolate software issues. In the Advanced Boot Options menu, choose “Safe Mode”.
- If the error does not appear in Safe Mode, a conflict with third-party software is likely.
- Uninstall recently added programs or drivers one by one until you isolate the problematic software.
- Roll back software updates that precede the start of the crashes.
- Update buggy software programs to their latest stable versions.
By isolating software changes and conflicts, you can narrow down and remove problem applications causing system instability and critical crashes.
How to Fix Overheating Issues
Hardware components overheating, especially the CPU and GPU, is another common cause of the BSoD error. Fix overheating problems:
- Power off and open your PC case to physically inspect components. Look for blocked vents or fans clogged with dust.
- Clean dust buildup using compressed air. Make sure fans spin freely.
- Reapply thermal paste between the CPU and cooler if it’s dried out.
- Monitor temperatures in the BIOS during boot, or with a system monitor utility while running Windows.
- Consider upgrading cooling components like CPU coolers, case fans, or the power supply.
Preventing components from overheating reduces crashes and extends hardware lifespan. Keep your PC internals clean and properly cooled.
How to Perform a Clean Install
If you cannot resolve the “A problem has been detected” error through troubleshooting, a clean install of Windows may be necessary:
- Backup personal data to external storage.
- Boot to a Windows 7 installation DVD or USB drive.
- Follow the prompts to install Windows fresh on your PC.
- Install hardware drivers and necessary applications.
- Restore personal data you backed up.
A clean install repairs damaged Windows system files that may resist troubleshooting fixes. This removes any complex software issues or conflicts.
Conclusion
The “A problem has been detected and Windows has been shut down” error can stem from several causes, ranging from faulty drivers and hardware to malware infections. Carefully analyze error details, isolate issues with safe mode, update faulty drivers and applications, replace failing hardware, and clean infections to resolve the problem. For stubborn issues, Startup Repair, a system file scan, or a full Windows reinstall may be required. With patience and persistence, you can troubleshoot the error and get Windows 7 running smoothly again.