What is recovery mode on an iPad?
Recovery mode is a special state an iPad can enter to allow you to restore or update its software. It is necessary when the iPad encounters a serious software issue that prevents it from booting up normally (Apple 2024[1]).
Entering recovery mode loads a basic version of iOS without loading the full operating system. This allows iTunes or Finder to communicate with the iPad and apply a fresh software install to hopefully resolve the issue. It is an important troubleshooting step before resorting to advanced repair methods.
When should you force an iPad into recovery mode?
Forcing an iPad into recovery mode should only be done as a last resort when the device experiences serious software issues that cannot be resolved through standard troubleshooting.
The most common scenarios that may require recovery mode include:
- iPad crashes and gets stuck at the Apple logo during start up
- Failed iOS update leaves iPad in activation loop
- Forgotten passcode makes iPad inaccessible
- Jailbreaking process fails and results in boot loop
- Major performance issues, glitches or bugs after a software update
- Screen is unresponsive, but iPad is otherwise functioning
- iTunes errors when trying to restore iPad software
- 3rd party apps cause constant freezing or crashing
In all these scenarios, recovery mode should allow you to successfully restore the iPad using iTunes on a computer. This will wipe the iPad back to factory settings, resolving any major software issues in the process.
Recovery mode is the last option before needing to take the device for hardware repair if a software restore does not work. It should not be used regularly or for minor issues that can be fixed through standard troubleshooting.
Requirements
Before forcing an iPad into recovery mode, you’ll need to make sure you have the following:
- An iPad running iOS 12.0 or later. Older versions of iOS do not support recovery mode in the same way (https://support.apple.com/en-us/HT201263).
- A computer with the latest version of iTunes installed. Recovery mode requires connecting your iPad to a computer with iTunes in order to restore or update the device (https://support.apple.com/en-us/108925).
- A Lightning to USB cable to connect your iPad to your computer.
- A recent backup of your iPad data in iTunes or iCloud. The recovery mode process will erase your iPad data, so having a current backup is highly recommended.
As long as you have those requirements covered, you should be ready to force your iPad into recovery mode.
Backup iPad Data First
It’s critically important to backup your iPad data before forcing the device into recovery mode. Recovery mode erases all content and settings from your iPad, so the only way to preserve your data is by backing it up beforehand.
You should backup your iPad to either iCloud or iTunes on a computer. Backing up to iCloud allows you to restore your data over-the-air later, while iTunes provides a wired backup option. To backup to iCloud, ensure you’re connected to WiFi and go to Settings > [your name] > iCloud > iCloud Backup and tap “Back Up Now.” To backup locally through iTunes, connect your iPad to a computer and open iTunes. Under Backups, right click on your iPad and select “Back Up Now.”
Without a current backup, all photos, documents, settings and other data will be permanently lost when the iPad is restored from recovery mode. So it’s absolutely vital to backup your device before proceeding any further. According to Apple Support, “Make sure that you have a current backup before you put your device into recovery mode so you don’t lose your information.”1
Step 1: Connect iPad to computer
To force an iPad into recovery mode, you first need to connect it to a computer using the appropriate USB cable. The iPad should be connected to a computer with iTunes installed.
Use the USB cable that came with your iPad or an Apple-certified Lightning to USB cable for an iPad with a Lightning connector. For older iPad models with a 30-pin dock connector, use a 30-pin to USB cable. Using a compatible, Apple-certified cable is important to ensure proper communication between the iPad and computer.
With the appropriate cable connected, plug your iPad into a computer that has iTunes installed. iTunes is required to communicate with the iPad when in recovery mode and complete the restore or update process.
Once connected, proceed to the next step to force restart the iPad and enter recovery mode.
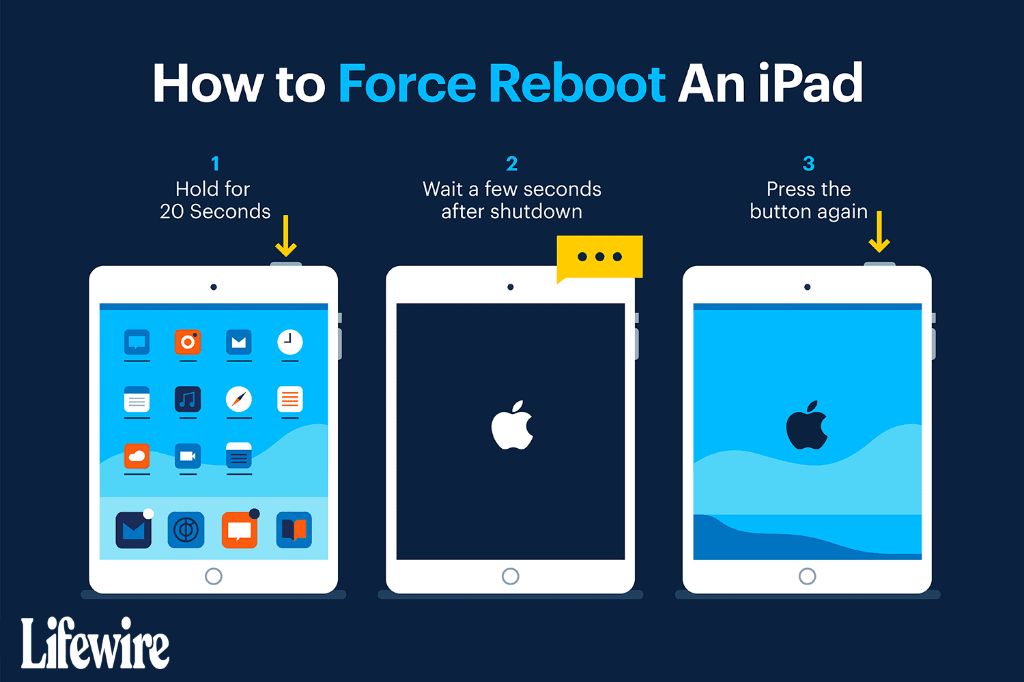
Step 2: Force restart the iPad
To force restart your iPad, you need to hold down the power button and home button (or top button on newer iPad models) at the same time until you see the Apple logo appear on the screen. This will force your iPad to reboot.
Specifically, follow these steps:
- On an iPad with a home button, press and hold both the power button and home button together until the Apple logo appears. This should take around 10 seconds.
- On newer iPad models without a home button, press and hold both the power button and top button together until the Apple logo shows up. Keep holding both buttons for at least 10 seconds.
- Once the Apple logo is displayed, release both buttons.
Forcing a restart like this will terminate all running programs and reboot your iPad. According to EaseUS Software, this can help resolve many issues like a frozen screen or non-responding iPad.
Step 3: Release power button only
After the Apple logo appears on your iPad screen, you can release the power button, but continue holding the home button down until iTunes detects your iPad and says “iTunes has detected an iPad in recovery mode.” According to Apple support, it’s important to keep holding the home button down after the Apple logo appears and while iTunes detects the iPad in recovery mode. Releasing both buttons too early can cause your iPad to boot up normally instead of entering recovery mode.
Step 4: iTunes will detect iPad in recovery mode
Once the iPad is forced into recovery mode, iTunes on your connected computer will detect that the iPad is in recovery mode and display a recovery mode screen. The recovery mode screen in iTunes will show an image of the iPad with a cable and arrow pointing to the iTunes icon to indicate that the iPad is connected and in recovery mode.
The iTunes recovery mode screen will also display a message stating “There is a problem with your iPad that requires it to be updated or restored.” This informs you that iTunes has recognized your iPad is in recovery mode and ready for you to restore or update it to fix any software issues.
At this point, with iTunes detecting the iPad in recovery mode, you can proceed to the next step of either restoring or updating the iPad software to get it functioning normally again. The key factor in step 4 is that iTunes provides the visual confirmation that the iPad is in recovery mode so you can continue the process.
For more details on the iTunes recovery mode screens, see the Apple support article on recovery mode: If you can’t update or restore your iPhone or iPod touch.
Step 5: Restore or update iPad software
With your iPad in recovery mode and connected to your computer, you can use iTunes to restore or update the iPad software. There are two options:
- Restore – This will completely erase your iPad and install the latest iOS version. All data, settings and apps will be wiped. You should backup your data first if possible. See this Apple discussion thread for more details.
- Update – If you want to install the latest iOS version but keep your data, you can choose to just update. This will preserve your settings and files.
Open iTunes on your computer and it will detect the iPad in recovery mode. Click on the iPad icon and then click “Restore” or “Update” depending on if you want to erase fully or just update. The software will be downloaded and installed onto your iPad automatically. See this guide for step-by-step instructions.
Once the restore or update process completes, your iPad will reboot and you can start using it again. If you chose to restore, you’ll need to set the device up again from scratch.
Exit recovery mode
Once you have finished restoring or updating your iPad software through recovery mode, you will need to exit recovery mode to use your iPad normally again. Here are the steps to exit recovery mode on an iPad:
1. Disconnect the iPad from your computer’s USB port. The “Connect to iTunes” screen should still be displayed on your iPad.
2. Press and hold the Sleep/Wake button on top of the iPad until you see the Apple logo appear on the screen. This may take up to 30 seconds.
3. Once the Apple logo appears, release the Sleep/Wake button. This will boot up your iPad as normal, exiting recovery mode.
4. If your iPad doesn’t exit recovery mode, you may need to force restart it again by holding down the Sleep/Wake and Home buttons together for at least 10 seconds until the Apple logo appears. This should force your iPad to boot up into normal mode.[Proven Guide] How to Fix iPad Stuck in Recovery Mode
After following these steps, your iPad should be fully functional again outside of recovery mode. All your data should be intact after restoring or updating through recovery mode.
