iTunes is the media management software created by Apple to sync music, videos, and other content between computers and iOS devices like the iPhone. iTunes allows you to add your music library and playlists to your iPhone for listening on the go through either automatic syncing when connected via USB or manual syncing for more control.
Manual syncing with iTunes gives you the ability to hand pick which songs, albums, artists, playlists get transferred to your iPhone. This allows you to save storage space on your iPhone and only sync music you want access to on your iPhone. With automatic syncing, any new music added to your iTunes library also gets added to your iPhone which can quickly eat up storage space.
The key benefits of manual syncing include:
- Saving iPhone storage by only syncing music you choose
- Creating custom playlists or mix albums to sync
- Avoiding unwanted music syncing from your iTunes library
- Greater control and customization over your iPhone music collection
Prerequisites
Before you can manually sync music from iTunes to your iPhone, you need to make sure you have the latest version of iTunes installed on your computer. iTunes can be downloaded for free from the Apple website. Having the latest version will ensure full compatibility with your iPhone.
You’ll also need to connect your iPhone to your computer using the included USB to Lightning cable. This allows iTunes to communicate directly with the iPhone to sync music. Make sure your iPhone has been updated to the latest iOS software version as well for best performance. Your iPhone will need to stay connected during the entire syncing process.
Enable Manual Syncing
To enable manual syncing of music between iTunes and iPhone, you first need to open iTunes preferences. Go to Edit > Preferences in the iTunes menu bar (Windows) or iTunes > Preferences (Mac).
In the Preferences window, click on the Devices tab. Here, you will see the option to “Prevent iPods, iPhones, and iPads from syncing automatically.” Make sure this option is unchecked to disable automatic syncing.
According to Apple Support, “When you sync automatically, iTunes erases any items from your device that aren’t already in your library. Manual syncing lets you drag items to your device individually, which can take longer but gives you more control. You can still have podcast content sync automatically.”1
Once you have unchecked this option, you can close Preferences. Now when you connect your iPhone to your computer, iTunes will not automatically sync all content. This allows you to manually select just the music you want to transfer.
Select Music to Sync
To select the specific music you want to transfer from iTunes to your iPhone, you will need to navigate to your music library in iTunes first. There are a couple different ways to select the music:
Create a playlist in iTunes with the songs you want to sync. To create a new playlist, go to File > New Playlist. Give the playlist a name, then drag and drop the songs you want into it. Once created, you can select this playlist to sync to your iPhone.
Alternatively, you can manually select individual songs, albums, or artists to sync. In the Music pane in iTunes, check the boxes next to the items you want to transfer. Any checked songs will sync to the iPhone on the next sync.
You can also use the ‘Selected playlists, artists, albums, and genres’ option to selectively sync music. Choose this option under Music in the device’s Summary pane. Then check the boxes next to playlists, artists, albums and genres to include them in the sync.
See this Apple support article for more details on selecting music to sync.
Sync Music to iPhone
To sync music from your iTunes library to your iPhone, first connect your iPhone to your computer using the USB cable that came with your device. Open iTunes and you should see your iPhone appear in the top right corner of the iTunes window.
Next, click the “Sync” button at the bottom right of the iTunes window. This will start the sync process and transfer music from your iTunes library to your iPhone. Depending on how much music you are syncing, this may take a few minutes to complete.
By default, iTunes will sync your entire music library to your iPhone. If you want to manually select specific artists, albums, or playlists to transfer, click the music dropdown menu and check “Selected playlists, artists, albums, and genres.” Then you can pick exactly which music gets synced over.
Once the sync is finished, safely eject your iPhone and all synced music will now be available in the Music app on your iPhone. You can repeat this process any time you want to sync new music purchases or playlists from iTunes over to your device.
Manage Storage
As you add more music from iTunes to your iPhone, you may start to run out of storage space. Here are some tips to manage storage on your iPhone:
First, check how much storage you have left by going to Settings > General > iPhone Storage. This will show you a breakdown of how much space is being used by different types of content.
If needed, you can free up space by removing unused apps, messages, emails, photos, videos or other content. You may also want to turn on “Optimize Storage” for music in Settings > Music which automatically removes downloaded songs you haven’t played in a while. Just make sure to disable “Sync Library” first so it doesn’t delete anything from your iTunes library (source).
Once you’ve freed up space, you can sync again from iTunes to add fresh music. Go to your iPhone in iTunes, click Music in the sidebar, select “Sync Music” and choose “Selected playlists, artists, albums, and genres.” Then check the specific music you want copied over – iTunes will only transfer the items not already on your iPhone (source).
By periodically managing your storage this way, you can keep adding more of your iTunes music collection to your iPhone.
Troubleshooting
If you run into issues syncing music from iTunes to your iPhone, there are some troubleshooting steps you can take to resolve them:
One common sync issue is getting error messages in iTunes when trying to sync. Some things to try are reauthorizing the computer in iTunes by going to Account > Authorizations > Deauthorize This Computer, then Authorize This Computer again. You can also try updating to the latest version of iTunes and iOS software, as sometimes sync issues are fixed in newer versions.
If certain songs or albums won’t sync properly, you can try turning off automatic syncing in iTunes preferences, deleting those items from your iPhone, syncing again to remove them from sync memory, then re-adding them and syncing again.
Replacing the USB cable and trying a different USB port on your computer can help resolve connectivity issues during syncing. Sometimes lint and debris in the Lightning port can also cause sync problems, so inspect the port for any obstructions.
If you continue to have persistent sync issues, you can try restoring the iPhone to factory settings then syncing again. But make sure your data is backed up first. For additional troubleshooting tips, refer to this guide or Apple’s forums.
Alternative Syncing Options
The iTunes desktop app and a wired connection is not the only option for syncing music between iTunes and your iPhone. There are a few alternative methods you may want to consider:
Sync Wirelessly Over WiFi: You can use Wi-Fi sync to connect your iPhone to iTunes wirelessly. This allows you to sync music without having to plug in your device. To enable Wi-Fi sync, connect your iPhone to your computer via USB initially and check the “Sync with this iPhone over Wi-Fi” option in iTunes. After that, you can sync anytime as long as your iPhone and computer are on the same Wi-Fi network. See Apple’s Wi-Fi Sync instructions for more details.
Use iCloud: If you subscribe to Apple Music or iTunes Match, you can sync your music library wirelessly through iCloud. Any music you add or edit in your library on one device will automatically be updated across all your other devices. This allows you to seamlessly keep your iPhone music collection in sync without manual syncing. Just make sure you have iCloud Music Library enabled under Settings > Music on your iPhone. See Apple’s iCloud Music Library guide for help setting this up.
Additional Tips
When syncing your music library from iTunes to iPhone, utilizing playlists can help keep your music organized. Create playlists in iTunes for certain genres, moods, or situations. Then, you can select specific playlists to sync instead of your entire library.
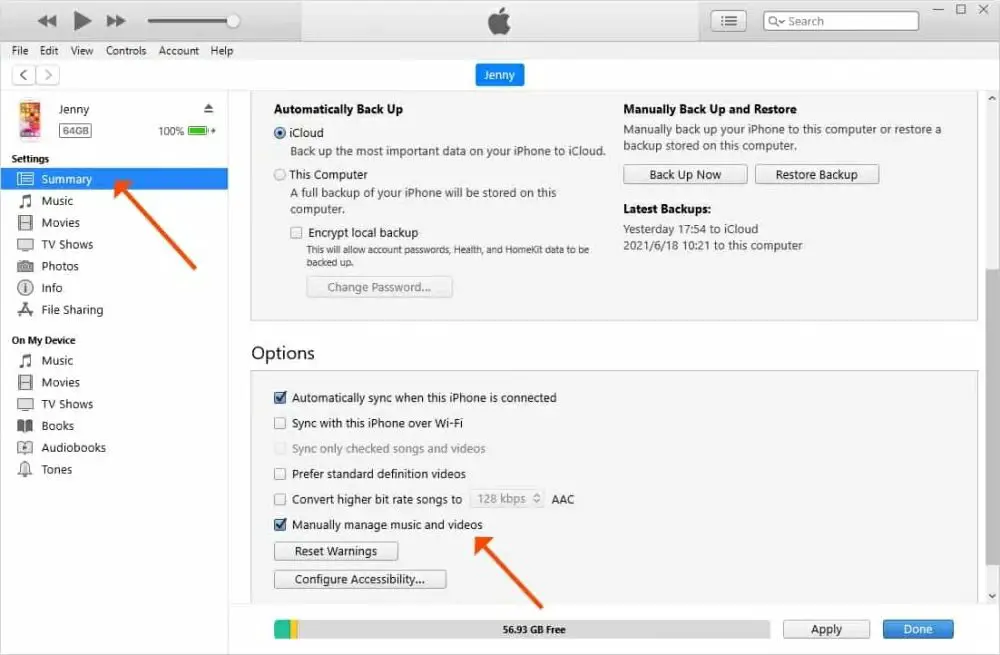
Adjust the sync settings in iTunes to control how music is transferred. Go to the Summary tab and check “Manually manage music and videos” to enable manual syncing. You can also choose to sync only certain playlists or artists. Additionally, set iTunes to not automatically sync all purchases to avoid filling up your iPhone storage.
Check the box next to “Previously Purchased” in your music library to download any songs purchased through your Apple ID to your computer. This makes them available to sync to your iPhone.
When finished syncing, eject the iPhone from iTunes properly to ensure changes are saved. You can also use the Sync button in iTunes to initiate a sync and apply settings.
Conclusion
In summary, manually syncing your music from iTunes to your iPhone gives you full control over your iPhone’s music library. By selectively choosing artists, albums, and playlists to transfer, you can tailor your iPhone’s library to only contain the songs you want for mobile listening. This allows you to keep your full iTunes library on your computer while minimizing storage on your iPhone. Having a curated music collection on your iPhone can make it easier to find and listen to your favorite music on the go. Overall, manually managing music through syncing is an easy way to transfer select tunes from iTunes and enjoy your top tracks anytime, anywhere on your iPhone.