GoPro cameras are popular action cameras designed to capture photos and videos of adventures and extreme sports. All GoPro camera models, including the latest GoPro HERO9, store media files on removable microSD memory cards.
Using a compatible SD card is important for getting the best performance from your GoPro. The camera’s user manual provides recommendations on the minimum card requirements, but you can maximize features like high resolution video modes by using a fast, high capacity SD card.
This guide will walk through the steps to safely remove and replace the SD card in the GoPro HERO9.
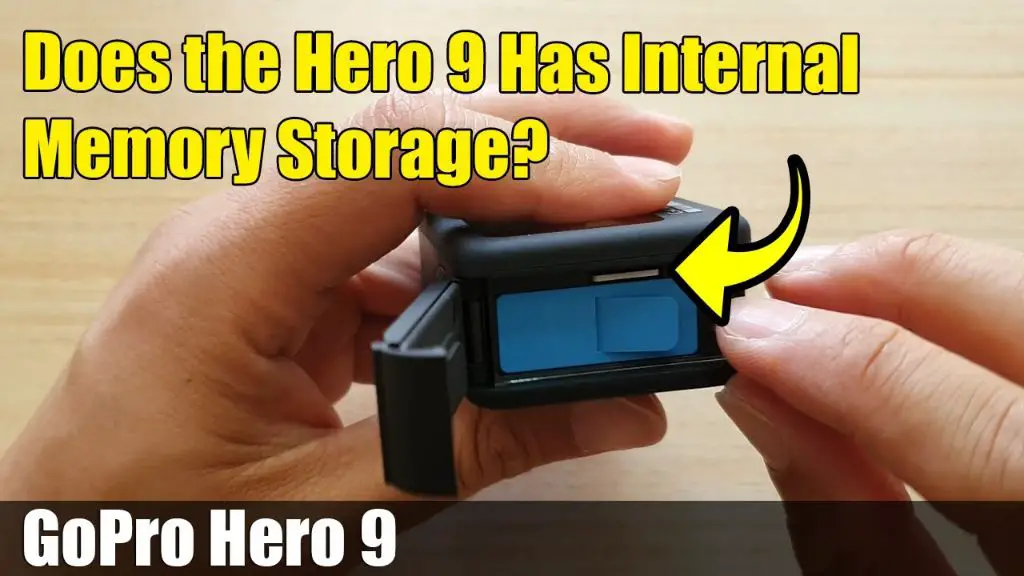
Locate the SD Card Slot
The SD card slot on the GoPro Hero 9 is located on the right side of the camera, next to the battery compartment. It has a small rectangular door that you need to open to access the slot.
Specifically, when looking at the camera from the back, the SD card slot will be on the right hand side of the camera. The door is spring-loaded and you just need to slide it backwards to pop it open.
Behind the door is the microSD card slot itself. This is where you will insert and remove SD cards from the GoPro Hero 9.
It’s important to properly locate the SD card slot before trying to insert or remove a card. Trying to force a card into the wrong slot could damage the camera.
Reference:
https://www.youtube.com/watch?v=ySP1xpLkdaQ
Open the SD Card Slot Door
The SD card slot on the GoPro HERO9 Black is located on the right side of the camera, under a rubber door. To open the door, locate the small notch on the bottom edge of the door. Pull down on the notch until you hear a click and see a red marking under the notch. This unlocks and releases the door latch.
Once unlatched, lift up on the bottom edge of the rubber door to swing it open and access the SD card slot underneath. The door is attached to the camera body with a hinge, so it will remain connected as you open it. Be gentle when opening and closing the door to avoid breaking the latch mechanism.
According to GoPro’s support article “HERO9 Black – How to Operate the Side Door,” pulling down on the notch until you hear the click is key to properly unlatching the protective door.1 Once unlatched, the door can be fully opened to access the SD card slot.
Eject the SD Card
Before you can remove the SD card from the GoPro HERO9, you need to eject it first. To do this:
1. Locate the small spring-loaded SD card eject button on the side of the GoPro, next to the SD card slot door.
2. Use your fingernail or a small tool to press the eject button inwards. You should feel it click.
3. The button will partially eject the SD card out of the slot, enough so you can grab it with your fingers. According to GoPro’s user manual, “To remove a card, press it into the slot with your fingernail and it will eject” (source).
4. Be careful not to press the eject button again, as this will reinsert the SD card back into the slot.
Remove the SD Card
Once the SD card slot door is open, you can fully remove the SD card from the slot. It’s important to remove the SD card properly to avoid corruption or damage.
To safely remove the SD card from your GoPro 9:
- Gently press on the SD card to release it from the locked position in the slot. Do not forcefully yank it out.
- Slide the SD card straight out of the slot. Do not wiggle it around or angle it, just pull directly away from the camera.
- Make sure to pull the card all the way out of the slot until it is completely removed from the camera.
Once the card is removed, you can insert a new SD card if desired. It’s important to eject the card properly before removal to prevent any corruption or damage to files on the card (source). With the SD card fully slid out, it is now safely removed from the GoPro.
Insert a New SD Card
After removing the old SD card, you may need to insert a new SD card into your GoPro 9 camera. Here are the steps for properly inserting a new SD card:
First, locate the SD card slot on your GoPro. It is a rectangular slot with a push-push mechanism on the side or bottom of the camera. The SD logo next to the slot indicates where to insert the card.
Before inserting the SD card, make sure the card is facing the correct way. SD cards have a front and back side. The front side typically has brand labeling and the back has gold contact pins. Insert the card with the gold pins facing the camera slot.
Gently press the SD card into the slot until it clicks into place. Do not force it in; you should feel little resistance when properly aligned. Push the card in as far as it will go.
To eject the card, press it gently again until it springs out. You can now remove the entire card to swap it out for another one. Be sure to insert the new SD card in the same orientation.
Once inserted, the camera may prompt you to format or prepare the new SD card before use. Follow any on-screen instructions.
Close the SD Card Slot Door
After inserting a new SD card, it’s important to properly close the protective door over the SD card slot. On the GoPro Hero 9, this door is located on the right side of the camera. It helps protect the SD card from dust, moisture and damage.
To close the door, first make sure the SD card is fully inserted all the way into the slot. There should be a “click” sound when it locks into place. Then, slide the door closed over the slot. You’ll hear another “click” when the door securely latches shut. Apply gentle pressure with your finger to ensure the door is completely closed.
Closing this small protective door is essential to keep the SD card safe and the camera interior protected. As noted in the GoPro MAX guide, “Make sure the door is closed before using your camera. Water can damage your camera if the door is open or improperly closed.” [1]
With the SD card slot door securely closed, you can safely use your GoPro Hero 9 for shooting photos and videos again. Just be careful not to force the door open and risk breaking the latch.
Format the SD Card
Before using a new SD card in your GoPro camera, it is highly recommended to format the card first. This prepares the card to be optimized for capturing videos and photos with your GoPro.
Formatting the SD card erases all existing data, so be sure to back up anything you want to keep before formatting. It’s best practice to format cards using the camera you’ll be using it in, rather than your computer or other devices (Source).
GoPro cameras format cards using the exFAT file system, which allows them to properly structure folders and optimize performance. Formatting through the camera customizes the card for the best compatibility (Source).
Additionally, formatting the card right before a shoot helps prevent fragmentation and improves the card’s speed and stability. It’s a good idea to make formatting part of your pre-shoot checklist (Source).
Reinsert the SD Card
After formatting your new SD card on your computer or smartphone, you’ll need to reinsert it into your GoPro before you can start recording again. Reinserting the SD card is easy.
Hold the SD card with the label side facing toward the GoPro’s back screen. Carefully slide the SD card back into the thin slot until it clicks into place and is fully inserted. You may need to gently push it in until you feel it lock in. Be careful not to bend the card.
Once inserted, the SD card will be flush with the side of the GoPro. Do not force the card, if you meet a lot of resistance you may have the card facing the wrong way. The contacts on the card must face toward the GoPro’s screen.
After the card is reinserted, you can power on your GoPro and it will be ready to start recording video or taking photos again. The SD card will now show the full capacity. Check to make sure it is detecting the correct size of your card before recording important footage.
Conclusion
In summary, removing the SD card from the GoPro HERO 9 camera involves just a few simple steps:
- Locate the SD card slot on the side of the camera.
- Open the protective SD card slot door.
- Eject the SD card by pressing it gently further into the slot.
- Grasp the SD card between your fingers and pull it out of the slot.
- Optionally insert a new SD card, making sure it clicks into place.
- Close the SD card slot door to protect the slot.
Following these steps allows you to safely remove and replace the SD card in your GoPro HERO 9 camera. Just be sure to open the card slot door fully and eject the card before pulling it out.