Taking the hard drive out of an HP laptop is a fairly straightforward process that most users should be able to do themselves. The general steps will be the same across HP laptop models, but the specifics may vary slightly depending on the exact model you have. In this article, we’ll walk through the complete process step-by-step.
When You Might Need to Remove the Hard Drive
There are a few common reasons you may need to remove the hard drive from your HP laptop:
- Upgrading to a larger hard drive for more storage space
- Replacing a failed or damaged hard drive
- Removing sensitive data before disposing of or selling your laptop
Upgrading or replacing your hard drive can give an older laptop new life. And if you have sensitive personal or company data on your laptop’s hard drive, removing it is an important step before getting rid of the computer.
Prepare and Back Up Your Data
Before removing your hard drive, it’s essential to back up any important data on it. You’ll want to copy over all your documents, photos, music, and any other files you want to keep. An external hard drive or cloud backup service are good options for backing up your data.
Once your files are backed up, you’ll also want to deactivate any encryption features that are enabled, such as BitLocker on Windows laptops. This will allow you to access the drive contents normally after removing it.
Finally, charge your laptop fully and close any open programs.
Things You’ll Need
In addition to your HP laptop, you’ll need the following items to remove the hard drive:
- Small Phillips head screwdriver
- Tweezers (optional but helpful)
- Anti-static wrist strap (recommended)
The anti-static wrist strap helps prevent static discharge from damaging the laptop components. It’s an optional extra precaution, but a good idea when working with electronics.
Remove the Battery and Bottom Panel
For most HP laptops, the first steps to removing the hard drive involve separating the bottom panel from the chassis. This gives you access to the internal components.
Here are the basic steps to get started:
- Turn off your laptop and disconnect the AC adapter and any cables.
- Close the lid and place the laptop upside down on a flat, clean surface.
- Locate the battery release latch and slide it to unlock the battery.
- Lift the battery up and out of its compartment.
- Look for any small Phillips head screws holding the bottom panel in place. There may be several around the edges and one or two under rubber footpads.
- Unscrew all the Phillips screws and set them aside in a container.
- Starting at a corner or seam, carefully pry up the bottom panel. You may need to go along the edges releasing clips as you go.
- Once unclasped, lift the bottom panel off and set it aside.
This will expose the internal components of your HP laptop. You should now see the hard drive, as well as the RAM, wireless card, cooling fan and other parts.
Helpful Tips
– Make note of where each screw came from so you can easily reassemble later.
– A plastic prying tool can help separate the bottom panel, but be gentle to avoid breaking the clips.
– Consult the service manual for your specific model if needed to find all screw locations.
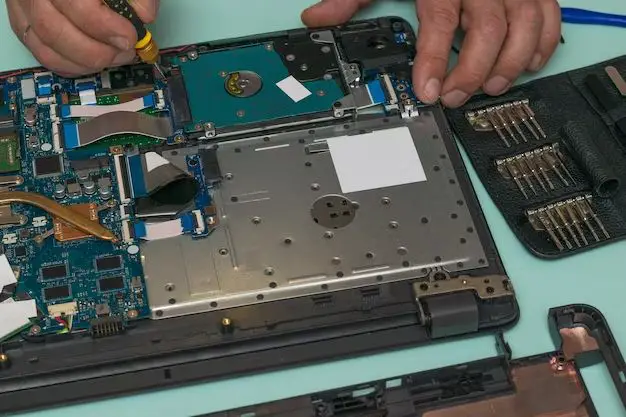
Disconnect and Remove the Hard Drive
With the bottom panel removed, you’ll now be able to access and remove the hard drive itself:
- Locate the hard drive inside the computer’s internal bay.
- Look for a small retaining screw holding the hard drive in place and unscrew it.
- Gently pull the plastic tab to slide the hard drive out of the bay.
- Unplug the SATA data cable and power cable from the hard drive.
- Use tweezers to gently pry the sides of the SATA connectors if needed to detach them.
- Lift the hard drive up and out of the computer.
Be careful when disconnecting and removing the drive. Do not pull sharply on the cables. Also avoid touching the circuit board on the bottom of the hard drive.
With the old hard drive removed, you now have easy access to install a new one if needed.
Helpful Tips
– Note the orientation of the hard drive when removed so you can reinstall correctly later.
– An anti-static mat is a good working surface when handling the bare drive.
– Avoid forcing connectors to detach if resistance is felt. Check for any visible screws or locks first.
Install the New Hard Drive
If you’re replacing your HP laptop’s hard drive, the installation steps are basically the reverse of removal:
- Align the new hard drive’s SATA connectors with the laptop’s data and power cables.
- Gently push the drive into the bay until fully seated.
- Replace the small retaining screw to hold the drive in place.
- Reconnect the SATA data and power cable connectors.
- Double check all cables are firmly plugged in.
When installing a new blank hard drive, you’ll need to reinstall your operating system afterwards. This will prepare the drive for use and allow you to restore your data from backup.
If you’re reusing the old drive without wiping it, you can simply reassemble your laptop at this point.
Helpful Tips
– Consult your drive’s documentation if you need help identifying the SATA connectors.
– Don’t force cable connections. The connectors are usually designed to fit one way easily.
– A properly connected SATA drive will feel firmly in place when installed.
Reassemble the Laptop
Once the hard drive replacement or removal is complete, you can reassemble your HP laptop:
- Align the bottom panel and gently press it back onto the chassis until all the clips click into place.
- Replace all the Phillips screws to hold the panel securely.
- Insert the battery into its compartment and press down until it clicks and locks.
- Reconnect the AC adapter and any other cables you removed earlier.
When turned back on, your laptop will now be running off the new hard drive. Or in the case of removing the drive without replacing it, the laptop will simply power on without the original hard drive installed.
Helpful Tips
– Take care when reattaching the bottom panel to avoid bending or breaking any clips.
– Refer to your reassembly notes if you forget which screws went where.
– Double check all screws are replaced and tightened to avoid rattling.
Initializing a New Hard Drive
If you installed a brand new blank hard drive, there are a few extra steps required before you can use it:
- Partition the drive – Using Disk Management on Windows or Disk Utility on Mac, initialize and format the new drive.
- Install an operating system – Windows or MacOS needs to be installed on the new blank drive.
- Reinstall apps and restore data – With OS setup complete, you can restore your files and redownload apps.
This process will prepare the new hard drive for use and make it bootable in your HP laptop. It provides a fresh blank slate to transfer your data and programs back onto.
Helpful Tips
– Refer to your operating system’s documentation for full instructions on disk preparation.
– You may need bootable OS installation media on a DVD or USB drive.
– Go slowly when reinstalling apps and data to avoid issues.
Troubleshooting Common Hard Drive Problems
In some cases, you may need to replace a failed or malfunctioning hard drive in your HP laptop. Here are some common drive issues and solutions:
Hard Drive Not Detected
If your BIOS doesn’t detect a drive, it could be:
- Disconnected data or power cable – Check both connections.
- Drive not fully seated – Remove and reinsert the hard drive.
- Failed drive electronics – Try a new replacement drive.
Boot Failure
Frequent blue screens or failure to boot could indicate:
- Corrupted operating system – Try System Restore or reinstall OS.
- Damaged hard drive – Replace the faulty drive.
- Loose cables – Check the drive cable connections.
Noise From Drive
Unusual noises like clicking or grinding may mean:
- Mechanical failure – Have the drive replaced immediately.
- Stuck spindle – Do not power on, have drive serviced.
Overheating Issues
If your laptop runs hot with the hard drive installed, it’s likely caused by:
- Insufficient airflow – Check vents for obstructions.
- Failing fan – Replace the CPU or GPU cooling fan.
- Too much load on drive – Upgrade to a stronger hard drive.
Diagnosing the exact cause of your specific hard drive issue can take some trial and error. If in doubt, seek help from a computer technician.
Conclusion
While the process varies slightly across models, removing and replacing the hard drive in an HP laptop is a straightforward DIY project for most users. Just be sure to take care and work slowly when handling delicate components. Back up important data in advance, assemble a few basic tools, and follow along with the step-by-step process covered here.
With some patience and care, you can upgrade, replace or remove the hard drive in your HP laptop without issues. Just take your time, note component locations, double check connections, and consult a technician if you run into any problems. In no time you’ll have your laptop running like new again.
| Hard Drive Removal Steps |
|---|
| 1. Back up important data |
| 2. Power off and disconnect laptop |
| 3. Remove battery |
| 4. Unscrew and remove bottom panel |
| 5. Disconnect hard drive cables |
| 6. Lift out old hard drive |
| 7. Install new hard drive |
| 8. Reconnect SATA cables |
| 9. Replace bottom panel |
| 10. Initialize and format new drive |
| Hard Drive Troubleshooting | Potential Causes |
|---|---|
| Drive not detected | Loose cables, unseated drive, electronics failure |
| Boot failure | OS corruption, damaged drive, loose cables |
| Unusual noises | Mechanical failure, stuck spindle |
| Overheating | Airflow blockage, failing fan, overloaded drive |