Secure erase is a feature in macOS that overwrites the entire hard drive with random data to completely wipe the contents and make previously deleted files unrecoverable. It’s important for Mac users who want to permanently erase sensitive information before selling or disposing of their computer.
With standard file deletion, data is simply marked as available space but remains on the hard drive until overwritten by new files. Secure erase overwrites the space to prevent forensic data recovery. This ensures private files like financial records, business documents, or personal photos cannot be accessed by someone else obtaining the computer.
How Secure Erase Works
When you securely erase a drive on a Mac, the data is overwritten at least once by writing 0s or 1s to every location on the drive. This overwriting process ensures the old data can no longer be recovered or reconstructed from the drive.
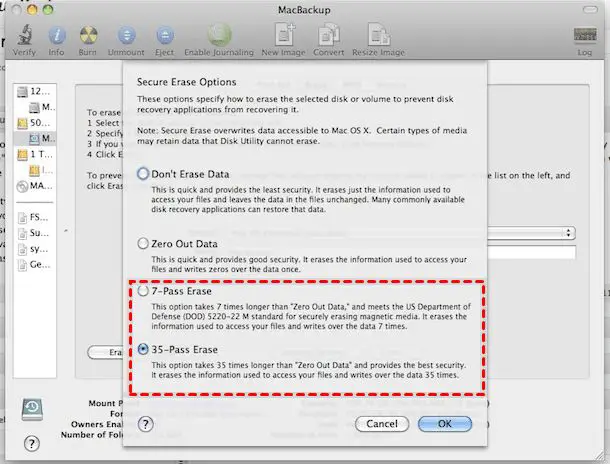
According to Apple’s Disk Utility documentation, the most secure erase option uses a 3-pass overwrite process:
- Pass 1 – Writes zeros to every block of data
- Pass 2 – Writes ones to every block
- Pass 3 – Writes random data to every block
This 3-pass system overwrites all data at least once with zeros, at least once with ones, and then with randomized data. This process ensures no remnants of the original data can be recovered from the drive.
Time Required
The amount of time required to securely erase a drive on a Mac depends on two main factors – the amount of data on the drive and the drive’s read/write speed. Generally, the more data present and the slower the drive speed, the longer the erase process will take.
For a relatively empty external hard drive connected via USB 3.0 or Thunderbolt, the secure erase may only take a few hours. However, for a nearly full internal SSD or HDD in a MacBook, it can take over 24 hours in some cases.
According to user reports, secure erasing a 500 GB external hard drive took around 18 hours, while a 2 TB external drive took approximately 4-5 hours [1]. For a MacBook Pro internal drive, users cite erase times ranging from 8 hours for a 128 GB SSD up to over 30 hours for a 1 TB HDD [2].
The type of erase also impacts duration. A simple 1-pass erase is faster than a 7-pass erase. Enabling FileVault encryption on the erased drive adds more time as well.
Factors Affecting Erase Time
The biggest factor affecting secure erase time is the type of drive – whether it is a traditional hard disk drive (HDD) or a solid state drive (SSD).
With HDDs, the drive heads must physically overwrite all sectors on the platter with zeros or random data patterns. This takes quite a bit of time, as the heads must mechanically move across the platters to access each sector. Performing a single pass overwrite on a 1TB HDD can take 2-3 hours.
SSDs have no moving parts, so erasing data is an electronic process of resetting cells to a blank state. However, due to the way SSDs work, they cannot directly overwrite existing data blocks. First, the target blocks must be erased before new data can be written. This erase-write cycle causes SSD secure erases to take longer than some expect. Erasing a 250GB SSD can take up to 30 minutes or longer. [1]
In general, larger drives of either type will take longer to securely erase. Modern SSDs and HDDs may also have features to expedite the process, but a full secure erase still takes significant time.
Typical Erase Times
Erase times can vary substantially depending on the type of drive and size of the drive being erased. Some typical erase times are:
Hard Disk Drives (HDD)
For traditional hard disk drives, erase times are longer due to the mechanical nature of the disks. According to one test on Apple discussions, a 500 GB external HDD took around 18 hours to complete a 7-pass secure erase [1]. The specific erase technique used can also impact times. A Reddit user reported that the most secure erase option took over 24 hours to run on a 4TB external HDD [2].
Solid State Drives (SSD)
For SSDs that use flash memory, secure erase is generally much faster. One source indicates that a typical 256GB SSD can be erased in under 30 minutes [2]. Larger SSDs may take longer, but rarely exceed a few hours for even multi-pass secure erase techniques.
Maximizing Erase Speed
There are a few tips to help speed up the secure erase process on a Mac and external drives:
For external hard drives, detaching the drive while erasing can significantly improve erase speeds. The secure erase process is slowed down by simultaneously reading data over the connecter cable. By detaching the drive, the erase can focus solely on writing zeroes without interruption (Source).
For built-in SSDs, using the fastest secure erase option with a single pass is usually sufficient for safe data destruction. Multiple passes are unnecessary on modern SSDs as they already encrypt data at the hardware level (Source).
On both HDDs and SSDs, freeing up disk space before erasing can help improve performance. The secure erase process takes longer when there is more data to overwrite.
Using third-party erase tools instead of the built-in Disk Utility may also provide speed improvements on some drives. Specialized tools can optimize the erase process for specific drive types.
Securely Erasing Free Space
There’s a quicker way to securely erase any deleted files from your Mac’s free space without having to wipe your entire drive. This method focuses solely on obliterating traces of deleted data rather than erasing all content on the volume.
To use this technique, launch Disk Utility and select the “Erase” tab. Choose the disk you want to erase free space on, then click “Erase Free Space.” This overwrites all free space on the volume with zeros, ensuring previously deleted files cannot be recovered. The process is much faster than completely wiping and rewriting an entire drive.
According to Apple’s support article, erasing free space may take “anywhere from a few minutes to a few hours” depending on the amount of space and the speed of your drive. SSDs can erase free space faster than traditional hard drives.
You can also use third-party tools like CleanMyMac X’s Shredder module to securely erase free space. The advantage of this method is speed, as it targets only deleted data rather than everything on your volume.
Using Third-Party Tools
There are many third-party tools available that can securely erase files and free space on a Mac. Some popular options include:
DoYourData Super Eraser – Uses certified erasure algorithms like DoD 5220.22-M to permanently delete files beyond recovery. Works on internal and external drives.
EaseUS Bitwiper – Securely wipes entire partitions or disks to Department of Defense standards. Supports SSDs and traditional hard drives.
These tools work by overwriting the target data multiple times with random data, making recovery impossible even with advanced forensic tools. They provide an extra level of security compared to the built-in Secure Erase methods.
When shopping for third-party erasure tools, look for ones that support relevant standards like DoD 5220.22-M, have a good reputation, and are updated regularly. Carefully review the features to verify the tool meets your specific security needs.
Recovering Erased Files
Once files have been securely erased using macOS’s Secure Erase feature, it becomes very difficult to recover the erased data. This is because Secure Erase overwrites the existing data with random data, making the original data essentially irrecoverable.
According to Reed College’s IT department, “Securely erasing files and free space on your Mac ensures that the erased files are completely deleted and practically impossible to recover.” The more times data is overwritten on a drive, the less likely it becomes that anything can be recovered.
While it may be possible to recover fragments of overwritten data using advanced forensic tools, complete files are unlikely to be recoverable after just a single pass of Secure Erase. For maximum security, macOS allows users to specify up to 35 passes when securely erasing data.
So in summary, securely erased files on a Mac are extremely difficult if not impossible to recover, especially when multiple overwrite passes are used. The random data written over the original files renders recovery unrealistic in most scenarios.
Summary
Securely erasing files on a Mac can take anywhere from a few minutes to several hours depending on the size of the drive and number of files. The key factors that determine erase time are:
- Drive size – Larger drives take longer to erase.
- Drive type – SSDs erase faster than traditional hard drives.
- Free space – Erasing free space takes longer than erasing allocated files.
- File size – Many small files can erase quickly but large files like videos can be time consuming.
- File system – APFS can erase faster than HFS+ in some cases.
- Tool used – Apple’s Disk Utility is slower than third-party tools designed for optimized performance.
For a typical internal hard drive, you can expect a full secure erase to take 2-4 hours. Using third-party tools can speed this up. To maximize performance, erase free space separately after erasing files. With proper tools and techniques, secure erase on a Mac doesn’t have to be an all-day process.