Having enough free hard drive space on your Mac is important for optimal performance. When your hard drive starts getting full, your Mac will slow down and you may encounter issues like application crashes and trouble installing updates. So how much free space is recommended for a Mac?
Quick Answer
The general recommendation is to have at least 10-20% of your hard drive free at all times. For example, if you have a 500GB hard drive, you’ll want to aim for around 50-100GB of free space.
Why Free Hard Drive Space Matters
There are a few reasons why having enough free hard drive space is important for your Mac:
- Improves Performance – When your hard drive is nearly full, your Mac has to work harder to save files, open applications, and run the system. This can lead to slowdowns and lag.
- Prevents Crashes – A full hard drive increases the chance of application crashes and system errors. With enough free space, these issues are reduced.
- Allows Updates – macOS and application updates often require several gigabytes of temporary storage. Without enough space, you may not be able to install important updates.
- Provides Wiggle Room – Extra free space gives your Mac some breathing room for caches, logs, and application data. This wiggle room helps optimize performance.
In short, free hard drive space allows your Mac to run faster, more stable, and gives you the flexibility to update apps and the operating system. Running your hard drive too close to full will cause major headaches.
How is Hard Drive Space Used on a Mac?
Before determining how much free space you need, it helps to understand what’s taking up space on your hard drive. Here are some of the main space hogs:
- User files – This includes your documents, photos, videos, music, downloads folder, and any other personal files you save.
- Applications – The apps and programs installed on your Mac take up gigabytes of storage, especially creative suites, games, etc.
- System files – macOS system files, frameworks, caches and logs can total tens of GBs.
- Backups – Local Time Machine backups and mobile device backups eat into your free hard drive space.
- Mail attachments – If you use a desktop email client, attachments are stored locally.
- Caches – Apps and websites store temporary caches that can slowly accumulate.
Knowing what’s taking up space will help you identify areas to free up room when your drive gets full.
How to Check Hard Drive Usage on a Mac
Checking your Mac’s hard drive usage is easy. Here are a couple ways to do it:
Finder
Open a Finder window and click on your hard drive in the left sidebar (usually named Macintosh HD). In the window that appears, you’ll see a color-coded chart showing your disk usage categories. This gives you a quick visual overview.
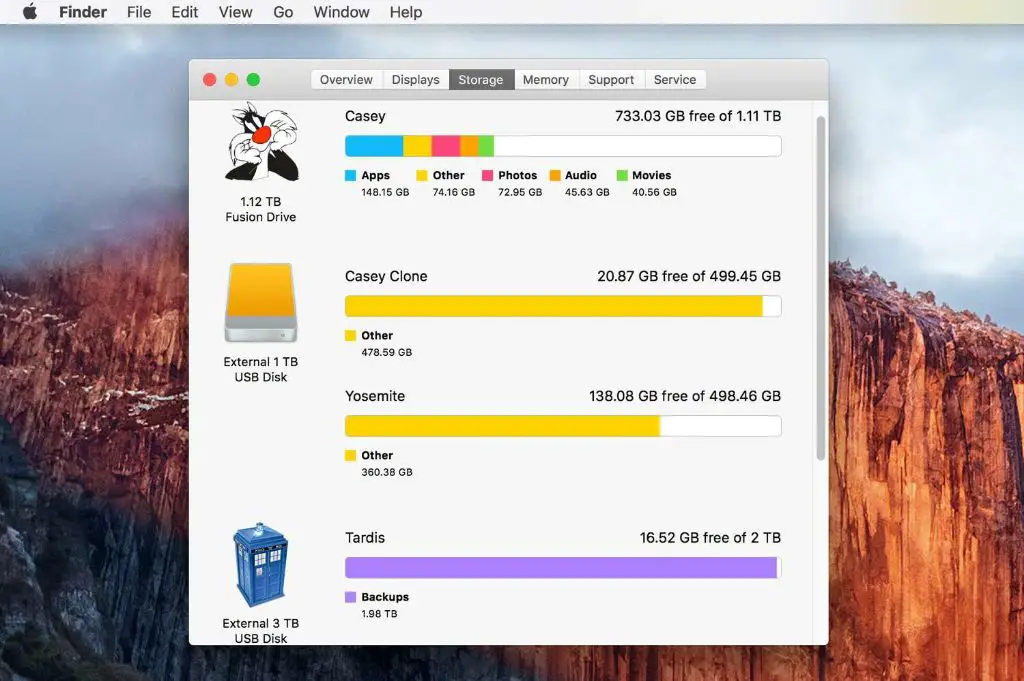
About This Mac
Click the Apple menu and choose About This Mac. Click the Storage tab to see a usage graph and breakdown of how much space different categories are using.
System Information
For the most detailed usage data, open System Information (in Applications > Utilities) and click Storage in the sidebar. You’ll see precisely how much space is used and free for each volume.
How to Free Up Hard Drive Space on a Mac
When your free space starts getting low, here are some ways to free up room on your Mac’s hard drive:
Empty Trash Bin
The first step is always to empty your Trash which clears out any deleted files. You can right-click the Trash icon in the Dock and choose Empty Trash.
Remove Unneeded Files
Browse your personal files for any documents, downloads, videos, etc. you no longer need. Permanently deleting these files frees up space.
Uninstall Unused Apps
Get rid of apps and programs you no longer use. Some apps can take up multiple GBs of drive space even when not in use.
Clear Caches
Use a cache cleaner tool like CleanMyMac X to remove unnecessary system and app caches. This can recover gigabytes of space.
Delete System Junk
Tools like CleanMyMac X also help remove unneeded system junk files, logs, temporary files and other space hogs.
Backup and Delete iOS Device Backups
If you backup your iPhone or iPad locally, these backups consume storage over time. Consider backing up your device and then deleting the oldest backups.
Reduce iCloud Storage
If you’re paying for 2TB iCloud storage but not using it, reduce your plan to save on cost and local storage used for iCloud content.
Compress Files
Use compressor utilities like The Unarchiver to compress files like photos, videos and music. This reduces their footprint while preserving quality.
Adjusting How Storage is Used
In addition to removing files and cleaning up your Mac, adjusting some system settings can optimize your storage usage. Here are a few tips:
- Store fewer email attachments locally.
- Turn off Photostream if you don’t use it.
- Store photos and videos on external storage.
- Disable local Time Machine backups if you backup to a NAS.
- Only index key folders in Spotlight to reduce index size.
- Reduce the amount of Safari website data stored.
Tweaking settings like these helps prevent your Mac’s storage from being used inefficiently over time.
Upgrade Your Hard Drive
If you frequently run low on space even after cleaning up and optimizing your Mac, consider upgrading its hard drive. Adding storage gives you breathing room for your needs.
On desktop Macs, you can add a secondary internal drive or replace the existing drive with a higher capacity one. On MacBooks, you can replace the internal drive with an aftermarket one with more space.
As a last resort, you can use external USB drives or a NAS to add affordable storage. Just keep in mind that external drives are slower than internal ones.
Create an Upgrade Plan
The best way to avoid constant storage headaches is to proactively make a plan to upgrade your Mac’s storage. Here are some tips:
- Monitor your free space weekly to see ongoing trends.
- Note when you repeatedly hit 10-15% free space.
- Determine what categories are taking up the most space.
- Calculate how much your storage needs are growing annually.
- Use this data to decide when increased capacity is required.
- Factor in planned upgrades to higher resolution cameras, etc.
- Give yourself wiggle room so you’re not constantly running low.
With an upgrade plan in place, you can stay ahead of your Mac’s storage needs and prevent headaches down the road.
Tips to Manage Ongoing Storage Needs
Here are some additional tips for managing your Mac’s storage needs in daily use:
- Set up an automated process to clear caches, remove unneeded files, etc. on a schedule.
- Use cloud storage to supplement your local capacity when needed.
- Store media files and backups on an external drive once they are no longer in frequent use.
- Monitor your storage after major software or macOS updates which can impact space.
- Check for apps and files taking up more space than expected and troubleshoot why.
- Review your backups to see if multiple versions of large files are being retained.
Staying on top of your Mac’s storage needs takes a bit of work but pays off by keeping your computer running smoothly.
Conclusion
To summarize, here are some key points on managing Mac hard drive storage:
- Aim for at least 10-20% free space as a rule of thumb.
- Regularly check your storage breakdown to see what’s using space.
- Clean up unneeded files, caches, iOS backups, etc. to free up room.
- Make adjustments to apps and system settings that use a lot of space.
- Upgrade to a larger hard drive if needed for your usage.
- Proactively plan ahead for future storage needs.
- Use good ongoing practices to optimize and monitor your Mac’s storage.
Following these guidelines will help ensure your Mac’s hard drive has enough free space for optimal speed, stability and flexibility. Don’t wait until you run out of room completely!