Booting from a USB drive means starting up your computer using an operating system or other files stored on a USB flash drive rather than the installed hard drive. This can be useful for several reasons:
– Testing out an operating system without installing it. You can try out Linux distributions or new Windows versions without commitment.
– Diagnosing and repairing computer issues. Bootable USB drives allow you to run diagnostics, reset passwords, recover data, and troubleshoot problems.
– Increased portability. Carry your entire operating system and files with you on a small USB stick and boot it on any computer.
– Added security. Sensitive data can be stored on an encrypted USB drive that requires a password to boot. This prevents unauthorized access.
Overall, booting from USB provides flexibility, security, and convenience compared to relying solely on the installed internal hard drive. It allows you to work from any computer without modifying the host system.
Prerequisites
Before booting from a USB drive, you need to have a few things prepared:
Have a USB drive – The USB drive should have enough storage capacity for the OS files you want to boot from. An 8GB or larger USB 3.0 flash drive is recommended for best performance.
Have created a bootable USB – You need to prepare the USB drive by making it bootable. This involves downloading the OS image file (ISO) and using a utility like Rufus or Etcher to write the ISO onto the USB drive and make it bootable.
For instructions on how to create a bootable USB drive on Windows or Mac, refer to this guide.
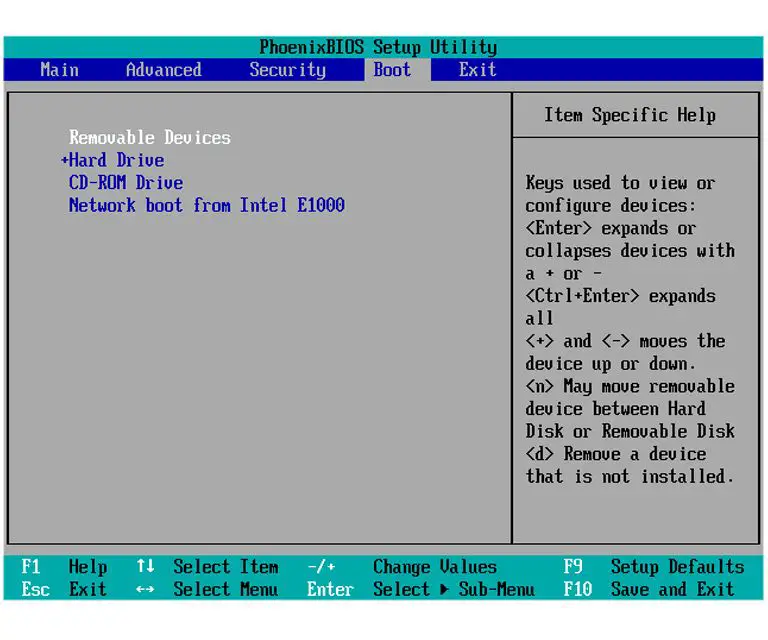
Change Boot Menu Settings in BIOS
One way to boot from USB without changing the default boot order is to modify the boot menu settings in your BIOS (Basic Input/Output System). The BIOS controls low-level settings on your computer and gives you options for customizing how it boots.
To access your BIOS setup, restart your computer and press the appropriate key during startup, often Delete, F2, F10, or F12. This will bring you to the BIOS settings screen.
Navigate to the “Boot” section and look for options related to the boot menu. There may be a setting called “Boot Menu” or “Boot Options Menu” that you can enable. This displays the boot menu when starting up your PC, allowing you to pick a temporary boot device like a USB drive.
Additionally, check if there is an option to show or enable F12 Boot Menu. This dedicates the F12 key during startup to bring up the boot menu. With these settings enabled, you can start your PC normally and press F12 or another key to select your USB drive to boot from (Source).
After saving changes and exiting the BIOS, you should now be able to boot from USB without modifying the permanent boot order. Just use the boot menu or F12 when starting up to temporarily override the default boot device.
Use a Dedicated Boot Menu Key
Many computers have a dedicated key that opens the boot menu directly when pressed during startup before the operating system loads (List of PC brands with their corresponding hot-keys). This allows selecting a boot device without changing the boot order in BIOS.
Common dedicated boot menu keys include Esc, F2, F10, F11, and F12. However, the specific key can vary depending on the computer manufacturer and motherboard model. Some examples include:
- Dell desktops: F12
- HP laptops: Esc
- Lenovo laptops: F12 or Novo button
- Asus laptops: Esc
To use a dedicated key, restart the computer and keep tapping the appropriate key as soon as the manufacturer logo appears. This will directly launch the boot menu before Windows starts loading. Then select the USB drive as the temporary boot device.
Using a dedicated key is often the fastest way to boot from USB without changing permanent boot order settings in BIOS. However, it is only a one-time boot selection for that session.
Reorder Devices in EFI
One way to boot from USB without changing the boot order is to directly reorder the devices in the EFI (Extensible Firmware Interface). Here’s how:
1. Restart your computer and access the EFI. On Windows, hold Shift and click Restart, then choose Troubleshoot > Advanced options > UEFI Firmware Settings. On Mac, hold Option during startup and click EFI Boot.
2. In the EFI, go to the Boot tab. You should see a boot order list with different drive devices.
3. Use the arrow keys to move the USB drive to the top of the boot order list. This will make the USB device the first boot option without changing the default boot order.
4. Save your changes and exit the EFI. Your computer should now boot from the USB drive first.
The benefit of reordering devices directly in the EFI is it allows booting from USB just one time without having to change the system’s default boot order. After rebooting, the original boot order will remain intact.
Use Boot Override
Boot override allows you to select a boot device one time from the boot menu, without changing the boot order. This can be useful if you want to boot from a USB drive temporarily.
To use boot override:
- Restart your computer and enter the BIOS setup utility, usually by pressing F2, Del, or Esc during startup.
- Navigate to the boot menu, often called “Boot” or “Boot Options.”
- You should see a boot override or temporary boot option near the top of the list of boot devices.
- Select your USB drive and press Enter to boot from it one time.
After rebooting, the computer will revert to booting from the first device in your permanent boot order 1. Boot override is handy for booting into something like a live Linux USB without having to rearrange your whole boot sequence.
Troubleshooting
If your USB drive is not detected in the boot menu, here are some troubleshooting steps to try:
Make sure your BIOS is set to UEFI instead of legacy/CSM mode. Many newer machines use UEFI and need a UEFI bootable USB –[1]. If you created the bootable USB in legacy mode, recreate it as a UEFI drive instead.
Try plugging the USB into a different port. Some ports may not be bootable, so switching to another USB port may allow detection.
Check if the USB drive is damaged or corrupted. Try reformatting the drive and recreating the bootable USB.
Update your motherboard BIOS/firmware to the latest version. Older versions may have boot issues with USB drives.
If the drive shows up in File Explorer but not the boot menu, make sure USB boot is enabled in the BIOS settings.
For Windows machines, you may need to enable the USB boot option under the Advanced Startup Options.[2]
Boot USB on Mac
Booting from a USB drive on a Mac is straightforward. Here are the steps:
First, plug your USB drive into your Mac. Make sure the drive has a bootable operating system installer on it, such as a macOS installer from the App Store or a Ubuntu live USB.
When starting up your Mac, hold down the Option (or Alt) ⌥ key immediately after pressing the power button. Keep holding the Option key until you see the startup disk selection screen showing available boot drives.
Using your arrow keys, select the USB drive you want to boot from. Press Enter to boot from the selected USB drive.
Your Mac will then start up from the bootable installer on the USB drive. You can proceed to install a new operating system, or test out an operating system live from the USB.
This key combination method allows you to select a USB drive for a one-time boot without changing the default system boot order. It’s the quickest way to boot USB on a Mac.[1]
You can also boot USB on Mac by changing the default boot order to prioritize the USB drive, through System Preferences > Startup Disk or by holding Option during boot and selecting your USB drive as the default boot device.
Boot USB on Chromebook
Chromebooks require special steps to boot from a USB drive since they are designed to boot into ChromeOS by default. There are a couple ways to boot a Chromebook from USB:
Enable USB Boot in Developer Mode
To boot a Chromebook from USB in developer mode:
1. Put your Chromebook into Developer Mode by pressing Esc + Refresh on startup and confirming. This will wipe your local data.1
2. With your Chromebook powered off, insert the USB drive into an available USB port.
3. Hold down Ctrl + U while powering on your Chromebook. This will bring up the boot menu.
4. Select your USB drive from the boot menu. Your Chromebook will now boot from the USB.
Enable USB Boot from Crosh Shell
You can boot a Chromebook from USB without enabling Developer Mode using the crosh shell:2
- Open the Chrome browser and type
chrome://croshinto the address bar. - Enter
ctrl+dto enter Developer Mode. - Type
shellto access the crosh shell. - Enter the command
crossystem dev_boot_usb=1to enable USB booting. - Insert your USB drive and restart your Chromebook.
- Press Ctrl+U during startup to open the boot menu and select your USB drive.
This will allow you to boot from USB without needing to completely enable Developer Mode.
Conclusion
Booting from a USB drive without changing the boot order in BIOS offers several benefits. It provides flexibility to boot different operating systems on the fly and test out software. The ability to boot without altering BIOS also enables quick troubleshooting when the main OS fails to load properly.
Overall, USB drives give users portability to carry their OS anywhere and boot it on multiple machines. This allows access to familiar environments and preferred software when traveling or using unfamiliar devices. One can also easily switch between versions or iterations of an OS for testing purposes.
In summary, booting from USB skips permanent configuration changes and preserves existing boot order settings. This saves time while still providing the advantages of a readily bootable OS on an external device.