Bad sectors refer to parts of a hard disk drive (HDD) that can no longer be read from or written to due to permanent physical damage or corrupted data. When a sector becomes bad, it can lead to data loss and potential file corruption.[1]
It’s important to periodically check for bad sectors on HDDs because they are mechanical devices with moving parts that can degrade over time. As an HDD ages and becomes more damaged, the number of bad sectors will typically increase. Checking for bad sectors allows you to identify potential hardware issues before they result in catastrophic data loss or failure.
There are various utilities available to scan for and attempt to repair bad sectors. On Windows machines, the CHKDSK command can be used to analyze the file system and check HDDs for problems like bad sectors. Running CHKDSK regularly provides a quick way to monitor HDD health.
Prerequisites
To check for bad sectors on a hard drive using the Command Prompt in Windows, there are a couple prerequisites:
- You need admin access on a Windows PC. Checking for bad sectors requires elevated permissions, so you’ll need an admin account.
- We will be using in-built Windows tools. Specifically, we’ll use the
chkdskcommand which is included in all modern Windows versions. No need to download anything extra.
As long as you have admin access on a Windows machine, you’re good to go. chkdsk has been around for ages and works on XP through Windows 11.
Access the Command Prompt
To check the hard drive for bad sectors using the Command Prompt, you need to first open CMD with administrator privileges. Here are the steps:
Open the start menu and search for “CMD”. Right click on the Command Prompt app result and select “Run as Administrator” from the context menu. This will open an elevated CMD window with admin rights.
Alternatively, you can use the Windows key + R keyboard shortcut to open the Run dialog box. Type “cmd” and hit Ctrl + Shift + Enter to launch CMD as administrator [1].
Running CMD as admin ensures you have the necessary permissions to execute drive scanning and repair utilities like CHKDSK.
Run CHKDSK
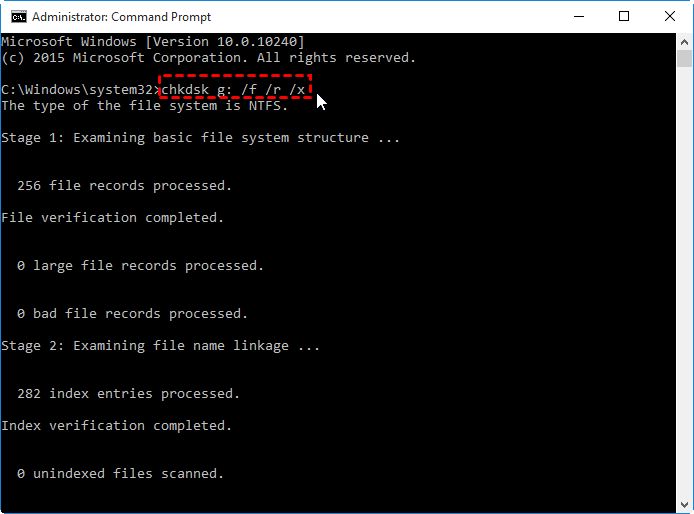
The chkdsk command is used to scan the HDD for errors and bad sectors. To run chkdsk on your hard drive, open the Command Prompt with administrator privileges and use the following command:
chkdsk C: /f /r /x
This command scans drive C: and uses the /f, /r, and /x switches:
- /f – Fixes errors on the disk
- /r – Locates bad sectors and recovers readable information
- /x – Forces the volume to dismount first if necessary
The /f switch instructs chkdsk to fix any errors found. The /r switch tells it to locate bad sectors and recover readable information. The /x switch forces the volume to dismount first if necessary before the scan. Using chkdsk in this way scans the drive thoroughly for errors and bad sectors and attempts to repair or recover data from any issues detected.
Interpreting CHKDSK Results
When CHKDSK scans your hard drive, it will report back any errors or issues it detects. Understanding how to interpret these results is important.
If CHKDSK does not report any errors, this means no issues were found on the drive during that stage of the scan. A clean scan with no errors reported indicates there are likely no bad sectors on the hard disk.
However, if CHKDSK detects bad sectors, it will note them in the results. Bad sectors are physical defects on the hard disk platter itself. Typical messages for bad sectors indicate the sector could not be read or is corrupted. According to Microsoft, if a bad sector is flagged as “not repairable” it means the OS has marked the sector to no longer be used [1].
CHKDSK may also report “cross-linked” files, which means the file links point to an incorrect cluster location. This can indicate file system corruption. Lost file fragments, invalid filenames, and invalid security IDs can also show up in scan results [2].
Overall, a clean CHKDSK scan with no errors is ideal. Any bad sectors, cross-linked files, or file system issues reported should be addressed to avoid potential data loss or disk failure.
Repairing Bad Sectors
CHKDSK can fix some bad sectors on your hard drive. The /f switch tells CHKDSK to repair any errors found on the drive. The /r switch performs a more thorough scan for bad sectors and attempts to recover readable information.
To use CHKDSK to repair bad sectors, open an elevated Command Prompt and run the following command:
chkdsk C: /f /r
Replace C: with the letter of the drive you want to scan and repair. CHKDSK will go through several stages where it checks the file system structure, then scans for and repairs bad sectors. This process can take a while depending on the size and condition of your drive.
The /r switch does a surface scan of the drive and attempts to recover data from bad sectors before marking them as unusable. This makes the process slower, but can rescue data that otherwise may have been lost. Generally, using /r is recommended when repairing bad sectors.
CHKDSK can only fix bad sectors that are marginally damaged. Completely unreadable sectors cannot be repaired. But running CHKDSK regularly can help identify problems and prolong the life of your hard drive.
For more details, see this Microsoft Answers forum thread: How to repair bad sectors of hdd
Handling Unrepairable Sectors
If CHKDSK finds bad sectors that cannot be repaired, it will mark them as “unreadable” in the scan results. Unfortunately, unrepairable bad sectors indicate permanent damage to the physical disk surface. Once sectors go bad, any data stored on them is usually lost for good.
If the number of bad sectors is below threshold limits, you may be able to continue using the drive safely. However, it’s crucial to regularly backup your data, as the problem could worsen over time. According to Seagate, drives can continue operating with several hundred unrepairable sectors, but performance may degrade.
If bad sectors exceed acceptable limits, it’s time to replace the faulty HDD. Major hard drive manufacturers specify the sector error threshold for replacement. For example, Seagate recommends drive replacement when uncorkable sectors exceed 1% of the total sectors, and Western Digital when it exceeds 7% 1. Continuing to use a drive beyond these limits risks further data loss and drive failure.
Before replacing your HDD, be sure to backup all data and migrate to the new drive. Some backup software like Disk Drill can help recover data from drives with bad sectors. You can then install the new HDD and restore your files from backup.
Preventing Bad Sectors
There are several steps you can take to help prevent bad sectors from occurring on your hard drive:
Safely eject external hard drives – Always use the “Safely Remove Hardware” option when disconnecting an external hard drive. Improperly ejecting can lead to file system corruption and bad sectors.
Allow hard drives to spin down – Configure your OS and hard drive settings to allow the drive to spin down after periods of inactivity. This gives the drive a chance to rest and cool down.
Maintain a stable power supply – Use a UPS (uninterruptible power supply) to avoid sudden power loss while writing data. Sudden loss of power can damage sectors.
Manage drive heat – Ensure your case has adequate airflow and keep the HDD away from other heat sources. Excessive heat can damage platters.
Do regular backups – Back up your data regularly to external drives or the cloud. This protects your data if bad sectors spread.
Perform disk checks – Periodically run CHKDSK scans to identify and repair bad sectors before they accumulate.
Replace aging drives – Hard drives have a limited lifespan. If your drive is over 3-5 years old, consider replacing it.
Signs of Damaged HDD
There are several warning signs that indicate your hard drive may be failing or have bad sectors. These include:
Data corruption: You may experience frequent error messages when trying to open files, or the files themselves may be corrupted or unreadable. This is a major red flag that there are bad sectors on the drive leading to data loss.1
Computer crashes: Bad sectors can cause system instability, freezes, and blue screen errors. If your computer is randomly crashing or freezing frequently, it could point to hard drive failure.2
Slow performance: As more sectors go bad, you may notice significantly slower file transfers, program launches, and overall sluggish system performance as the drive struggles to read data.3
Strange noises: Clicking, beeping, grinding, or loud spinning sounds coming from the hard drive can signal mechanical failure or problems reading data due to bad sectors.
Failure to boot: In severe cases, you may get stuck at the boot screen or encounter errors like “hard drive not detected” as the drive fails to initialize entirely.
Monitoring tools like SMART can pick up on issues like reallocated sectors and pending sectors before failure occurs. Overall, being aware of these symptoms can help prompt you to troubleshoot and backup your data before catastrophic failure.
Conclusion
Checking and handling bad sectors on your hard drive using the CHKDSK utility and Command Prompt can help improve performance and extend the life of your drive. Here are the key steps covered in this guide:
Access the Command Prompt by typing ‘cmd’ in the Windows search bar or Run dialog. Run CHKDSK by typing ‘chkdsk C: /f /r /x’ and hitting Enter. This will scan drive C: and repair any bad sectors.
Review the CHKDSK report for information on bad sectors found and repaired. ‘Recovering orphaned files’ means files were restored from bad sectors.
For unrepairable bad sectors, consider replacing the HDD if there are more than 100. As a precaution, backup important data and watch for signs of HDD failure.
Avoiding bad sectors comes down to protecting your HDD from shock/drops, maintaining drive health, and having good antivirus software.
Running CHKDSK regularly and monitoring your HDD’s health can help maximize its lifespan. If detected early, bad sectors can often be repaired before leading to irreversible damage.
