Regularly checking for disk errors is critical for any Ubuntu system. Disk errors can lead to data corruption, performance issues, and even complete system failure if left unchecked. That’s why Ubuntu provides multiple tools and methods for scanning, detecting, and repairing disk problems.
There are several ways to check for disk errors on an Ubuntu system. The two main methods are using the fsck utility to scan and repair filesystems, and using the badblocks tool to identify bad sectors on a disk. Other options include S.M.A.R.T. monitoring, the Disks utility, scheduling disk checks, and live disk checks. This guide will cover the major tools and best practices for checking disk health in Ubuntu.
Prerequisites
There are a few prerequisites the user needs before checking the disk for errors on Ubuntu:
The user needs to have administrative privileges to run disk checking utilities. Regular users will not have permission to execute these commands and tools. To check if you have admin access, open the terminal and run the ‘sudo -i’ command. If it asks for a password, then you have admin privileges.
Some disk checking tools like fsck and badblocks require an internet connection to download and install. Ensure your Ubuntu system is connected to the internet before running these utilities. A stable broadband or wifi connection is recommended.
According to the Ubuntu documentation, the minimum system requirements for running Ubuntu Desktop Edition include 2 GHz dual core processor, 4GB of RAM, and minimum 25GB of hard drive space (https://help.ubuntu.com/community/Installation/SystemRequirements). The disk space required depends on amount of data stored.
Before checking disk for errors, users should check their system meets the minimum requirements for Ubuntu. This ensures the disk utilities can execute properly without performance issues.
Using fsck
fsck, short for file system consistency check, is a utility that examines the file system for errors and attempts to repair them if possible. It is the primary tool on Linux for checking and repairing errors on storage devices like hard drives and SSDs [1].
To use fsck to check for disk errors in Ubuntu, first reboot the system into recovery mode. At the GRUB menu, choose the recovery mode option. This will bring up a menu – select “fsck” to run a file system check. fsck will scan the disk and report any errors found.
Some common fsck options include:
- -a – Automatically repair detected errors
- -r – Interactively repair detected errors
- -f – Force a full file system check even if marked clean
- -y – Answer yes to all prompts automatically
For example, to do a full non-interactive scan and repair, run:
fsck -fy /dev/sda1
Overall, fsck is the go-to tool on Linux for comprehensive disk error checking and repair. Running it regularly can help identify and resolve issues before they lead to serious file system corruption or data loss.
Using badblocks
The badblocks command is used to scan a disk drive for bad sectors. It reads the disk block by block, testing each block to see if it can store and retrieve data correctly. If a block fails the test, it likely contains bad sectors and badblocks will report it as “bad”.
To scan your disk for bad sectors using badblocks, first unmount any mounted partitions on the drive you want to test. Then run the badblocks command with the disk path as a parameter:
sudo badblocks /dev/sda1
This will scan the entire /dev/sda1 partition and display any bad blocks it finds. You can also add the -v option for verbose output:
sudo badblocks -v /dev/sda1
The scan can take a while depending on the size of your disk. Once it finishes, it will report any bad blocks found. If the count is non-zero, you have bad sectors that should be repaired.
You can try overwriting the bad blocks a few times to see if the drive can reallocate the sectors. But if the bad block count stays the same, the drive likely has permanent damage and should be replaced. Backing up your data right away is recommended.
For more details on using the badblocks command, refer to this guide: https://www.tecmint.com/check-linux-hard-disk-bad-sectors-bad-blocks/
Using S.M.A.R.T.
S.M.A.R.T. (Self-Monitoring, Analysis and Reporting Technology) is a monitoring system built into hard drives that detects and reports on various indicators of drive reliability and health. The smartctl tool can be used to read S.M.A.R.T. data from drives.
To check the S.M.A.R.T. status of a drive, use the command:
smartctl -a /dev/sdX
This will show the overall S.M.A.R.T. health status of the drive, as well as values for various S.M.A.R.T. attributes like read error rate, spin up time, etc. The Raw_Values show the current value, and thresholds determine if a value indicates potential drive issues.
S.M.A.R.T. self-tests can also be initiated to scan the drive and proactively uncover any problems. Short and long offline tests can be started with:
smartctl -t short /dev/sdX
smartctl -t long /dev/ sdX
The progress and results of self-tests can be checked with the -l selftest command. Overall, S.M.A.R.T. provides detailed insights into drive health and should be monitored for signs of potential hardware issues.
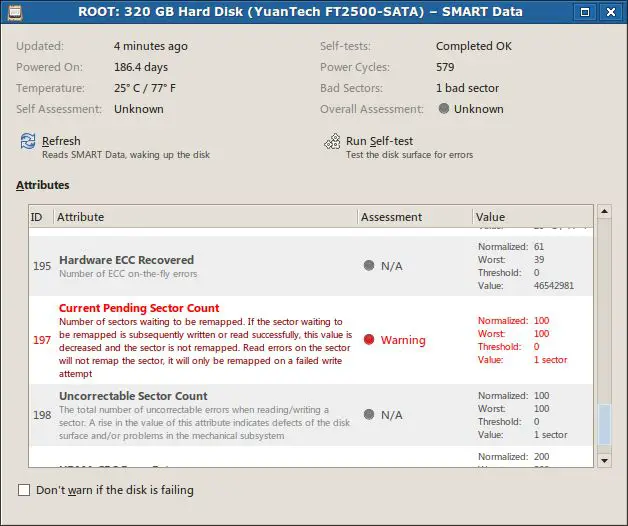
Using GNOME Disks
The GNOME Disks utility provides a graphical user interface for checking disks for errors in Ubuntu. GNOME Disks comes pre-installed on Ubuntu desktop editions and can be easily accessed from the applications menu. It allows performing various disk tasks through an intuitive and user-friendly interface.
To check a disk for errors using GNOME Disks:
- Open the GNOME Disks application. It can be found in the applications menu under Utilities.
- In the disk list on the left side, select the disk you want to check.
- Click on the menu button next to the selected disk and choose “SMART Data & Tests”.
- Click on “Self-Tests” and then click “Start Short Self-Test” to begin a short SMART self-test on the disk.
- Wait for the self-test to complete. The progress will be displayed.
- Once completed, any disk errors or issues will be reported under the “Self-Test Log” section.
This will perform a short SMART self-test on the selected disk and report any errors found. The GNOME Disks utility provides an easy way to check disk health through its graphical interface in Ubuntu.
For more details, refer to the GNOME Disks manual: Check your hard disk for problems (Ubuntu Documentation).
Scheduling Disk Checks
To set up periodic disk checks on Ubuntu using the fsck command, you can use cron jobs to run fsck automatically. The recommended frequency for disk checks is once every 30 boots (AutoFsck).
To set this up using cron, you can create a cron job that runs the fsck command with the -A flag, which will check all non-root filesystems. For example, adding this line to your crontab will run fsck every 30 reboots:
@reboot root fsck -A >/dev/null 2>&1; test $((${RANDOM} % 30)) = 0 && fsck -a # check fs every 30 reboots
This will run fsck in the background and only output anything if there are errors. The test statement runs fsck -a for a full check every 30th reboot.
You can also check specific drives on a schedule by specifying the device name or mount point instead of -A. For example:
0 5 * * * root fsck /dev/sda1
This will check the /dev/sda1 partition daily at 5 AM.
Live Disk Checks
One advantage of Ubuntu is the ability to easily boot into a live environment to check the disk for errors. This allows you to scan the hard drive without the OS running directly from that disk.
To perform a live disk check, first create a live Ubuntu USB drive. Then boot your computer from the USB drive to load the live environment. Once booted, open a terminal and run sudo fsck -f /dev/sdX, replacing sdX with the drive you want to check.
The main benefits of live disk checks include:
- The disk can be scanned without any OS files being locked or in use.
- Root file system errors can be detected and fixed, since the live OS runs from the USB.
- File system corruption is easier to repair when the affected drive is not mounted.
- A consistent environment for repeated checks and diagnosis of difficult disk problems.
Overall, live disk checks provide the most thorough and foolproof way to detect disk errors in Ubuntu. The live environment is essential for fixing certain problems that cannot be resolved from the running OS.
Disk Monitoring Tools
There are various disk monitoring tools available on Ubuntu that allow you to keep an eye on disk health and performance. Some popular options include:
GNOME Disks – The GNOME Disks utility provides basic disk health monitoring capabilities along with the ability to run benchmarks and perform SMART tests.
gkrellm – This system monitoring tool can display SMART disk health statistics such as temperature, reallocated sectors, and pending sectors. It provides an overview of disk status.
Conky – By configuring advanced Conky scripts, you can add extensive disk health statistics like I/O errors, spin up time, and more. This provides in-depth, technical data.
These tools allow you to monitor key disk health metrics like temperature, pending/reallocated sectors, CRC errors, spin retries, and more. They help identify potential disk issues before failure or data loss occurs.
Conclusion
Keeping your Linux disk healthy is crucial to avoiding potential data loss or system instability. We covered several useful methods for checking disks for errors in Ubuntu, including fsck, badblocks, S.M.A.R.T., and GNOME Disks.
It’s important to periodically scan your disks proactively with these tools, rather than waiting for errors to occur. Scheduled disk checks can run in the background automatically with cron jobs. For urgent disk issues, live disk checks from a bootable USB can provide access when the main OS is unavailable.
For further reading, Ubuntu’s documentation provides more details on Linux filesystem troubleshooting and the disk checking procedures we outlined here. The smartmontools project and badblocks man page also have in-depth technical information on S.M.A.R.T. monitoring and badblocks usage.
With proper care and maintenance, your Ubuntu disks should provide years of reliable service. Periodically verifying their health is time well invested.
