There are a few reasons why someone may want to completely delete all partitions on their Mac’s hard drive:
- Before selling or gifting the Mac, to wipe all personal data and start fresh
- To troubleshoot partition and disk issues, resetting may fix problems
- To reinstall macOS from scratch and clear out any problems
- To switch from a partitioned drive to having a single volume
- To change the partition scheme from MBR to GPT or vice versa
Completely deleting all partitions erases all data on the drive. So it’s crucial to back up your data first. With some forethought and care, this process can help resolve a number of issues by resetting the drive.
Back Up Important Data
It is highly recommended to back up any important files before proceeding. Deleting partitions will erase all data stored on the hard drive.
To back up your data, you have a few options:
- Copy important files to an external hard drive or cloud storage.
- Use Time Machine to back up your entire hard drive to an external drive formatted for Time Machine. According to Apple Discussions, Time Machine requires the external drive to be formatted as Mac OS Extended (Journaled) or APFS.
- Clone your entire hard drive using a tool like Carbon Copy Cloner or SuperDuper. This will create an exact replica of your hard drive that you can restore from later.
Be sure to verify the backups completed properly before proceeding. Having a solid backup is crucial to avoid permanent data loss.
Understand the Risks
Deleting all partitions on your hard drive is an irreversible process that will permanently erase all data stored on the drive. It is critical to back up your important files and data before proceeding.
According to this Quora post, wiping a hard drive will delete all existing partitions and reformat the entire drive. Any files or data that were stored on the partitions will be permanently deleted.
As this Apple forum discussion points out, anytime you manipulate drive partitions there is a risk of losing all data. Be absolutely certain you have backups before deleting partitions, as there will be no way to recover lost files.
In summary, deleting all partitions is an extreme, irreversible action. Be prepared to lose all data and files on the drive. Back up anything you want to keep before proceeding.
Check Current Partitions
Before deleting any partitions, it’s important to check what is currently on your hard drive. The easiest way to view your current partitions is using Apple’s Disk Utility app.
To check your partitions in Disk Utility:
1. Open Disk Utility (located in Applications > Utilities).
2. Click “View” in the top menu bar and select “Show All Devices”. This will display both volumes and the physical disks.
3. Select the physical disk (not a volume) from the sidebar. This will show all existing partitions on that disk.
You can now see the layout of partitions, their names, formats, and sizes. Take note of any partitions you want to keep before deleting. For more details on a partition, select it and click the “Info” button.
For more advanced partition checking, you can also use Terminal commands like “diskutil list” and “diskutil info /dev/diskX”. But Disk Utility provides an easier GUI for most users.
Unmount the Partitions
Before deleting the partitions on your Mac’s hard drive, you’ll need to unmount any partitions that are currently mounted. Mounting makes a disk or partition’s contents available to the operating system. Unmounting a disk or partition ejects it and makes it unavailable to the OS before formatting or deletion.
To unmount a partition in macOS, open the Disk Utility app and select the mounted partition you want to unmount in the sidebar. Then click the “Unmount” button at the top of the Disk Utility window or the eject icon next to the partition name [1]. This will unmount the partition and eject it so it is no longer available to macOS.
You can also use the diskutil unmount command in Terminal to unmount partitions by their identifier codes. For example: diskutil unmountDisk /dev/disk2s1 unmounts the disk with identifier code “disk2s1” [2]. Unmount all partitions before proceeding with deletion.
Delete the Partitions
In Disk Utility, you can delete all partitions from your Mac’s hard drive to erase everything and create a blank slate. Here are the steps:
- Open Disk Utility on your Mac. The easiest way is to use Spotlight Search and type in “Disk Utility”.
- In the sidebar, select the top-most hard drive that contains all the partitions you want to delete. Usually this is named “Macintosh HD” or something similar.
- Click the “Erase” button at the top of the Disk Utility window. This will delete all existing partitions on the drive.
- In the popup dialog, make sure “Scheme” is set to “GUID Partition Map” and “Format” is set to “Mac OS Extended (Journaled)”.
- Click “Erase” to confirm deleting all partitions on your Mac’s hard drive.
This will remove all partitions and data, leaving your hard drive blank and ready for a new partition table and OS installation (source). Be absolutely certain you have backups before deleting partitions, as the process is not reversible.
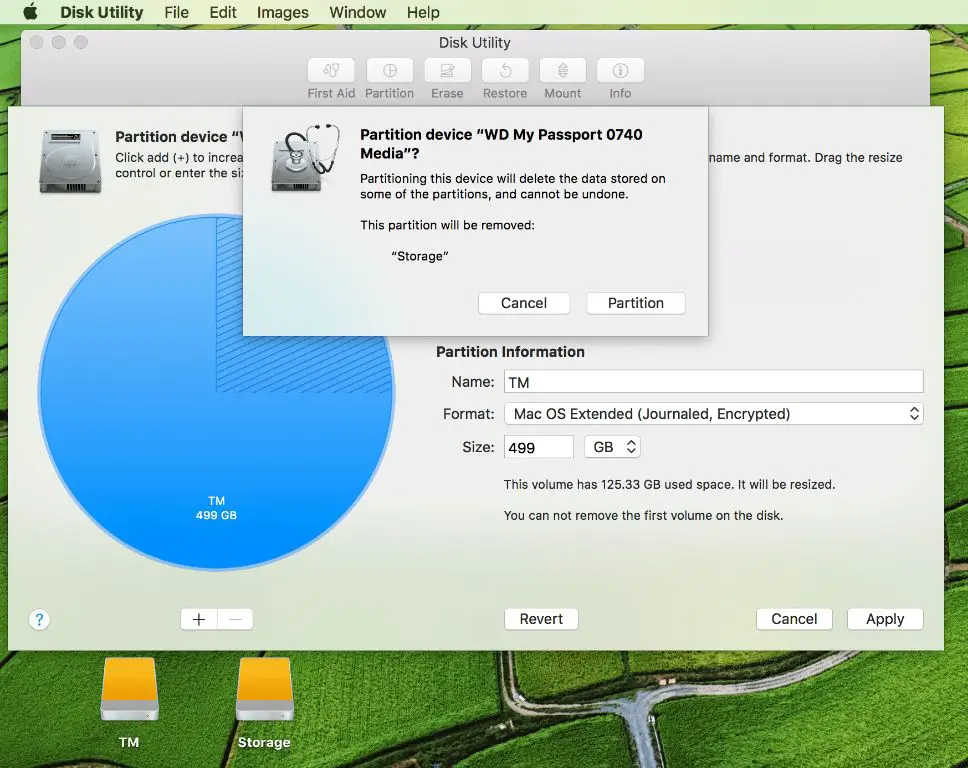
Create a New Partition
After deleting all existing partitions on the Mac hard drive, the next step is to create a new single partition that will take up the full disk space. This can be done using the Disk Utility app or the command line.
To create a new partition with Disk Utility:
- Open Disk Utility
- Select the hard drive device from the sidebar
- Click the Partition button
- Specify 1 partition from the drop down menu
- Select the disk format type (APFS or Mac OS Extended)
- Name the partition
- Click Apply to create the partition
This will create a brand new empty partition taking up the full disk space [1]. The partition can then be formatted in preparation for installing macOS.
Format the Partition
Once you have deleted all existing partitions on the Mac hard drive, the next step is to create a new partition and format it. The most common format for the Mac operating system is Mac OS Extended (Journaled). This format enables additional features like journaling, which improves data integrity.
To format the new partition as Mac OS Extended (Journaled):
- Open Disk Utility on your Mac. You can find it by searching in Spotlight or going to Applications > Utilities.
- Select the drive you want to format from the left sidebar. Make sure you select the disk, not a volume or container.
- Click the Erase button along the top menu bar. This will open the erase pop-up.
- Give the drive a name if desired.
- Select Mac OS Extended (Journaled) as the format.
- Click Erase to begin formatting the partition.
Formatting can take several minutes depending on the drive size. Once completed, the drive will show up with the new format and name. It is now ready for macOS installation.
For more details, refer to Apple’s support documentation on formatting disks.
Reinstall macOS
Once you have formatted the new partition, you will need to reinstall macOS. Here are the steps to reinstall macOS on the new partition (Apple Support):
- Boot into Recovery mode by restarting your Mac and holding down Command + R.
- Select Reinstall macOS from the macOS Utilities window.
- Click Continue and follow the onscreen prompts to reinstall macOS on the new partition.
- If prompted, select the new partition to install macOS on.
- Once the installation is complete, you will be brought to the setup assistant to create a new admin account and configure settings.
After reinstalling macOS, your Mac will have a fresh install on the newly formatted partition and you can restore your data from your backup.
Restore Backed Up Data
After completing the clean install of macOS, you can restore your files and settings from your Time Machine backup. Here are the steps to restore your data:
1. Make sure your Time Machine backup drive is connected to your Mac. Restart your Mac and hold down the Command + R keys to boot into Recovery Mode.
2. Select “Restore from Time Machine Backup” and choose your backup drive. Select the most recent backup.
3. The Restore Assistant will scan your backup and restore your files, settings, and macOS. Keep your Mac plugged in until the restoration process is complete.
For more details, refer to Apple’s support article on how to restore your Mac from a backup.