RAID 5 is a data storage technology that uses multiple hard drives to achieve fault tolerance and improved performance (PITSGlobalDataRecoveryServices, 2022). It requires a minimum of three drives and uses distributed parity to protect against data loss if one drive fails (ZDNet, 2016).
The key benefits of RAID 5 include (PITSGlobalDataRecoveryServices, 2022):
- Data redundancy – Data is striped across multiple drives, with parity information distributed across all drives. If one drive fails, data can be rebuilt using the parity information.
- Improved performance – RAID 5 uses striping to spread data across multiple disks. This allows for faster reads and writes compared to a single disk.
- Cost effective – Only one parity drive is required, so you get data redundancy without as much cost as other RAID levels like RAID 10.
RAID 5 is best suited for use cases that require a balance of data protection, performance, and storage efficiency. It works well for servers, workstations, and other environments where some fault tolerance is needed without excessive cost (ZDNet, 2016).
RAID 5 Hardware Requirements
To setup RAID 5, you will need to meet certain hardware requirements:
Minimum number of hard drives: At least three hard drives are required for RAID 5 configurations, though four or more disks are recommended for improved performance and fault tolerance [1]. RAID 5 uses block-level striping with distributed parity, so a minimum of three drives allows for data striping across two disks with parity information on the third.
Identical drive capacities: It is highly recommended to use identical drives in terms of storage capacity for RAID 5 arrays. Mixing drive capacities can lead to wasted storage space.
RAID controller card: A dedicated RAID controller card is required to setup and manage the RAID 5 array. Many motherboards have an integrated RAID controller, but a separate PCIe RAID card is recommended for optimal performance.
Entering BIOS
To access the BIOS setup utility on startup, you need to press a specific function key or key combination as the computer boots. The exact key varies between motherboard manufacturers, but common options include F2, Delete, Esc, F10, F12, Ctrl+Alt+Esc [1]. You may see a prompt to “Press __ to enter Setup” during the Power-On Self-Test (POST) screen.
Once you enter the BIOS interface, you can navigate between menus using the arrow keys. Look for options like “Advanced” or “Integrated Peripherals” to find RAID configuration settings. Select or enter the menu using Enter. You may need to scroll down to see all available menus. Read on-screen descriptions and help info to understand what each setting does before changing any values [2].
Key things to look for are enabling RAID mode, creating the RAID array, and assigning drives to it. The steps will differ between BIOS brands, but the general process is similar. Take care not to change any other settings without understanding their function.
[1] https://www.lifewire.com/bios-setup-utility-access-keys-2624462
[2] https://www.tomshardware.com/reviews/bios-keys-to-access-your-firmware,5732.html
Enabling RAID Mode
To create a RAID array, you first need to enable RAID mode in the BIOS. This allows the BIOS to recognize multiple drives as a single logical unit. The steps to enable RAID mode may vary between different system manufacturers, but generally involve:
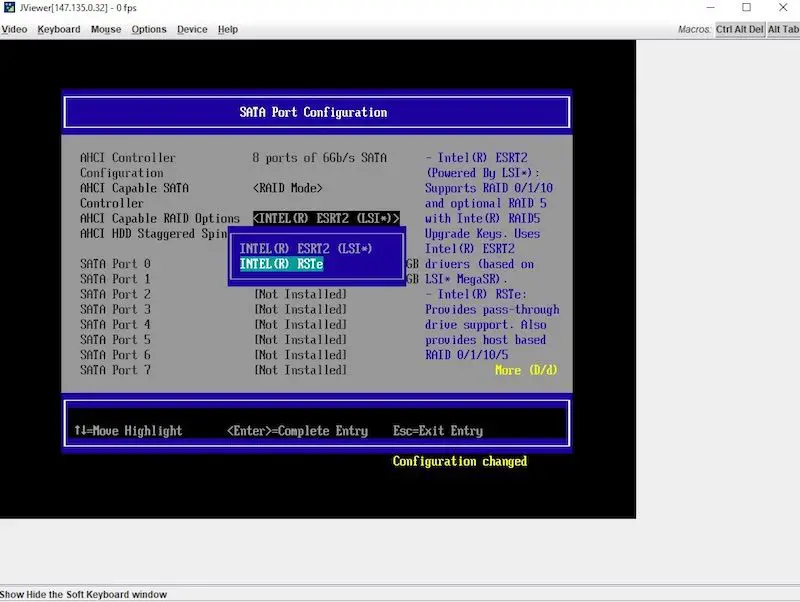
Finding the SATA or Storage Configuration section in BIOS. This is often under an Advanced or Integrated Peripherals tab. Look for an option to change the SATA mode from IDE or AHCI to RAID (sometimes called RAID Autodetect). According to Asus, IDE mode does not support RAID arrays. AHCI mode can read RAID arrays but not create them. You need RAID mode enabled for array creation and management.
There are key differences between IDE, AHCI and RAID mode:
- IDE mode allows the OS to communicate with each drive independently. No RAID capabilities.
- AHCI mode supports hot swapping and advanced features like Native Command Queuing. Can read but not create RAID arrays.
- RAID mode enables the RAID capabilities built into the disk controller. Required for creating and managing RAID arrays.
Once RAID mode is enabled, you can proceed to creating the RAID 5 array in BIOS.
Creating a RAID 5 Array
Once you have enabled RAID mode in the BIOS, the next step is to create the RAID 5 array. This is done through the RAID configuration utility in the BIOS.
To locate the RAID configuration options, look for a menu item labeled “RAID Configuration” or something similar once you have entered the BIOS. This is where you will create the array.
Follow these steps to create a new RAID 5 array in the configuration utility:
- Select the option to create a new array. This may be labeled “Create Array” or “New Array”.
- Choose RAID 5 as the RAID level when prompted.
- Select the physical drives you want to include in the array. Most configurations require at least 3 drives.
- Ensure the array size is correct. This will depend on the size and number of drives added.
- Select any additional options like write caching if offered.
- Confirm the array creation when prompted.
The BIOS will then initialize and build the RAID 5 array. This may take some time depending on the size and number of drives. Once complete, the new array will be available for installing the operating system.1
Adding Drives to the Array
Once you have created the initial RAID 5 array in the BIOS, you may want to expand the array by adding additional drives. It’s important to select drives that are the same size or larger than the existing drives in the array. Generally, the process involves:
1. Booting into the system BIOS.
2. Navigating to the RAID configuration utility.
3. Selecting the RAID 5 array you want to expand and choosing the “Expand Array” option.
4. Selecting the available drive(s) to add to the array from the list of detected drives. Drives must be unallocated and equal to or larger than existing array drives.[1]
5. Confirming the selection to add the new drive(s).
The initialization process will start automatically, rebuilding the array to stripe data across the new and existing drives. The time required depends on the size of the drives being added. Plan for approximately 20 minutes per gigabyte of capacity being added to the array.[2] The system can still be used during the expansion, but performance may be degraded until the process finishes.
Once complete, the expanded capacity will be available in the RAID 5 volume without needing to reconfigure the operating system or applications.
Saving Settings and Exiting BIOS
Once you have configured the RAID 5 array, it is important to save the RAID settings before exiting the BIOS. Here are the steps:
1. After configuring the RAID 5 array, you will be brought back to the main BIOS screen. Navigate to the “Save & Exit” tab.
2. Select the “Save Changes and Exit” option. This will save the RAID configuration.
3. The system will prompt you to confirm saving the changes. Select “Yes” to save and reboot.
4. The computer will now reboot, and the RAID configuration will be retained. The RAID 5 array will be detected during the boot process.
It is crucial to save RAID settings before exiting BIOS. Otherwise, the RAID configuration will be lost when rebooting. Saving the settings ensures the array persists across reboots.(Source)
Verifying RAID 5 Setup
After configuring RAID 5 in BIOS, it’s important to verify that the array was set up properly before installing an operating system and using it. There are two main ways to confirm the RAID 5 array is working correctly:
Check RAID status in BIOS
Re-enter the BIOS setup utility and look for the RAID configuration screen. This should show the RAID 5 array as “Normal” or “Online.” All the drives added to the array should be listed here too. If any issues are shown like a degraded or offline array, there may be a problem that needs to be addressed before proceeding (Source).
Verify redundancy in OS
Once an operating system is installed, RAID status can be verified in the OS too. In Windows, use the Disk Management utility to examine the status of the RAID drives. They should show up as a single volume with a RAID 5 label. The status should be shown as “Healthy.” In Linux, the mdadm utility can be used to confirm the RAID array details (Source).
Verifying the RAID configuration was successful in BIOS and the OS is an important step before relying on the array for critical data storage and redundancy.
Maintaining a RAID 5 Array
Once a RAID 5 array is configured, ongoing maintenance is required to monitor drive health and take precautions to prevent data loss. Here are some best practices:
Monitor drive health regularly using disk utility software to check for signs of failure like bad sectors or read/write errors. Watch for warning messages from the RAID controller about degraded arrays. Consult the controller documentation on how to run patrol reads or consistency checks, which help identify problems early.
If a disk does fail in a RAID 5 array, the array will switch to a degraded state and continue operating using parity data on the remaining disks. But it’s crucial to replace the failed drive as soon as possible to avoid data loss if another drive fails. Hot swap the new drive into the array and initiate a rebuild, which recreates the lost data from parity. The rebuild puts significant stress on the array so avoid heavy disk activity until it completes.
Take precautions like using enterprise-grade drives, monitoring drive temperatures and vibration, providing adequate cooling and backups. Schedule regular backups of the RAID 5 array in case multiple disk failures or controller issues occur. Test restores periodically to verify backup integrity and consider supplementing RAID 5 with an additional backup solution.
Sources:
[1] Best Practices for Installing and Configuring RAID Arrays
[2] Contemporary best practices for RAID
Conclusion
Configuring RAID 5 in BIOS provides important data redundancy and improved performance for your storage system. The key steps covered in this guide include enabling RAID mode in BIOS, creating the RAID 5 array, adding drives, and saving the BIOS settings.
With RAID 5 properly configured, you gain the benefits of data protection in case of a single drive failure. The array can withstand a failed drive while maintaining full read/write functionality. Additionally, by striping data across multiple drives, RAID 5 provides faster read and write speeds compared to a single drive.
For more help with optimizing and maintaining your RAID 5 array, consult your motherboard manual or visit technology forums. There are also advanced RAID management utilities available to provide additional monitoring and configuration options. With the steps covered here, you now have a solid foundation for leveraging the advantages of RAID 5 storage.