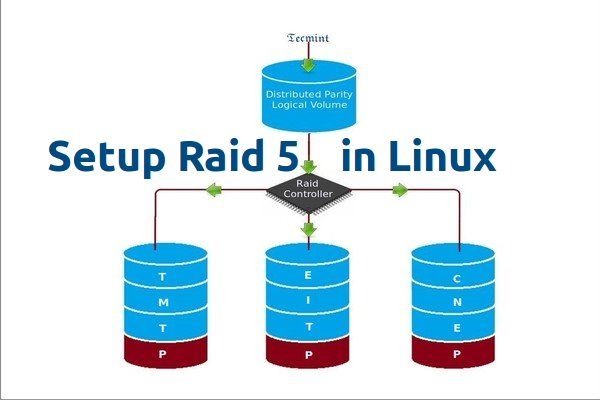
RAID 5 is a storage configuration that spreads data across multiple hard disk drives using block-level striping with distributed parity. This provides fault tolerance and improves performance compared to a single disk drive (Source 1).
The key benefits of RAID 5 include (Source 2):
- Improved read performance – spreading data across multiple disks allows for concurrent disk reads.
- Fault tolerance – parity information allows data to be reconstructed if a disk fails.
- Efficiency – only one disk worth of space is used for parity, the rest for data.
RAID 5 is best for situations that require high read performance, fault tolerance, and efficient storage utilization. It’s commonly used for transactional databases, email servers, and media streaming (Source 3).
Prerequisites
Before configuring RAID 5, you need to ensure you have the necessary hardware and software ready. The key prerequisites are:
- Hard drives – You need at least 3 hard disk drives (HDDs) to create a RAID 5 array. Most setups use 4+ drives for better performance and capacity. All the drives should be the same size.
- RAID controller card – A dedicated RAID controller is required to manage the RAID 5 array. This can be a hardware RAID card or motherboard with RAID support.
- Server or PC – The RAID array will be configured on a server or PC that supports RAID technology.
- Operating system – You’ll need an OS installed with RAID drivers to recognize and manage the RAID 5 array. Common choices are Windows, Linux, etc.
Once you have verified these components are available, you can proceed with the RAID 5 configuration steps outlined below.
Step 1 – Install Hard Drives
The first step in configuring RAID 5 is to install the hard drives. RAID 5 requires a minimum of 3 drives to work properly (https://www.seagate.com/products/nas-drives/raid-calculator/). While you can use more drives, 3-4 is the most common configuration.
Install at least 3 HDDs in your server or PC, making sure they are all the same size and speed for optimal performance. Mount the drives in the drive bays, connecting the SATA and power cables. The server/PC will then detect the new drives once powered on.
With 3 drives installed, you now have the minimum configuration to setup RAID 5. The drives do not need to be initialized or formatted yet, we will handle that in the RAID configuration steps.
Step 2 – Enter RAID Configuration
To enter RAID configuration settings, you need to access the BIOS setup utility during system boot. The steps to enter RAID configuration may vary slightly depending on the system manufacturer and model.
On Dell PowerEdge servers, press F2 during boot to enter System Setup and access the RAID configuration utility. Other common keyboard shortcuts include pressing Ctrl+I, Ctrl+R, or Ctrl+F to enter RAID configuration.
Alternatively, you may be able to access RAID configuration after booting into the operating system. For example, on Windows you can use the Dell OpenManage Server Administrator tool. Or on Linux, use mdadm commands to view and configure RAID.
The RAID configuration utility allows you to create RAID volumes, monitor disk status, and manage other RAID settings before installing the operating system.[1]
Step 3 – Create RAID 5 Array
When you enter the RAID configuration in your system BIOS, you will need to create the RAID 5 array. Select the option to create a new RAID 5 array. This will allow you to select the hard drives you want to include in the array.
Select at least 3 hard drives to include in the RAID 5 array. The minimum number of drives required for RAID 5 is 3. More drives can be added if higher capacity or redundancy is needed. For basic setup, select 3 unused hard drives of the same size to add to the array. The total capacity will be the size of your smallest drive multiplied by the number of drives minus 1 (for parity).
Once you have selected the drives, confirm the setup to create the RAID 5 array. The system will initialize and begin building the array, distributing parity data evenly across the drives. After it completes, you will have a fault-tolerant RAID 5 array ready for formatting and mounting.[1]
1. https://www.wikihow.com/Configure-RAID
Step 4 – Configure RAID Settings
Once the RAID 5 array is initialized, we need to configure the array settings. There are two key settings to focus on:
- Strip size – This determines the size of each block of data that is written across the disks in the array. For RAID 5, a smaller strip size like 64KB can improve performance for random writes, while a larger strip size like 1MB is better for large sequential reads and writes [1]. A good middle ground is 128KB.
- Write caching – Enabling write caching stores data to be written in a memory cache before writing to disk. This improves write performance but risks data loss in a power failure. Battery backups or uninterruptible power supplies help mitigate this risk.
To configure these settings in the RAID controller, go into the configuration utility and locate the properties or settings for the RAID 5 array. Input the preferred strip size like 128KB. Also, enable write caching if you have protections against sudden power loss. Otherwise leave it disabled.
Step 5 – Initialize RAID 5 Array
After creating the RAID 5 array, the next step is to initialize and sync the array. Initializing a RAID 5 array involves calculating and writing parity data across the drives. This is an important step as it ensures redundancy and fault tolerance are set up properly across the array.
The initialization process can take a long time to complete depending on the size and number of drives in the array. For a typical 4-drive RAID 5 array, initialization can take 6-12 hours. Larger arrays with more drives can take up to 24 hours or longer to initialize.
The “Initializing” status indicates the RAID configuration utility is currently calculating and writing the parity information across the disks. It is best not to interrupt this process. Let the initialization run fully until it shows a “Ready” status.
The initialization synchronizes all the disks in the array so that the proper parity data is stored. This allows the RAID 5 configuration to continue operating normally even if one of the drives fails. The long initialize time contributes to the excellent fault tolerance of RAID 5.
Once initialization completes, the RAID 5 array will be ready for formatting and usage. The initialization puts the redundancy in place to allow RAID 5 to withstand a single disk failure without data loss.
Source: https://forums.tomshardware.com/threads/intel-storage-raid5-what-does-initialize-do.667974/
Step 6 – Create Partition
Once the RAID 5 array has been initialized, the next step is to create a partition on the full array to utilize all the available storage space. This will prepare the RAID 5 volume for formatting in the next step.
To create a partition, first right-click on the Unallocated space of the RAID 5 array in Disk Management and select “New Simple Volume” 1. This will launch the New Simple Volume Wizard.
Follow the wizard, specifying the size of the volume which should be the maximum available size to use the full capacity of the RAID 5 array. It’s recommended to leave the default settings for drive letter and file system – a single partition using the whole Unallocated space 2.
Click Next through the wizard, and finish to create the new partition utilizing the full RAID 5 array. This single partition will now be ready for formatting in the next step.
Step 7 – Format RAID Array
Once the RAID 5 array has been initialized, the next step is to format the array with a file system so that it can be mounted and used by the operating system. The most common file systems used are NTFS for Windows and ext4 for Linux.
To format the RAID 5 array, we will use the mkfs (make filesystem) command. For example, to format the array as ext4 on Linux:
sudo mkfs.ext4 /dev/md0And to format as NTFS on Windows:
mkfs.ntfs /dev/md0This will format the entire RAID array with the selected file system. Formatting destroys any existing data on the disks, so only perform this step on a new RAID array.
The main benefits of formatting the RAID array are:
- Allows files and data to be stored in an organized hierarchical structure
- Enables permissions, security features, compression, etc.
- Optimizes the filesystem for the operating system
So formatting with a robust filesystem like ext4 or NTFS is an essential step before the RAID 5 array can be put into production use.
Step 8 – Mount RAID Array
Once the RAID 5 array is created, initialized, and formatted, it needs to be mounted to begin using it. The mount command is used to mount the array to a mount point, which is simply a directory where the array will be accessible.
First, create a directory to use as the mount point. This can be anywhere, but /mnt is commonly used for mount points:
sudo mkdir /mnt/raid5
Then use the mount command to mount the RAID device to this directory:
sudo mount /dev/md0 /mnt/raid5
Where /dev/md0 is the RAID device name, and /mnt/raid5 is the mount point directory.
The RAID array is now mounted and ready to use! Any data written to /mnt/raid5 will be stored on the RAID device.
To persist the mount through reboots, you need to add an entry to the /etc/fstab file. See this AskUbuntu post for details.
With the RAID array mounted, you can now start storing data, installing applications, etc. on the array just like any other disk volume.