APFS (Apple File System) is the proprietary file system developed by Apple for macOS, iOS, watchOS and tvOS. It was introduced in 2017 to replace HFS+ and is optimized for solid-state drives. APFS offers features like strong encryption, space sharing, fast directory sizing, atomic safe-save primitives and more.
NTFS (New Technology File System) is the primary file system for recent versions of Windows and Windows Server. It was introduced in 1993 and improved over subsequent versions of Windows. NTFS is known for stability, security, performance and supports very large storage media.
You may need to convert your APFS drive to NTFS if you want to use an external drive interchangeably between Windows and macOS. Since APFS is not natively supported in Windows, converting to NTFS makes the drive accessible on both platforms. The conversion process involves backing up data, erasing and reformatting the APFS drive to NTFS. This guide provides step-by-step instructions for converting APFS to NTFS.
Prerequisites
Converting an APFS volume to NTFS requires meeting certain prerequisites first:
-
You need a computer running Windows 10 version 1703 or later or Windows Server 2016 or later. Older Windows versions do not support APFS.[1]
-
Administrative privileges are required on Windows to run the conversion tools. Standard users cannot convert volumes.[2]
-
Make sure you have backups of the APFS drive before attempting conversion. The process may cause data loss if interrupted.[3]
Meeting these prerequisites ensures your Windows system can access, convert, and work with the APFS volume without issues after conversion.
Preparation
Before converting an APFS volume to NTFS, it is crucial to make preparations to ensure a smooth process. Here are the key preparation steps:
Create a Backup
As with any major disk operation, it is highly recommended to create a full backup first. Backing up the APFS volume provides a safety net in case anything goes wrong during the conversion process. Follow standard backup procedures using Time Machine or another backup utility before proceeding.
Install Required Tools
Converting from APFS to NTFS requires having the proper utilities installed. On Macs, you will need to install APFS for Windows by Paragon Software which enables Windows to recognize APFS volumes. On Windows, you may need to install the latest updates from Microsoft to recognize APFS drives.
Check Disk Integrity
As a precaution, check the target disk for errors using Disk Utility’s First Aid feature on macOS or chkdsk in Windows. This verifies the disk is healthy before attempting the file system conversion, avoiding potential issues down the line.
Convert APFS Volume to NTFS
To convert an APFS volume to NTFS, follow these steps:
1. Connect the APFS drive to your Windows PC. You can use a USB cable or mount it in an external drive enclosure.
2. Open File Explorer and locate the APFS drive. Right-click on it and select “Format”.
3. In the Format dialog, under “File system” select “NTFS”. Check the “Quick Format” box.
4. Click “Start” to begin the formatting process. This will take some time to fully convert the drive to NTFS.
5. When completed, the drive will now be fully formatted as NTFS and accessible on your Windows PC.
For more details, refer to this guide: https://recoverit.wondershare.com/format-harddrive/convert-apfs-to-ntfs.html
Verify Conversion
After converting from APFS to NTFS, it’s important to verify that the conversion was successful before continuing to use the drive. Here are some ways to check:
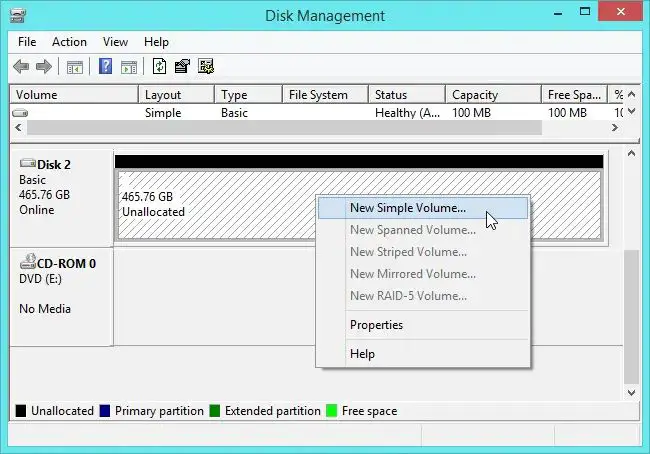
Open up Disk Management again and view the properties for the drive. It should now list “NTFS” under “File System” instead of “APFS”. You can also double check this by right clicking the drive and selecting “Properties”.
Try opening some files from the newly converted drive. Photos, videos, documents etc should open without issue. This confirms read/write access is working properly on the NTFS volume. If you get errors trying to access files, the conversion likely failed.
Use the “chkdsk” command to scan the drive for errors. Open an elevated Command Prompt and run “chkdsk X: /f” where X is the drive letter. It will scan and fix any file system errors if found.
Overall, verifying that Disk Management reports NTFS as the file system, files open properly, and chkdsk finds no issues will confirm a successful APFS to NTFS conversion.
Post-Conversion Tasks
After successfully converting from APFS to NTFS, there are some additional steps to take in order to optimize the system.
First, you’ll want to tweak some NTFS settings for improved performance. Some best practices include enabling NTFS compression to save disk space, disabling Last Access timestamp to reduce unnecessary disk writes, and adjusting cluster size for your typical file sizes [1]. Refer to Microsoft’s documentation on NTFS optimization for more detailed guidance.
Next, you’ll need to reinstall any applications that were installed under APFS. Since the filesystem changed, these programs will need to be reinstalled under NTFS. Make a list of your essential apps and get them set back up.
Finally, restore any user files that you backed up prior to the conversion. This includes documents, photos, downloads, and other personal files. Copy them from your backup device to your local NTFS drive. Double check that all files copied over successfully so you don’t lose anything important.
With these post-conversion tasks completed, your system will be fully migrated to NTFS and running optimally.
Performance Comparison
When comparing performance benchmarks between APFS and NTFS, APFS generally has faster read/write speeds for SSD storage while NTFS is better optimized for HDD storage. However, there are some key differences and considerations.
According to benchmarks, APFS has faster metadata operations and can copy/move large numbers of small files quicker than NTFS due to improved allocation algorithms [1]. APFS also offers stronger encryption and better SSD optimization.
On the other hand, NTFS has broader compatibility with older systems. It also has more mature defragmentation tools, useful for HDDs. In some tests, NTFS achieved higher sequential throughput for very large files [2].
In summary, APFS is faster for common operations on SSD storage, while NTFS offers compatibility and optimization for HDDs. Consider your specific storage medium and usage patterns when choosing a file system.
Troubleshooting
Here are some common errors that may occur when converting an APFS volume to NTFS and how to fix them:
Conversion Fails Midway
Sometimes the conversion process may fail midway due to data corruption or other issues. In this case, you can try using a recovery tool like Wondershare Recoverit to retrieve your data first. Then format the drive completely using Disk Utility before trying the conversion again.
Volume Shows Unsupported File System
If Windows shows the converted drive as an unsupported file system, reconnect the drive and initialize it using Disk Management. This will recreate the partition table and format the volume, fixing the issue.
Data Recovery
In case important files get lost or deleted during the conversion, you can use data recovery software like Recoverit to get them back. It scans the drive deeply and retrieves data even from formatted partitions.
Alternatively, you can send the drive to a professional data recovery service if the data is extremely critical.
To avoid data loss, always backup your data beforehand when converting file systems.
Reverting Back to APFS
In some cases, you may want to revert your APFS volume back to NTFS after converting to NTFS. Here are the steps to convert back:
1. Open Disk Utility on your Mac.
2. Select the NTFS volume you want to revert.
3. Click “Erase” in the toolbar.
4. Choose “APFS” as the format.
5. Click “Erase” to confirm.
The volume will now be reformatted as APFS, reversing the original NTFS conversion.
Some scenarios where reverting to APFS makes sense include:
- You run into issues with NTFS compatibility on Mac after converting.
- You need features only supported by APFS like encryption or Time Machine backups.
- You want to switch back to using your drive primarily with Mac rather than Windows.
Overall, the ability to convert back and forth comes in handy if your cross-platform usage needs change over time. Just be careful to back up your data first before any reformatting.
Conclusion
Converting an APFS volume to NTFS is a fairly straightforward process that involves backing up your data, uninstalling the APFS driver, converting the volume, and running chkdsk. While NTFS and APFS have their pros and cons, NTFS may be preferable in environments that require greater compatibility with older versions of Windows.
When going through the conversion process, be sure to follow each step carefully and in order. Make backups, validate the conversion was successful, and test thoroughly before deleting your backups or making additional changes to the volume. Be prepared to troubleshoot issues if they arise.
In summary, converting from APFS to NTFS provides compatibility benefits at the cost of losing some APFS features. Consider your specific needs and environment when evaluating the tradeoffs. With the proper precautions, the conversion process is quite manageable.
As a final recommendation, make sure you fully understand the implications before converting a volume. Test the process on non-critical data first if possible. Overall, with planning and care, APFS to NTFS conversion can expand the usability of your drive.
