VHD (Virtual Hard Disk) and VHDX (Hyper-V Virtual Hard Disk) are disk image file formats used by Microsoft virtualization products like Hyper-V and Virtual PC. They function as virtual hard drives that can be attached to virtual machines.
VHD is the older format that has a maximum size of 2TB per file. VHDX was introduced in Windows Server 2012 and has a maximum size of 64TB per file. VHDX also provides greater protection against data corruption along with better alignment with physical sector sizes.
There are a few key reasons someone may want to convert a VHD to a VHDX file:
- To take advantage of the larger maximum file size limit of VHDX if the VHD is over 2TB.
- To get the improved resiliency against corruption that VHDX offers.
- To aid in migrating the virtual machine from an older version of Hyper-V that only supports VHD to a newer one that uses VHDX.
- To enable features only available in VHDX like support for larger sector sizes.
Overall, converting from VHD to VHDX provides benefits in terms of expanded capacity, better performance, and improved data integrity.
Prerequisites
Before converting a VHD file to VHDX, you’ll need to have the following:
- A VHD (Virtual Hard Disk) file that you want to convert. This is the source file that will be converted to the newer VHDX format.
- Enough free disk space to store the converted VHDX file. VHDX files require more space than VHD, so be sure to have additional storage capacity available.
- Access to a Windows machine with Hyper-V installed. Hyper-V enables the VHD to VHDX conversion and comes standard on Windows 8 and higher versions.
- Administrator access on the Windows machine in order to install and run the conversion tools.
Once you have a VHD file ready and a Windows PC with ample disk space and Hyper-V, you can begin the process of converting the VHD to VHDX format.
Back Up the VHD File
Before converting the VHD file, it is crucial to back up the original VHD file. As G2 highlights, backing up data is critical to protect against data loss from hardware failure, accidental deletion, malware attacks, and more. Without a backup, the original VHD would be lost forever if anything went wrong during the conversion process.
According to research, up to 30% of businesses that experience significant data loss go out of business within two years (source). Backups provide the ability to restore the original VHD file in case of data corruption or loss. As virtual machines become critical business infrastructure, properly backing up VHDs is a necessary part of business continuity and disaster recovery planning.
There are many recommended best practices for backing up VHD files, including using built-in hypervisor backup tools like Hyper-V Backup Manager or third party backup software. The key is to maintain at least three copies of important data – the original, a local backup, and an offsite/cloud backup. Following the 3-2-1 backup rule allows restoring data even in cases of equipment failure or site disaster.
Taking the time to properly back up the VHD before conversion protects against potential data loss and provides options to revert back if the conversion causes any problems. It’s a simple but crucial step that should not be skipped.
Download the Converter
Microsoft provides several tools for converting virtual hard disks. The main conversion tool is called Microsoft Virtual Machine Converter. This free tool can convert VMware and Hyper-V VHDs to formats compatible with Azure and other Microsoft services.
To get started, visit the Microsoft Virtual Machine Converter download page and choose the installer for your version of Windows. The supported operating systems are Windows 8, Windows 8.1, Windows 10, Windows Server 2012, and Windows Server 2012 R2.
After downloading, run the installer and follow the prompts to install the Virtual Machine Converter on your system. Once installed, you can launch the app and begin converting VHD files.
Open the Converter
The converter interface is fairly straightforward and intuitive. When you first launch the converter, you’ll see the main screen which allows you to select the input VHD file and choose the output format (VHDX).
According to the Disk2VHD documentation, the interface provides a simple wizard-style process to specify the VHD file you want to convert and where you want to save the newly-converted VHDX file. There are only a few options to set.
The main screen has two primary fields – one for choosing the VHD input file and one for specifying the output location. There are also checkboxes to optimize the VHDX for either Windows 8 or Windows 8.1. Lastly, there is a simple “Convert” button to start the process.
The interface is clean and minimalistic. As the documentation mentions, the entire conversion process only takes a few clicks thanks to the simplistic wizard approach. Just select your input file, choose the output location, and click Convert.
Select VHD File
To select the VHD file you want to convert, open File Explorer and navigate to the location where your VHD file is stored. VHD files are often located in the Virtual Hard Disks folder.
Once you have located your VHD file, click on it once to select it. You will see it become highlighted when it is selected. Alternatively, you can right click on the VHD file and choose “Open” to select it.
With the VHD file selected, you can now proceed to the conversion tool and it will automatically detect the selected VHD file. For example, in the Hyper-V Manager, with your VHD file selected, choosing Edit Disk will open the Edit Virtual Hard Disk Wizard with your VHD already chosen.
If your conversion tool does not automatically detect the selected VHD file, you may need to use the file browser in the tool to navigate to the location of your selected VHD file and open it. Be sure the entire file name including extension (.vhd) is displayed to confirm you have properly selected the VHD source file.
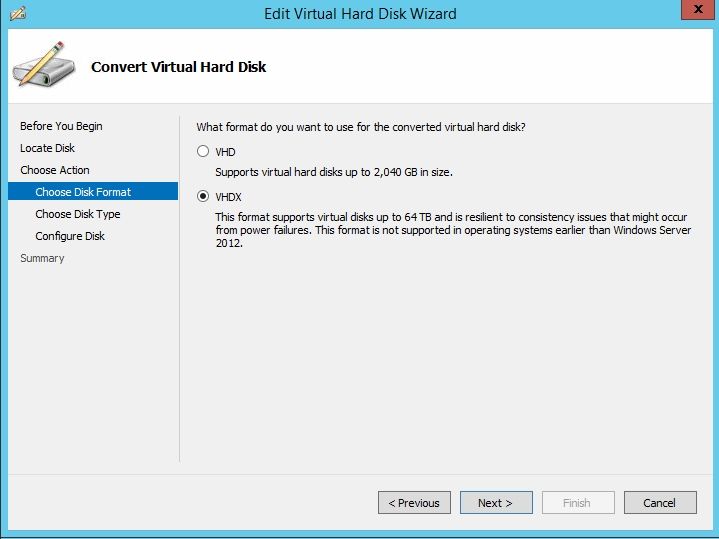
Choose Output Format
When converting a VHD file to VHDX, you must select VHDX as the output format. VHDX is the newer virtual hard disk format introduced with Windows Server 2012 and Hyper-V. It offers several advantages over the older VHD format:
VHDX supports virtual hard disks up to 64 TB in size, compared to 2 TB for VHD. This allows you to create much larger virtual machines with VHDX.1
VHDX utilizes a resilient log to prevent data corruption during power failures. VHD does not have this safeguard.
VHDX supports 4K native physical sector, allowing for improved performance especially on newer physical disks. VHD uses 512-byte sectors.
VHDX includes performance optimizations such as support for larger block sizes. This can result in faster read/write times.
By converting your VHD to VHDX, you gain all of these benefits while still being able to run the virtual machine on Hyper-V. So when selecting the output format, make sure to choose VHDX.
Choose Output Location
When converting a VHD file to VHDX, you will need to specify where to save the new VHDX file. The converter tool will prompt you to select an output location. It is recommended to choose a new folder or location to avoid overwriting the original VHD file.
Some tips on choosing the output location:
- Create a new folder such as “VHDX Files” to store the converted VHDX files.
- Browse to a location with sufficient disk space to hold the VHDX file. VHDX files are usually larger than VHD files.
- Avoid saving the VHDX file in the same folder as the original VHD file to prevent accidental overwriting.
- For VMs, it’s common to store VHDX files in C:\Users\Public\Documents\Hyper-V\Virtual Hard Disks.
- Alternatively, VHDX files can be stored anywhere on available storage drives.
The converter tool will validate if the specified output location is valid before starting the conversion process. Be sure to double check the location to avoid any issues.
Start Conversion
Once you have selected the input VHD file, chosen the output VHDX format, and specified the desired output location, you are ready to start the conversion process. The time it takes to convert the VHD to VHDX will vary depending on the size of the source VHD file and the processing power of your computer.
The conversion essentially involves reading all the data from the VHD file, reformatting it into the VHDX structure, and writing out the new VHDX file. Expect it to take anywhere from a few minutes for a small VHD up to several hours for very large multi-GB VHD files. The conversion tool will display a progress bar so you can monitor the status.
Some key pointers on the conversion process:
- Perform the conversion on the local disk if possible, rather than over the network. This will be much faster.
- Avoid using the same physical disk for both the source VHD and destination VHDX files. Reading and writing to the same disk significantly slows the process.
- Consider using a SSD rather than a HDD for better performance.
- Close other applications during the conversion to maximize compute resources for the converter tool.
Overall the conversion process is straightforward but can take substantial time depending on your hardware. Be patient and avoid interrupting the conversion once it begins.
Verify Conversion
Once the conversion process is complete, it’s important to verify that the VHDX file was converted properly and contains all of the data from the original VHD file. Here are some steps to check the converted VHDX file:
1. Open File Explorer and navigate to the folder where you saved the converted VHDX file. Check that the file is present and has the .vhdx extension.
2. Right-click on the VHDX file and select Properties. Check that the file size matches or is close to the original VHD file size.
3. If you have Hyper-V installed, attach the VHDX to a new virtual machine as a hard drive. Boot the VM and verify that the operating system and data load as expected.
4. Run CHKDSK on the VHDX drive letter to check for file system errors or corruption. A clean CHKDSK result indicates a successful conversion.
5. Spot check files and folders, especially ones towards the end of the drive. Open them to verify the contents match the original VHD.
6. Check Disk Management to see the VHDX drive and partition information. Compare to the original VHD layout.
Following these steps will validate that the important data and structure converted correctly from VHD to VHDX format.