Partitioning is the process of dividing a hard drive into separate logical storage spaces. With modern large capacity hard drives, partitioning has become an important tool to better organize and manage data. There are several benefits to partitioning a large hard drive:
Partitioning allows you to separate your data based on type – for example having one partition for your operating system, programs, and applications, and another partition for your personal files and documents. This can make backups and reinstalling your OS simpler (source).
Having multiple partitions allows you to install and boot into different operating systems on the same hard drive. You can have partitions for Windows, Mac, Linux etc. This makes dual booting multiple OS easier (source).
Partitioning essentially isolates your data, which provides some protection against data corruption. If one partition is corrupted, the other partitions may still be accessible (source).
This guide will cover the steps needed to partition a large 4TB hard drive, including backing up existing data, deleting old partitions, creating new partitions, assigning drive letters, and moving data to the new partitions.
Determine Goals
When partitioning a large hard drive like 4TB, it’s important to first determine your goals and ideal setup. Some key considerations include:
How many partitions you need – For a single OS, 2-3 partitions is typical – one for the system files, one for personal data, and optionally one for swap space. For multi-boot setups, you’ll need a separate partition for each OS.
Partition sizes – Red Hat recommends at least 256MB for swap, and most experts suggest at least 50GB for the system partition. The rest can be allocated to data. Adjust as needed based on your usage.
Separating OS and data – It’s advisable to keep the system files on a separate partition from your personal data for ease of backups and OS reinstallation. The data partition can be much larger.
File system types – The system partition should generally use a Linux native file system like ext4 or XFS. Data partitions can use other formats if needed for compatibility.
Your goals will determine how many partitions you need and how large each should be. Plan this carefully as it’s not easily changed later.
Backup Data
It is crucial to back up your data before partitioning a hard drive. As partitioning essentially reformats the drive, any existing data on the drive will be erased if it is not properly backed up first. According to The 7 critical backup strategy best practices to keep data safe, increasing backup frequency and continuing to follow the 3-2-1 backup rule are recommended before any major operation like partitioning (https://www.techtarget.com/searchdatabackup/feature/The-7-critical-backup-strategy-best-practices-to-keep-data-safe).
There are several options for backing up your data:
- External hard drives – You can copy your data to an external USB hard drive that has enough capacity, at least two or three times the size of your current drive according to How to Back Up Your Digital Life (https://www.wired.com/story/how-to-back-up-your-digital-life/).
- USB flash drives – Smaller amounts of critical data can be backed up to USB flash drives.
- Cloud storage – Services like Google Drive, Dropbox, etc allow you to back up data to the cloud.
- Online backup service – Services like Backblaze and Carbonite provide automated cloud backups.
Once you have securely backed up your data using one or more of these options, you can safely proceed with partitioning the hard drive.
Delete Existing Partitions
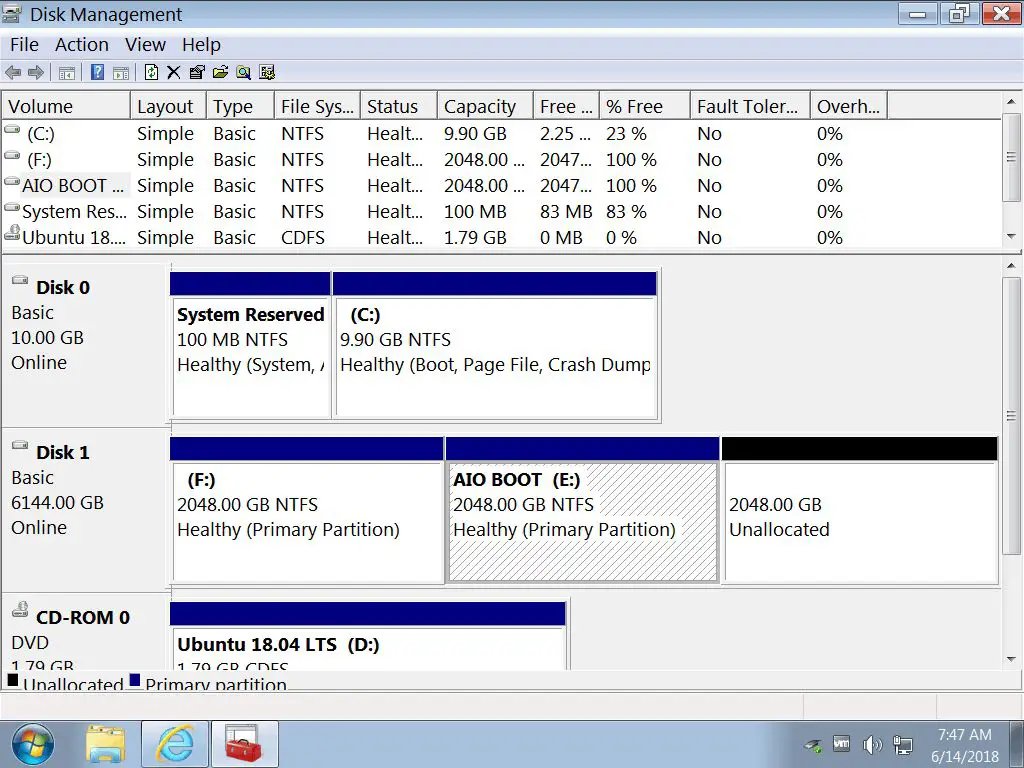
Before creating new partitions, you’ll need to delete any existing ones on the hard drive. This can be done using the Disk Management utility in Windows.
To delete a partition:
- Open Disk Management by typing “diskmgmt.msc” in the Windows search bar or Run command.
- Right-click on the partition you want to delete and select “Delete Volume…”
- In the confirmation prompt, check “Delete volume” and click “OK”.
- The partition will now be removed and show as unallocated space.
Make sure to delete all existing partitions on the drive before proceeding, so the full 4TB is shown as unallocated space. This will allow you to create your new partition setup from scratch.
For more details, refer to: How to delete a drive partition on Windows 10
Create New Partitions
The easiest way to create new partitions on a hard drive in Windows is by using the Disk Management utility. Here are the steps:
- Open Disk Management by right-clicking on This PC or My Computer and selecting Manage. Then go to Storage > Disk Management.
- Right-click on the unallocated space on your hard drive and select New Simple Volume. This will launch the New Simple Volume Wizard.
- Specify the size of the partition in MB. It’s best to leave some unallocated space in case you need to expand a partition later. Give the volume a descriptive name.
- Assign a drive letter to the partition. This will be the letter that shows up in My Computer. Choose any available letter.
- Select the file system to format the partition with, such as NTFS or exFAT. NTFS is recommended for Windows systems.
- Check the box to quick format the partition if you don’t need a full format.
- Click Next and Finish to create the new partition.
Repeat these steps to create additional partitions as needed. You can create up to four primary partitions on a basic MBR disk before you would need to convert it to dynamic. The Disk Management utility makes it quick and easy to divide up your high capacity hard drive into organized partitions.
Source: Create and format a hard disk partition
Format the Partitions
Once the new partitions are created on the hard drive, the next step is to format them. Formatting assigns a file system to the partition, which allows the operating system to store and retrieve data from it. The two most common file systems for Windows are:
- NTFS – This is the default system for Windows. It supports file permissions, encryption, compression, and large partition sizes.
- exFAT – An updated FAT32 file system that supports larger files and partitions up to 128 PB. Compatible with both Windows and Mac.
To format a partition in Windows:
- Open the Disk Management utility.
- Right-click the new partition and select Format.
- Choose the desired file system – NTFS is recommended for most uses.
- Give the partition a meaningful label if desired.
- Click OK to start the formatting process.
Formatting deletes any existing data on the partition and prepares it for use with the selected file system. Once completed, the partition will show the new file system type and assigned drive letter.
Assign Drive Letters
After creating the new partitions on the hard drive, the next step is to assign drive letters to each partition. Drive letters allow you to easily identify and access the different partitions. According to Microsoft, “If you want to change a drive letter assigned to a drive, or you have a drive that doesn’t yet have a drive letter, use Disk Management to add, change, or remove drive letter assignments” (Microsoft).
To assign or change drive letters in Windows, first open up Disk Management. This can be accessed by right-clicking on Computer or This PC and selecting Manage. In Disk Management, right-click on the partition you want to assign a letter to. Then click “Change Drive Letter and Paths.” From here you can add, change, or remove a drive letter (StarTech).
It’s important to properly manage drive letter assignments to avoid conflicts. Try to stick with the default letter assignments where possible. You also want to make sure the drive letters make sense for the partitions and data types.
Move Data to Partitions
Once you have created and formatted the new partitions on your hard drive, the next step is to transfer data from the original drive over to the new partitions. It is recommended to plan how you want to organize your data across the partitions before moving any files. For example, you may want one partition just for media, another for documents, etc.
To move files and folders to the new partitions, open File Explorer in Windows. Under “This PC”, locate the drive with the partitions you created. Double click to open the partition you want to move files to. Now open a second File Explorer window and navigate to the location of the files you want to move over. Select and drag the files/folders to the new partition window. This guide provides step-by-step instructions for moving data to a new partition in Windows 10.
Take your time to organize and move data to the appropriate partitions. You can move multiple batches of files/folders as needed. Once finished, you can delete the leftover data on the original drive if no longer needed.
Test Setup
After creating and formatting the new partitions, it is important to thoroughly test the setup to validate the partitions and check for any issues. Here are some recommended steps for testing:
First, access Disk Management again and confirm that all the new partitions are listed with the correct sizes and drive letters assigned (Microsoft). Double check that the partitions and drive letters match what you had planned.
Next, open File Explorer and verify that you can access each partition using its drive letter. Try creating a test folder on each partition to confirm read/write access (Dell).
Then, transfer some test files between the partitions. Move data from the original partition to the new ones, and also between the new partitions. Check that files are transferred properly without errors or issues.
Finally, use a partition scanning or repair tool like chkdsk to scan the partitions and check for problems. Running chkdsk /f can fix any file system errors or bad sectors (Chron). Monitoring SMART attributes can also check the drive health.
Following thorough testing like this validates proper setup and functioning of the new partition layout. Address any discoveries during testing before relying on the new configuration for important data.
Maintenance
Once you have your hard drive partitioned, it is important to perform regular maintenance to keep your partitions optimized and working properly over time. The main aspects of hard drive partition maintenance include defragmenting, error checking, and monitoring free space.
Defragmenting your partitions helps improve performance by organizing files and data so they are stored contiguously on the drive. This reduces the amount of time needed to access files spread out over the partition. It’s recommended to defrag your partitions at least monthly. In Windows you can use the built-in Disk Defragmenter tool.[1]
Running error checks will scan the partition for any corruption or bad sectors. This can help identify potential problems early and prevent data loss. Use the Check Disk tool in Windows to run error checking on a schedule such as monthly.[2]
Monitoring free space is also important, so partitions do not become overly full. Ideally you want to keep at least 15-20% free space available on each partition. Check disk usage periodically and clean up unneeded files. You may eventually need to resize partitions to allot more space to those needing additional capacity.
Properly maintaining your hard drive partitions will help ensure optimal performance and longevity of your drive.
[1] https://www.partitionwizard.com/news/hard-drive-maintenance.html
[2] https://www.pcmag.com/how-to/how-to-partition-a-hard-drive