There are several reasons why you may want to permanently delete everything from an external hard drive in Windows 11. For example, you may be selling or giving away the hard drive and want to completely wipe it. Or perhaps the drive has become cluttered with old, unnecessary files over time and you want to do a clean reset.
However, it’s critical to understand that deleting everything from an external drive will permanently erase all data on the drive. So before proceeding, you’ll want to copy or back up any important files you may need in the future onto another location. Once the drive has been wiped, there is no way to recover anything that was deleted.
With that warning in mind, deleting everything from an external hard drive in Windows 11 is a fairly straightforward process. This guide will walk through the necessary steps to fully wipe and reformat the drive.
Back Up Important Files
Before deleting everything on your external hard drive, it is crucial that you back up any important files you want to keep. Otherwise, those files will be permanently erased.
To back up files, connect a separate external hard drive that has enough storage capacity. Open File Explorer and navigate to the external drive you want to back up. Select the folders and files you want to keep, right click and choose “Copy”. Then navigate to the backup drive and right click to “Paste” the files. Confirm the files are now on the backup drive before proceeding.
Alternatively, you can use the built-in Windows Backup and Restore utility. Open Backup and Restore and click “Set up backup”. Choose “Let me choose” and select the folders from the external drive you want to back up. Choose the backup destination drive and click “Save settings and run backup” to create the backup.
It is crucial to verify all important files are backed up properly before deleting the originals from the external drive. Reformatting will permanently erase all data.
Connect the External Drive
The first step is to connect the external hard drive you want to format to your Windows 11 computer. Physically plug the drive into a USB port on your computer using the appropriate cable that came with the drive. Most external hard drives use a standard USB cable.
Once connected, wait a few seconds for Windows to recognize the drive and install any required drivers. You should see a notification that the drive has been detected. The external drive should then appear in File Explorer.
To open File Explorer, click on the folder icon in the taskbar or press Windows Key + E. This will open a new File Explorer window. In the left pane, you should see your external drive listed under “Devices and drives” or under “This PC.” Click on the external drive to select it. Make sure you have selected the correct drive before proceeding.
Now your external drive is connected and accessible in File Explorer. You can now proceed with formatting the drive.
Format the Drive
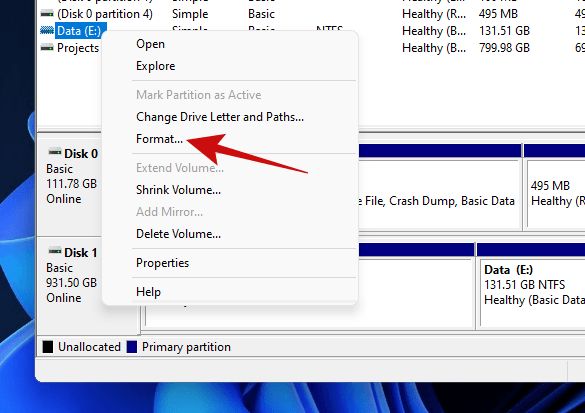
The next step is to format the external hard drive. Formatting will erase all data on the drive and re-partition it so Windows can use it. To format the drive, right click on the external hard drive in Windows Explorer and select Format from the pop-up menu.
In the Format dialogue box that appears, choose “Quick Format” to format the drive quickly. Then give the drive a descriptive name like “Backup Drive” to easily identify it. Make sure the correct drive is selected so you don’t accidentally format the wrong drive. Finally, click “Start” to begin the formatting process. This will completely erase and reformat the external drive so it’s empty and ready to use for backups or extra storage.
Delete Drive Partition
Using Disk Management, you can delete the partition on the external hard drive to remove all formatting. To do this:
- Open Disk Management by pressing Windows key + R, typing “diskmgmt.msc” and hitting Enter.
- Right-click on the partition you want to delete and select “Delete Volume…”
- In the prompt, check “Delete partitions and logical drives” and click OK.
This will remove all existing partitions and formatting from the external hard drive, preparing it for reformatting (source). Deleting the partition erases all data, so be sure to back up your files first.
Clean the Drive
To completely clean the drive and remove any leftover data, use the diskpart clean command. This deletes all partitions and deletes the signatures on the drive. As recommended by Windows Central [1] and TechTarget [2], follow these steps:
- Open the Command Prompt as Administrator.
- Type
diskpartand press Enter to open the DISKPART tool. - Type
list diskto view available disks. - Select the external drive by typing
select disk #(where # is the disk number). - Type
cleanand press Enter to completely clean the disk.
This will wipe all data, partitions and signatures off the external drive, leaving it completely blank.
Overwrite Free Space
Even after deleting all files and reformatting the drive, remnants of old data may still exist in the free space on the hard drive. To ensure all traces are wiped clean, use a freeware tool like Eraser to overwrite the free space on the drive. This replaces any leftover bits with meaningless filler data to prevent recovery of deleted files.
Eraser is an easy to use program that can perform up to 35 passes over the free space. This helps ensure any previously deleted files are completely obliterated and unrecoverable. It provides peace of mind that no sensitive information remains on the drive before donating, recycling or repurposing it. Overwriting free space is an optional but highly recommended step for thoroughly wiping external drives.
Check for Errors
Before reformatting the external hard drive, it’s important to scan for any bad sectors or errors using the CHKDSK utility in Windows. CHKDSK will scan the drive and attempt to fix any logical file system errors it finds.
To run CHKDSK on an external drive in Windows 11:
- Open File Explorer and right-click on the external hard drive.
- Select “Properties” from the context menu.
- Click the “Tools” tab and then click “Check” under Error checking.
- Check both boxes to “Scan for and attempt recovery of bad sectors” and “Automatically fix file system errors”.
- Click “Start” to begin the scan.
CHKDSK will provide status updates as it scans. It may take some time to complete depending on the size of the drive. Pay attention to any messages about errors being fixed.
If CHKDSK finds unrepairable errors, it’s recommended to back up any important data and replace the faulty external hard drive. Failing drives can potentially damage data during reformatting.
Once CHKDSK completes without serious errors, the drive can safely be reformatted.
Reformat the Drive
After cleaning the drive, it is recommended to repeat the formatting steps again as an extra precaution. This helps ensure maximum data removal from the external hard drive.
To reformat the drive:
- Reconnect the external hard drive to your Windows 11 computer if you removed it.
- Open File Explorer and right-click on the external drive.
- Select “Format” from the menu.
- Choose “Quick Format” and click “Start” to reformat the drive.
Formatting the drive a second time overwrites the drive again, removing any leftover data traces. This provides peace of mind that all previous data has been securely erased from the external hard drive.
Conclusion
In summary, to securely delete everything from an external hard drive on Windows 11, you should start by backing up any important files, connecting the external drive, formatting the drive, deleting the drive partition, thoroughly cleaning the drive using software to overwrite free space, checking for any errors, and reformatting the drive. It’s critical to understand this process is irreversible and will permanently erase all data. Once the drive has been wiped, you can choose to reuse it as external storage or for backups.
